Voice services - CDRs
This document describes the Call Detail Record page in the Teliqon Portal and explains how to review detailed outbound call information. It covers filters, CSV export, the call list table, sorting, pagination, and row-per-page controls.
General information
On the Call Detail Record page, you can view detailed information regarding calls within your Teliqon Portal project. You can access this page from the sidebar on the left:
The CDR page includes the following elements:
-
Top toolbar;
-
Call list;
-
Bottom toolbar.
Top toolbar
The top toolbar looks as follows:

The page includes the following elements:
-
Tab switching. Currently, only the “Outbound calls” tab is available. The “Inbound calls” tab will be added in future updates, allowing you to switch between pages.
-
Filter button.
-
Refresh button. Used to update the data to reflect the latest changes.
-
Export report button CSV Download.
Filter
Using the Filter button, you can filter data by the following parameters:
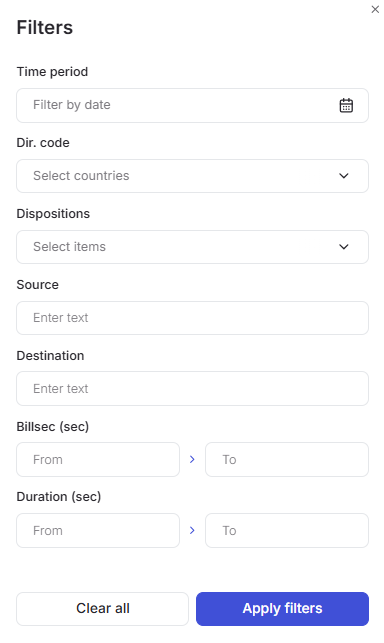
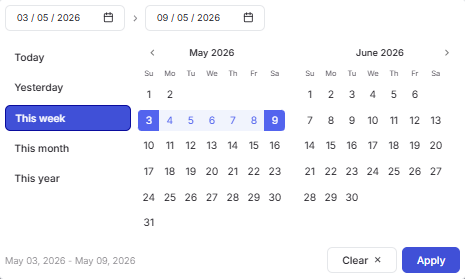
a. Time period - select the date in the calendar for which you want to display call information.
To set a date range, use one of the following methods:
-
Click on the dates in the calendar, selecting the start and end dates;
-
Select one of the preset options (“Today”, “Yesterday”, “This week”, “This month”, “This year”).
To apply the changes, click the Apply button.
If you change your mind, you can close the calendar by clicking on the empty space outside of it or reset the selected dates using the Clear button.
b. Direction code - a filter by country code. Simply select one or more options from the dropdown list. To simplify your search, you can type one or more characters, and the list of suggestions will narrow down based on your input.
c. Disposition - a filter by call status. It can be selected using the values provided in the dropdown list:
-
Failed;
-
Busy;
-
No answer;
-
Answered.
d. Source and Destination - filters for the calling party's number and the called party's number, respectively. Data is entered manually via the keyboard.
e. Billsec and Duration - filters for the billable duration and total duration, respectively. Use the keyboard to enter the upper and lower limits, or just one of the two.
You can combine these parameters to obtain more detailed data.
Once you have selected the required filters, click the Apply filters button.
If you want to reset all filter values, click Clear all.
CSV Download
To download a CSV file, click the CSV Download button. Before doing so, ensure that your export meets the required criteria: the selection must contain no more than 700,000 records.
If you need to export a larger volume of data, please contact portal support.
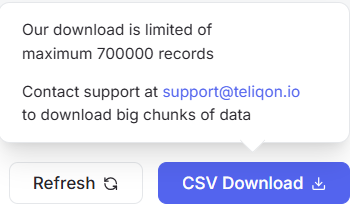
To obtain a specific data selection, you must first configure the filtering parameters and then click the CSV Download button.
Afterward, you will receive an email with a link to the data, which will remain active for 24 hours. To download the archive, click the Download button.
Email example:

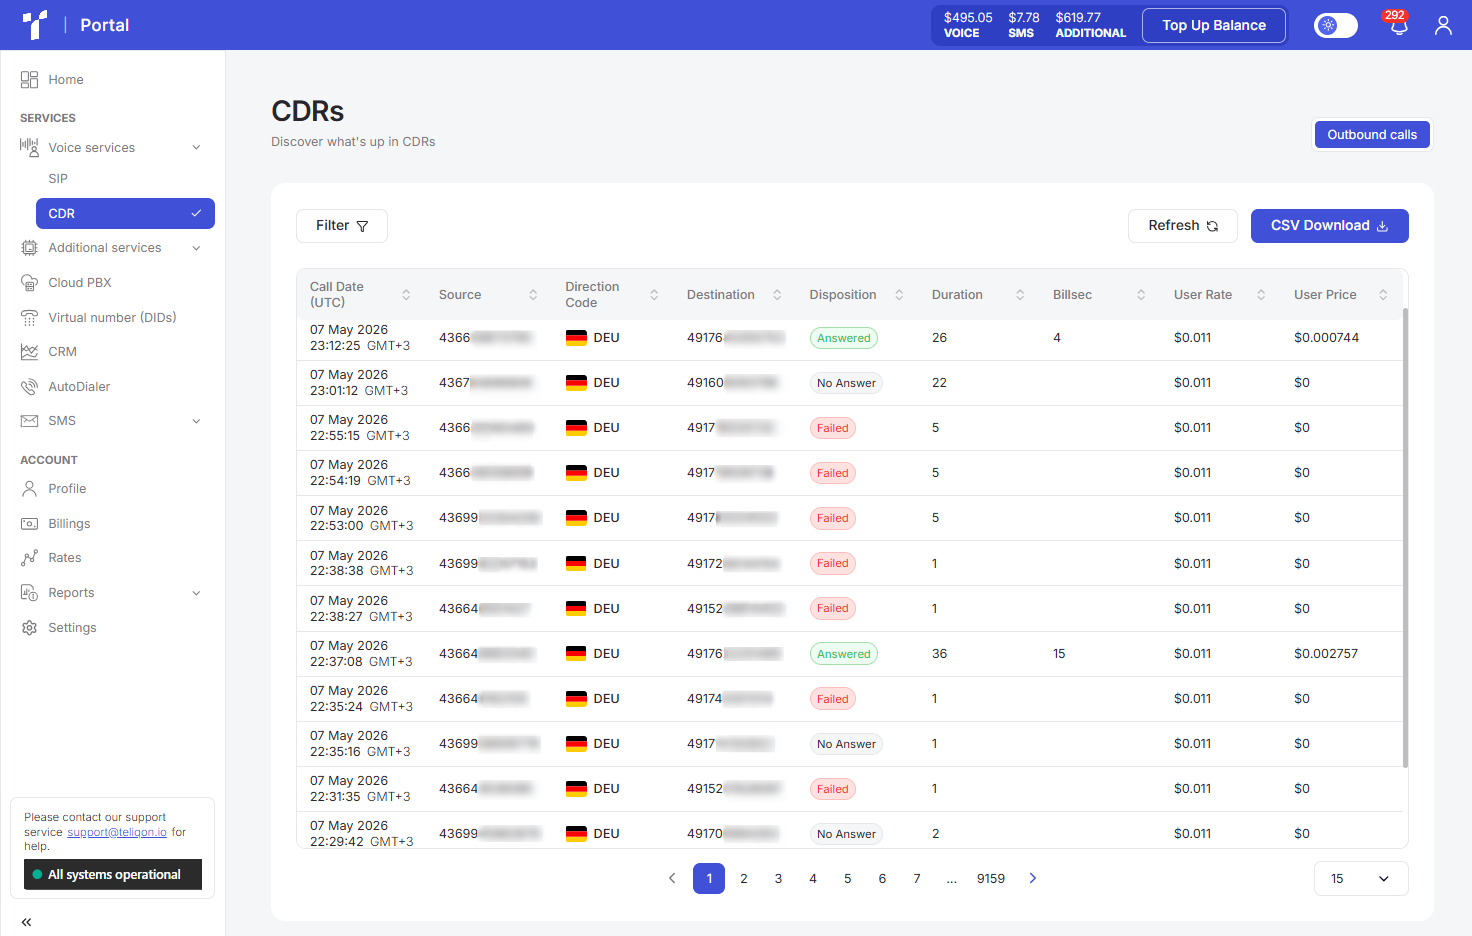
Call list
The call list looks as follows:
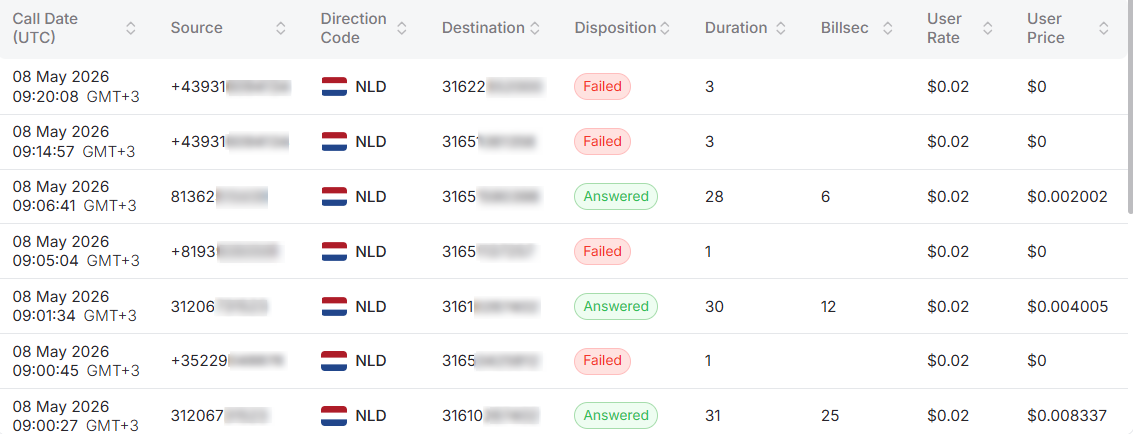
The call list consists of the following parameters:
-
Call Date (UTC): The date when the call occurred. Displayed in UTC.
-
Source: The phone number from which the outbound call was made.
-
Direction Code: The country code to which the call was made.
-
Destination: The phone number to which the outbound call was made.
-
Disposition: The call status. It can be: ANSWERED, NO ANSWER, FAILED, BUSY.
-
Duration: The total duration of the call. This includes the ringing time and the actual conversation time.
-
Billsec: The duration of the actual conversation.
-
User Rate: The price per minute of the call in USD.
-
User Price: The actual price for the call.
A value sorting function is available in the table. To activate this option, click the arrow next to the column name, and the data will be automatically sorted in ascending order. To change the order to descending, click the same arrow again.

Bottom toolbar
The bottom toolbar looks as follows:

It provides the following options:
-
Use page pagination;
-
Select the number of rows per page. The following options are available:
a. 10 per page;
b. 15 per page;
c. 25 per page;
d. 50 per page;
e. 100 per page;
f. 250 per page.
Voice-services - SIP
The document describes the SIP page of the Teliqon Portal, including SIP endpoint management, filtering, search, endpoint editing, pagination, and SIP gateway information. It explains how users create and manage SIP endpoints and where gateway-related connection details are displayed.
Lead checker
This document describes the Lead Checker functionality in the Teliqon Portal. It explains number verification, history, filtering, and detailed metadata analysis for format and analysis checks.
