User menu
This document describes the User menu in the Teliqon Portal, including balance information, notifications, and profile-related actions. It explains how users can access notification history, manage notification states, and navigate to related profile, billing, and settings pages.
General information
The User menu is located at the top of the screen, on the bar featuring the Teliqon logo.

The User menu contains the following elements:
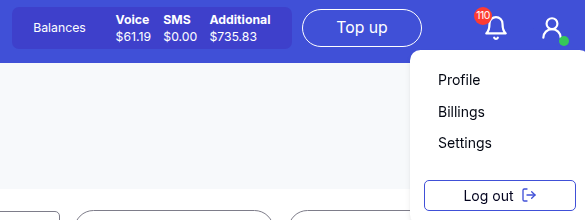
- Project balance information: Voice, Additional, and SMS.
- Top up button: Used for replenishing the balance.
- Theme toggle: For quick switching between dark and light modes.
- Notification icon: A “bell” icon for alerts.
- User profile avatar: Access to profile settings.
Balance information
The Balances table displays the current status of your project’s balances in real time.
A dedicated Top Up Balance button redirects you to the top-up page, allowing you to quickly and easily replenish your account.

More detailed information on how to top up your project is provided in this section.
Notifications
Notifications will be sent and displayed according to the following events described in the Settings section:
- Get notifications about DID numbers - the ability to receive in-portal notifications regarding actions with your virtual numbers;
- Get notifications about balances - the ability to receive notifications regarding project balance changes. For example, when the balance reaches a specific threshold configured on the Profile page;
- Get notifications about subscriptions - the ability to receive notifications regarding actions with your service subscriptions.
Clicking the bell icon opens a notification window:

You can quickly mark a message as read by clicking on a specific notification:
Within this pop-up window, you also have the option to quickly navigate to the Settings page by clicking the gear icon in the top right corner, where you can promptly configure all notification parameters.
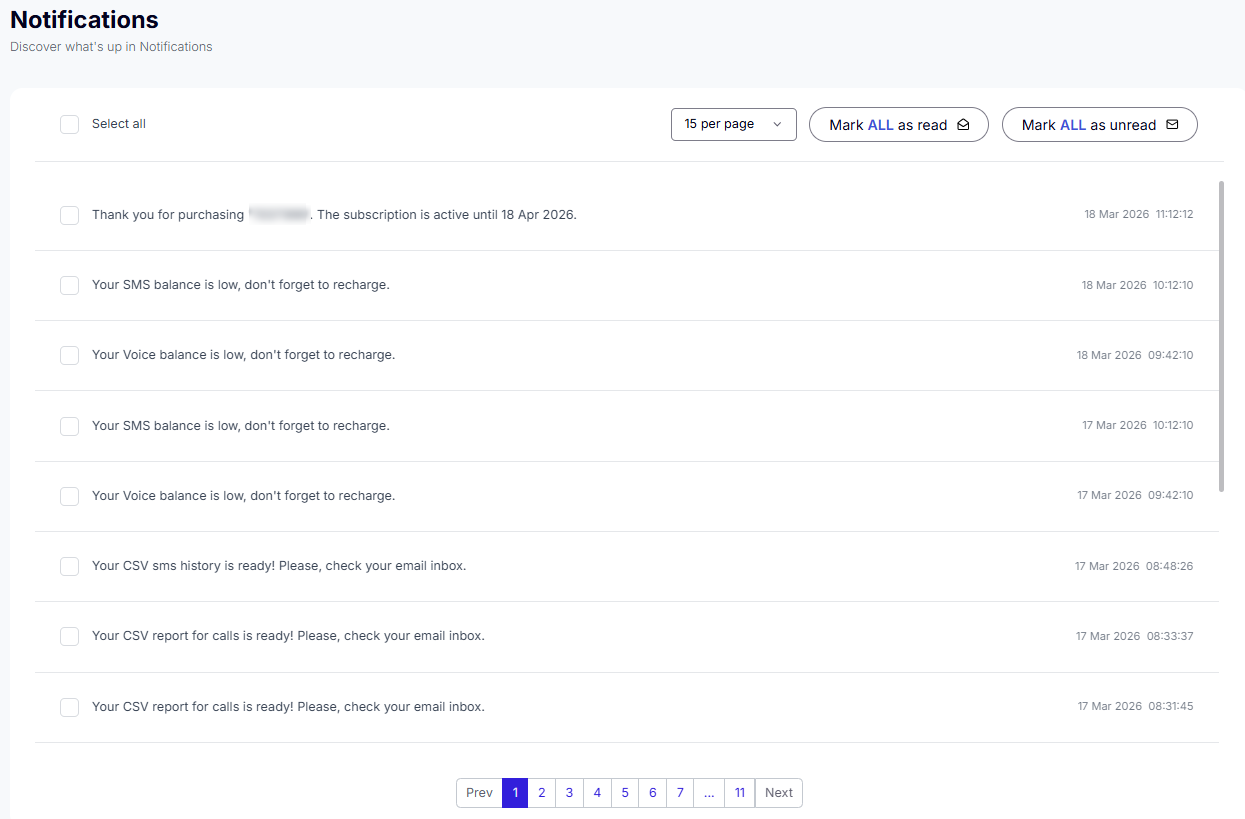
You can view your full notification history by clicking the View All button at the bottom of the notification list window.

This will open a dedicated page with your complete history of alerts:
In this section, you can select all entries on the page using the Select All button or manually choose specific notifications to perform two available actions:
- Mark all selected entries as “read”;
- Mark all selected entries as “unread”. If you have not pre-selected any entries, the action will automatically be applied to all available notifications.
Additionally, on this page you can:
- Use page pagination;
- Select the number of rows per page. The following options are available:
a. 10 per page;
b. 15 per page;
c. 25 per page;
d. 50 per page;
e. 100 per page;
f. 250 per page.
Profile settings
Clicking the profile icon will open a window with the following available actions:
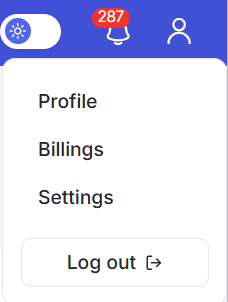
- Go to the Profile page. This section is detailed here;
- Go to the Billings page. This section is detailed here;
- Go to the Settings page. This section is detailed here;
- Log out button.
Clicking the Log out button will sign you out of the system.
You can read about how to log in (sign in) to the system in the following document.
Login / Registration
This document describes login, registration, account confirmation, email change, and password recovery flows in the Teliqon Portal. It explains which fields and actions are available to users and how the system responds during account access and recovery procedures.
Dashboard
This document describes the Dashboard page of the Teliqon Portal, including Calls and SMS overview statistics, balance notifications, traffic charts, top destinations, and related account actions. It also explains top-up, billing, rates, transfer balance, and filtering tools available from the dashboard.
