Account Profile Guide
This page describes the Profile section in the Teliqon portal. It explains how to view and configure profile information, other settings, balance notifications, and login history.
General information
On the Profile page, you can view and configure your user profile information for the project in Teliqon portal. You can access this page from the side menu on the left:

The Profile settings page includes the following blocks:
- Profile information;
- Other settings;
- Voice balance notifications;
- Login history.
Profile information
The Profile information block looks as follows:
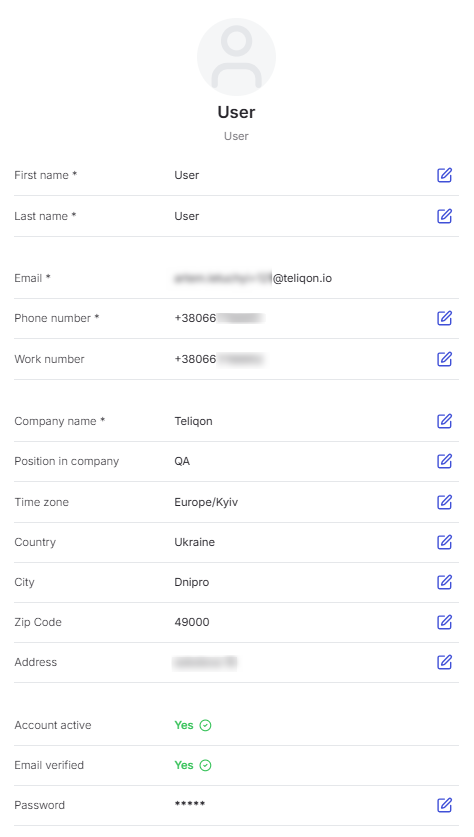
In this block, you can view information regarding the following user data:
- First Name;
- Last Name;
- Email;
- Phone number;
- Work number;
- Company name;
- Position in company;
- Time zone;
- Country;
- City;
- Zip code;
- Address;
- Account active;
- Email verified;
- Password. To change a field value, click the edit icon (pencil) to its right. Then, enter the new information using your keyboard or select an option from the dropdown list.
You can change all fields except for Email, Account active, and Email verified.
Once you are done editing, click the Save button to keep your changes, or click Cancel to discard them.
Other settings
The Other settings block contains buttons, each of which leads to a corresponding section:
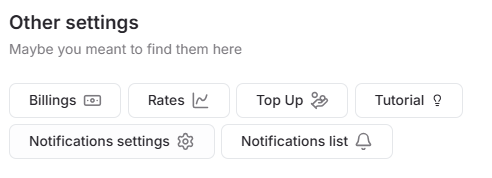
- Billings: A section regarding your project's deduction and top-up history, described in more detail here;
- Rates: A section regarding rates and destinations, described here;
- Top Up: A section for topping up the project, which you can access via this link;
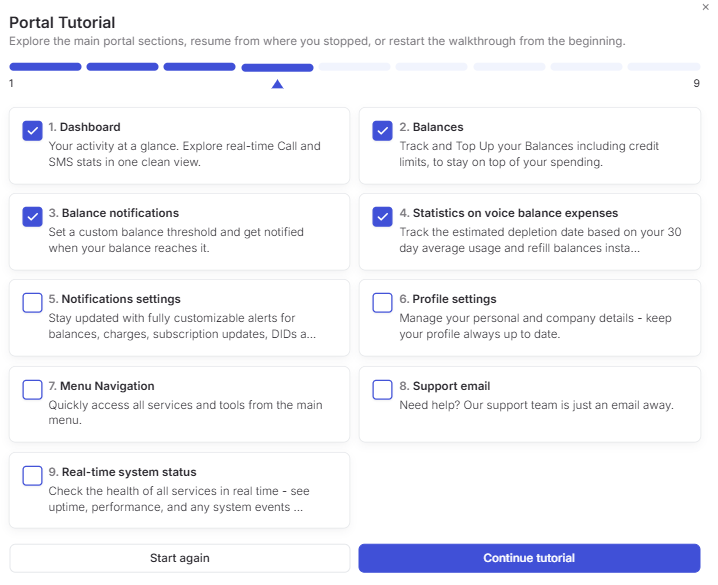
- Tutorial: Use this button to access an interactive tutorial on how to use the portal. After clicking it, a window will open where you can:
- Start over by clicking the Start again button to reset your progress and retake the tour from the beginning.
- Select a section by checking a specific topic or clicking the corresponding stage on the progress bar at the top.
- Continue training by clicking the Continue tutorial button to pick up exactly where you left off. After making a selection, an interactive menu with hints will open:

- Notifications settings: This section is for configuring notifications; more details are available here;
- Notification list: You can view your notifications on a separate page; this section is described in more detail in the “User Menu”.
Balance notifications
This block displays the amount that, when reached, triggers a notification regarding the need to top up your account for voice services.
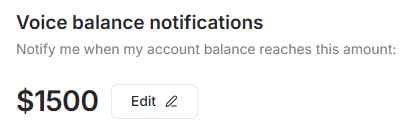
You can configure this amount via the Dashboard section or directly in this block using the Edit button.
Clicking the Edit button opens a field where you can enter the new amount using your keyboard:
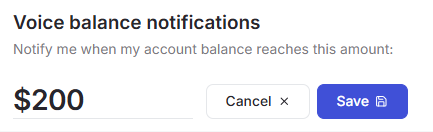
If you change your mind about changing the amount, click the Cancel button; the value will remain unchanged, and the editing mode will be closed.
After clicking Save, the new value will be stored, and you will receive a notification every time your balance reaches this threshold.
If you would like to additionally configure balance notifications related to SMS, please go to the Dashboard section.
Login history
This block displays the user's login history (account logins), which looks as follows:
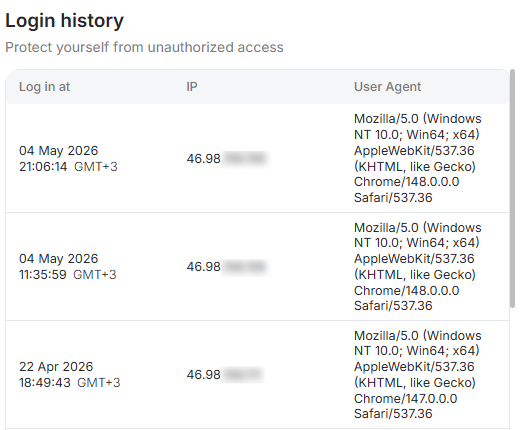
The following data can be viewed in the table:
- Date and time of login to the system;
- IP address from which the login was performed;
- User Agent (client application identification string) - information about the browser and operating system used by the manager.
SMS - OTP
This document describes the SMS OTP page in the Teliqon Portal and explains how to configure SMS settings, view pricing, calculate SMS costs, and check processed SMS history. It also describes how to work with the SMS OTP API, including request parameters and callback response examples.
Account Billings Guide
This page describes the Billings section in the Teliqon portal. It explains how to view voice and additional service billing transactions, filter records, export data, and use the table controls.
