Settings
This document was converted from DOCX to MDX. Review headings, lists, links, and images against the source document. This description should be updated to match the specific content of the document.
General information
In this section, you can configure various parameters for Teliqon CRM entities and functional blocks.
To view the full list of Teliqon CRM elements available for configuration, navigate to the Settings menu section.
To proceed to a specific setting from the list, click on the corresponding name in the left-hand menu.
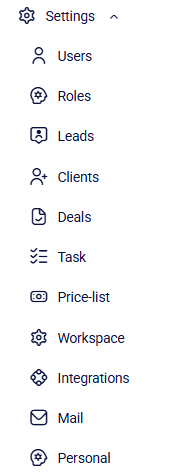
Then, select the items you wish to begin configuring.
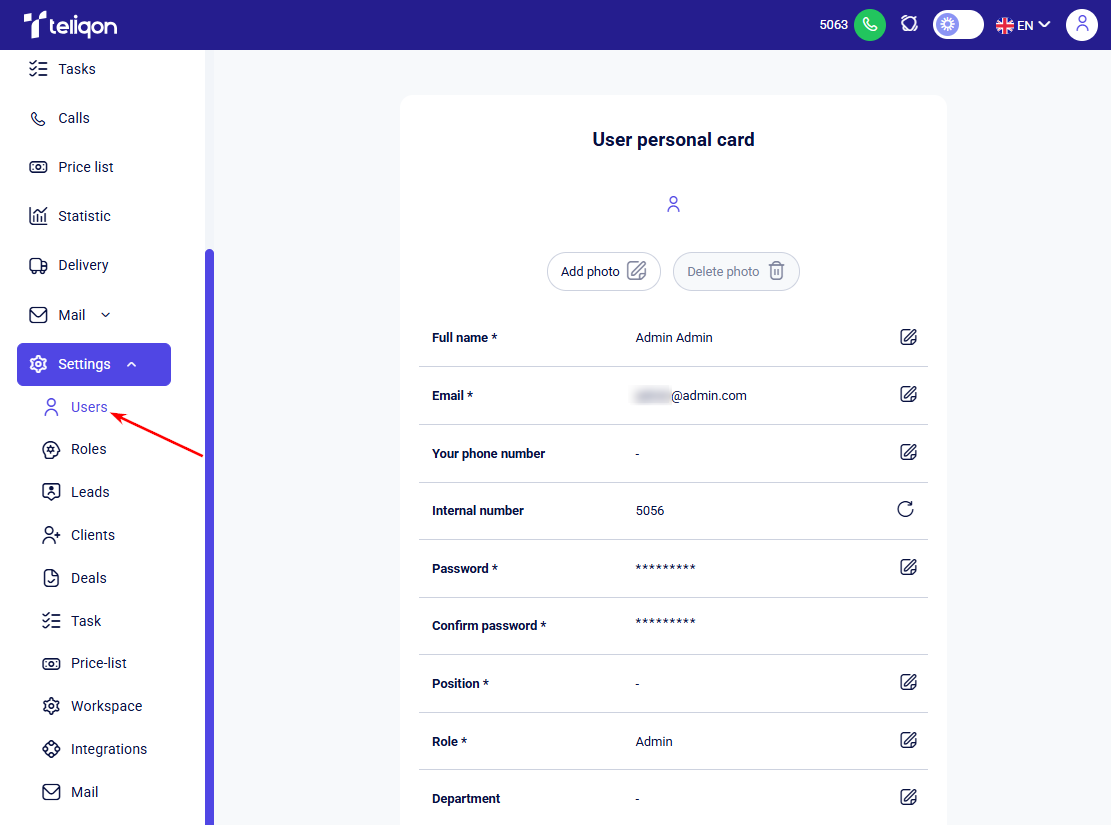
Users section
In this section, you can view information about users, modify their data, and configure positions. Let's take a closer look at each block:
Position
In the Users section, you can also configure positions for your system users. By default, there are two positions that cannot be edited or deleted: Manager and Director:
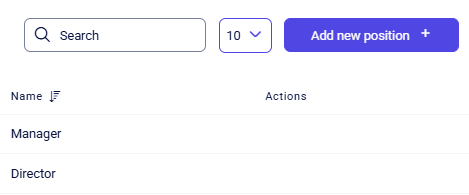
The toolbar for this block provides the following options for managing positions:
-
Search;
-
The button to limit the number of records displayed on the page;
-
Add new position +
Clicking the Add new position + button opens a window where you enter the position name and click Save:
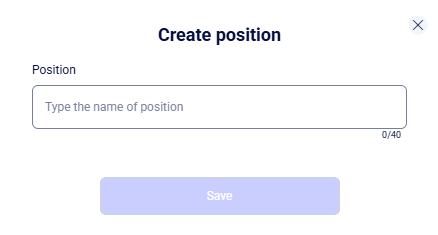
After confirmation, the new position will be added to the general list. You can change its parameters or delete it from the list at any time.
The Search field provides a convenient search for positions by full or partial name. Simply place the cursor in the field and start typing - the system automatically begins filtering the list in real time, responding even to a single character. This allows you to instantly find the required entries within a large list of users without having to click any additional buttons.
The Items per page dropdown allows you to configure the amount of data displayed on a page at once.
Available options:
-
5;
-
10;
-
25;
-
50;
-
100
Users
This block contains a list of all users in your project with their primary data:
-
Full name;
-
Email;
-
Role;
-
Internal number (and status: online/offline);
-
Position;
-
Status;
-
Last login;
-
Actions (that can be performed on the user).
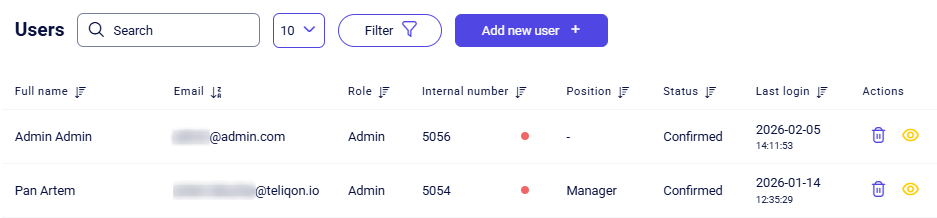
A quick sort function is available for all columns, except for the Actions column.

Only one quick filter can be active at a time. It has three states, which you can toggle between by clicking on the filter:
-
No sorting;
-
Sort descending;
-
Sort ascending.
Clicking a different quick filter will reset the previously selected filter to its initial state (no sorting).
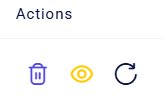
The Actions column has three options:
-
Remove user;
-
View (and edit) user profile;
-
Resend invitation (appears if the user has not confirmed their login to the Teliqon portal).
To edit a user account, click the Eye icon in the Actions column next to the required manager. In the window that opens, you can modify the account parameters:

To change any field, click the Edit icon (pencil shape) located to the right of the value. The field will then become active for entering new data.
To change the password, click the Edit icon, enter the new password, and confirm it in the field below.
The Internal number field allows you to regenerate the manager's SIP number. Simply click the generation button once, and the SIP number will change instantly. A user status indicator is located next to the field: green indicates that users are online, orange indicates they are on break or in a call, and red indicates that they are offline.
After making all necessary changes, click Save at the end of the menu to apply them. Alternatively, click Cancel to exit without saving.
To return to the user list, click Users in the navigation menu on the left:
You can manage the user list using special tools:
-
Search field;
-
Items per page dropdown;
-
Filter button;
-
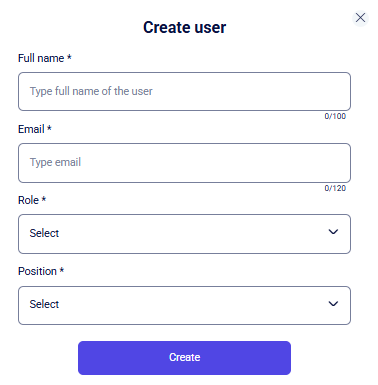
Add new user + button.

The Add new user + button is used to create access for new project users. When creating a new user, fill out the form by providing mandatory data: Full name, Email, Role, and Position. Saving the profile is impossible without filling in these fields.
The Search field provides a convenient search to quickly find users by Full name or Email. The search is dynamic: it begins from the first character entered and does not require clicking any additional buttons.
The Items per page dropdown allows you to configure the amount of data displayed on a page at once. Available options:
-
5;
-
10;
-
25;
-
50;
-
100
The Filter button allows for an advanced search within the user table. Clicking it opens a form where you can filter data by key parameters: Full name, Internal number, Email, Role, or Position:
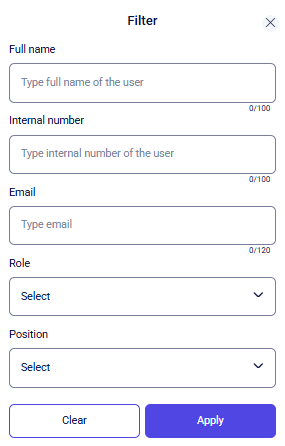
Enter the required criteria and click Apply to filter the list. To cancel your selection and return to the full user list, click Clear or click the X icon in the top right corner.
Roles section
This section contains a tool for managing roles available when creating users in your CRM.

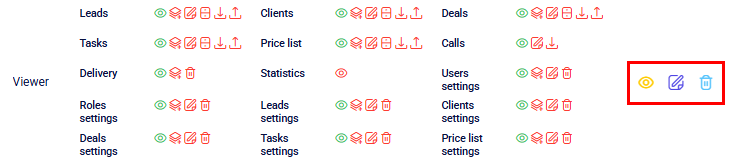
By default, there are 2 roles that cannot be deleted or edited:
-
Admin;
-
User.
The permission status for each role is color-coded: green indicates active access rights, while red indicates inactive (restricted) ones.
Creating a role
You can add custom roles using the Create role + button. Clicking this button opens a pop-up window for role creation:
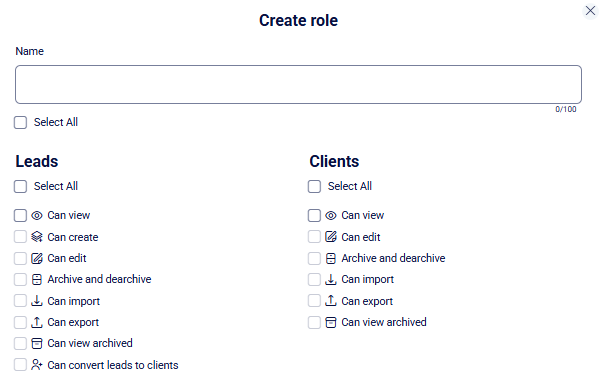
The Name field is mandatory. Enter the required value in the corresponding line to proceed.
Access rights settings are also available for working with Leads, Clients, Deals, Tasks, and Price Lists. List of access levels:
-
Select All (access levels);
-
Can view;
-
Can create;
-
Can edit;
-
Archive and dearchive;
-
Can import;
-
Can export;
-
Can view archived;
-
Can convert leads to clients (for Leads).
Access list for Calls:
-
Select All;
-
Can view;
-
Can request archive;
-
Can play records.
Access list for Delivery:
-
Select All;
-
Can view;
-
Can create;
-
Can delete.
Access list for Statistics:
-
Select All;
-
Can view.
Access list for configuring Users/Roles/Leads/Clients/Deals/Tasks/Price list settings:
-
Select All;
-
Can view;
-
Can create;
-
Can edit;
-
Can delete.
After selecting the desired settings, click Create. The role will then appear in the roles list immediately.
To cancel the action and close the role creation window, click the X in the top right corner of the screen.
Editing/Deleting a Role
You can edit or delete a previously created role. For instructions on how to create a role, see the Creating a role section.
To change the role parameters, click the Edit (pencil) icon in the corresponding row. To delete a role, use the Remove button located to the right of the edit tool.
After clicking the edit button, the following form will open:
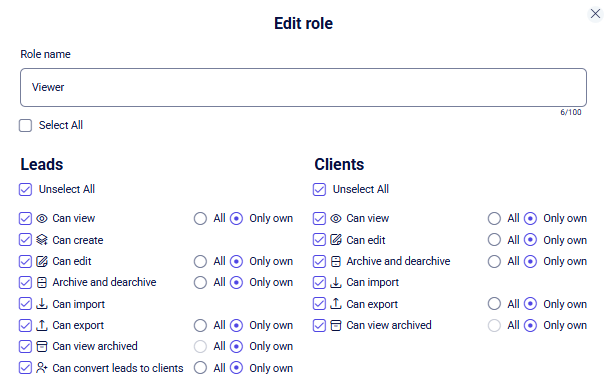
In this form, you can change:
-
Rename the role.
-
Action management: you can determine whether a manager with this role can view, create, edit, archive, convert, or export/import data.
-
Visibility levels: for each action, you can set the scope to “All” (access to the entire company database) or “Only own” (access only to those contacts where the manager is assigned as the responsible party).
Once you have updated the necessary settings, click Save.
To close the editing window without saving, click the X in the top right corner. You will be returned to the previous section.
Leads section
This section is designed for managing the lead structure. It includes settings for primary fields, the ability to add new parameters via the New field + button, and status administration tools.
Lead
The first block is Lead, which contains both primary (system) and additional fields:
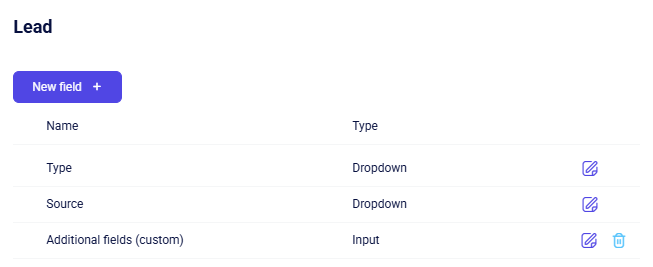
System fields
System fields are permanent and cannot be deleted. However, you can still customize how they function.
To update a field's settings, click the Edit (pencil) icon at the end of the row. This opens a configuration window where you can adjust the following:
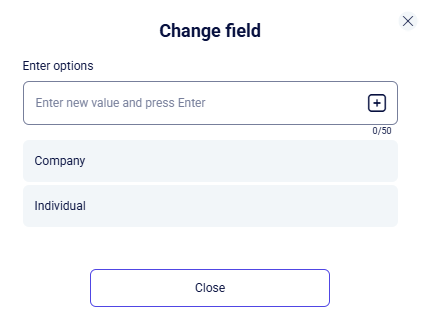
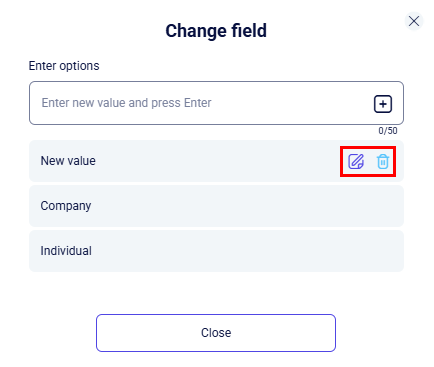
System options within primary fields cannot be edited, but you can expand them by adding your own items.
To do this, type the name of the new value into the Enter options field and press Enter. The new value will then appear in the list, where you can modify or remove it using the corresponding action icons.
Custom fields
To create additional fields in this section, use the New field + button. This will open the following creation form:

Enter a name for the new field and select its type: Input (a text field for manual data entry) or Dropdown (a selection list with predefined options). If you choose Dropdown, you will need to configure the specific values that will be available for selection.
Once you have finished the setup, click Create, and the new field will appear in the general list.
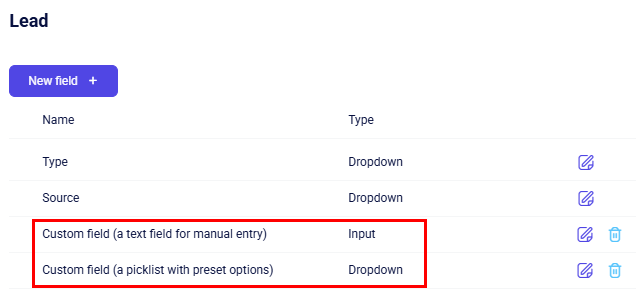
You can edit or delete any custom fields using the tool icons provided.
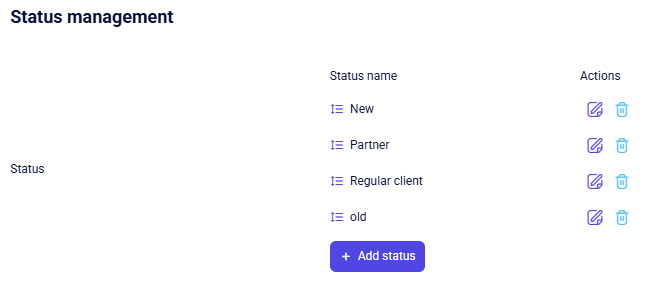
Status management
This section allows you to manage lead statuses. You can create new stages or edit the parameters of existing ones. Lead status indicates the current stage of interaction with a potential customer within the sales funnel (pipeline) (e.g., “New,” “In Progress,” “Awaiting Payment”). It helps track the progress of each request and provides a clear view of where a deal stands.
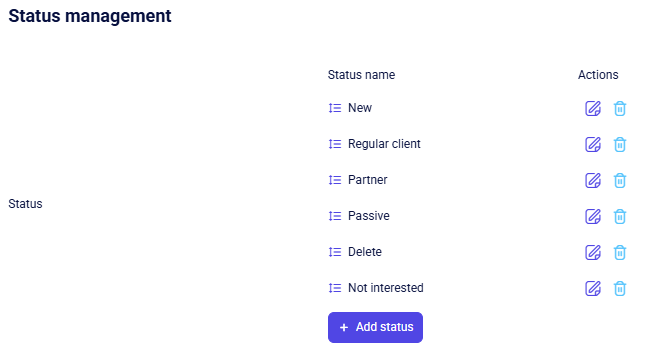
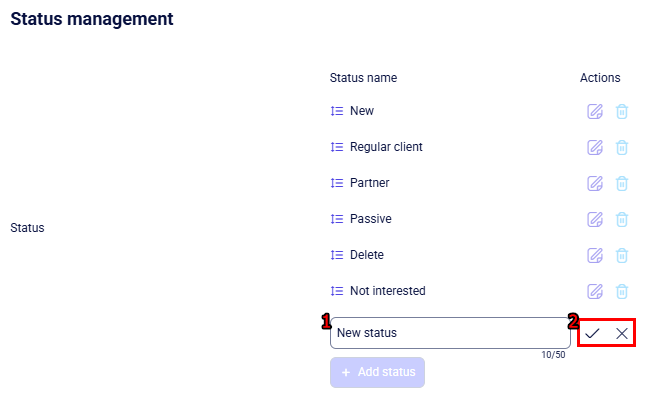
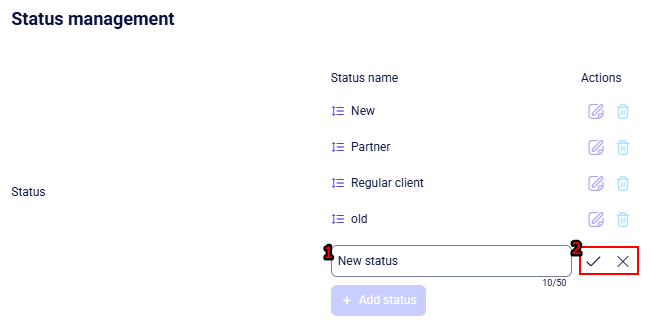
Click + Add status and enter a name in the new field.
Use the Confirm icon to finalize the addition or the X to cancel. Please note that providing a status name is mandatory.
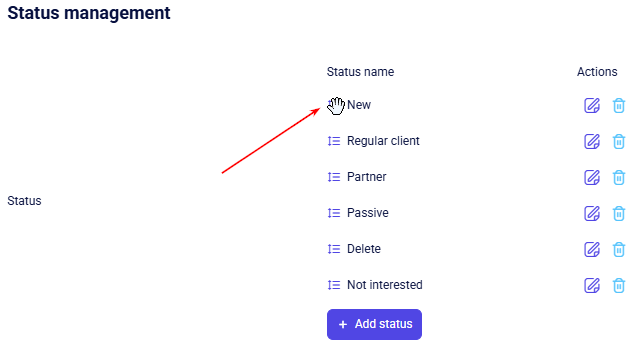
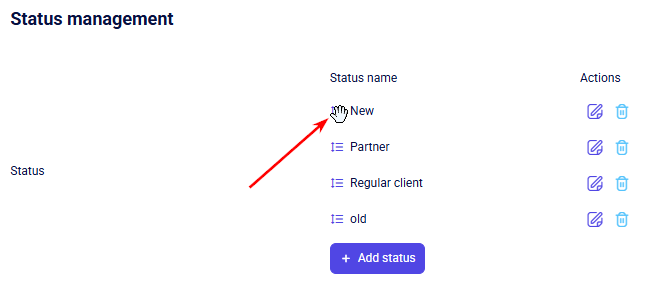
To change the order of statuses, use the Drag-and-drop feature. When the cursor turns into a Hand icon, click and drag the status to its new spot in the list.
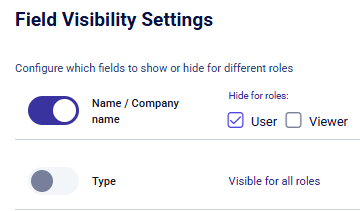
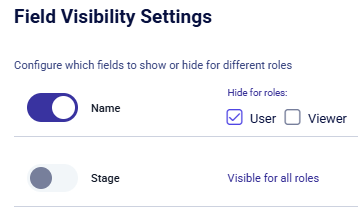
Field Visibility Settings
This block is designed for managing field visibility. It allows for flexible access control by specifying which fields should be hidden from certain user roles.
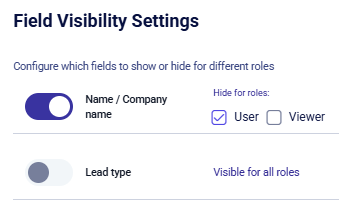
All fields are visible to every role by default. To hide a specific field, enable the toggle next to it and select the roles that should not have viewing access.
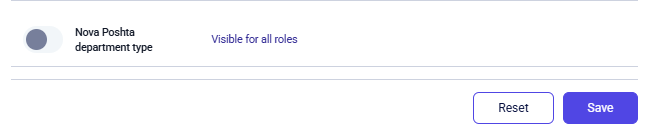
After making all the necessary changes, you can either Save the settings or Reset them using the corresponding buttons.
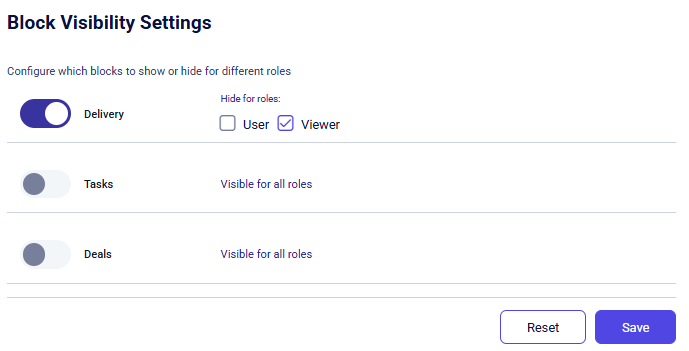
Block Visibility Settings
This section allows you to manage the visibility of entire blocks within the lead card. You can set personalized configurations for each role, determining which specific information blocks will be completely hidden from users.
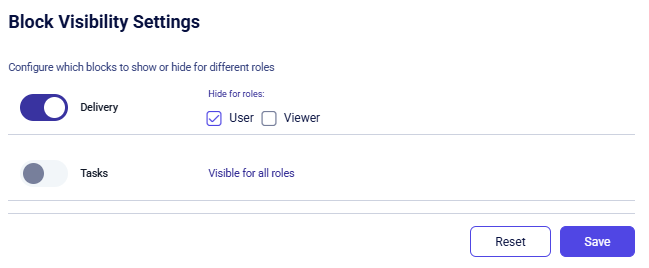
Initially, every block is viewable by all users. To limit access, activate the toggle next to the block title and choose the roles you wish to restrict.
After making all necessary changes, you can either Save the settings or Reset them using the corresponding buttons.
Clients section
This section contains a description of the basic fields for the Clients module and functionality for adding new fields via the New field + button.
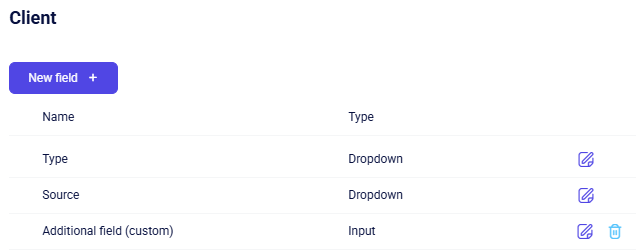
Client
The Client block, where you can manage both primary (system) and additional fields for the client entity:
System fields
System fields are permanent and cannot be deleted. However, you can still customize how they function.
To update a field's settings, click the Edit (pencil) icon at the end of the row. This opens a configuration window where you can adjust the following:

System options within primary fields cannot be edited, but you can expand them by adding your own items.
To do this, type the name of the new value into the Enter options field and press Enter. The new value will then appear in the list, where you can modify or remove it using the corresponding action icons.

Custom fields
To create additional fields in this section, use the New field + button. This will open the following creation form:
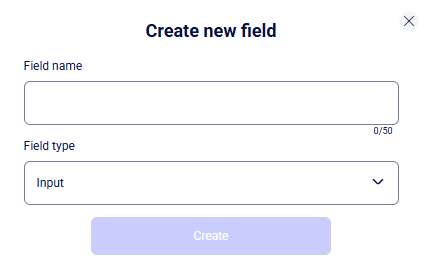
Enter a name for the new field and select its type: Input (a text field for manual data entry) or Dropdown (a selection list with predefined options). If you choose Dropdown, you will need to configure the specific values that will be available for selection.
Once you have finished the setup, click Create, and the new field will appear in the general list.
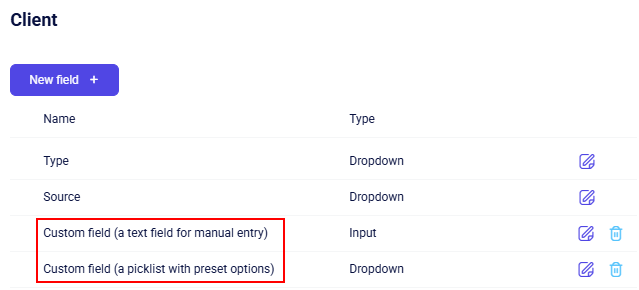
You can edit or delete any custom fields using the tool icons provided.
Status management
This section allows you to manage client statuses. You can create new stages or edit the parameters of existing ones. Client status indicates the current stage of interaction with a potential client within the sales funnel (pipeline) (e.g., “New,” “In Progress,” “Awaiting Payment”). It helps track the progress of each request and provides a clear view of the deal's current stage.
Click + Add status and enter a name in the new field.
Use the Confirm icon to finalize the addition or the X to cancel. Please note that providing a status name is mandatory.
To change the order of statuses, use the Drag-and-drop feature. When the cursor turns into a Hand icon, click and drag the status to its new spot in the list.
Field Visibility Settings
This section manages field visibility on the client card. It offers flexible data control, allowing you to hide specific fields from certain user roles.
All fields are visible to every role by default. To hide a specific field, enable the toggle next to it and select the roles that should not have viewing access.
After making all the necessary changes, you can either Save the settings or Reset them using the corresponding buttons.
Block Visibility Settings
This section allows you to manage the visibility of entire blocks within the client card. You can set personalized configurations for each role, determining which specific information blocks will be completely hidden from users.
Initially, every block is viewable by all users. To limit access, activate the toggle next to the block title and choose the roles you wish to restrict.
After making all necessary changes, you can either Save the settings or Reset them using the corresponding buttons.
Deals section
This page provides tools for managing the deal structure and sales funnels (pipeline). You can edit the parameters of existing fields or delete those that are no longer in use.
Deal
The Deal block, where you can manage both primary (system) and additional fields for the client entity:
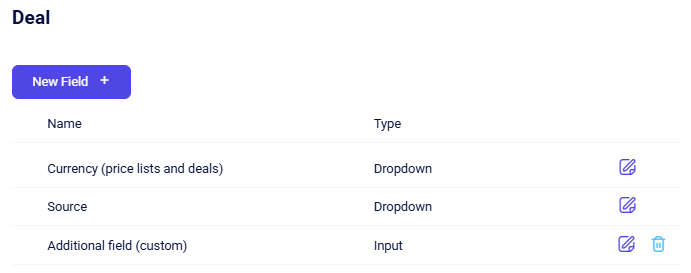
System fields
System fields are permanent and cannot be deleted. However, you can still customize how they function.
To update a field's settings, click the Edit (pencil) icon at the end of the row. This opens a configuration window where you can adjust the following:

System options within primary fields cannot be edited, but you can expand them by adding your own items.
To do this, type the name of the new value into the Enter options field and press Enter. The new value will then appear in the list, where you can modify or remove it using the corresponding action icons.

Custom fields
To create additional fields in this section, use the New field + button. This will open the following creation form:
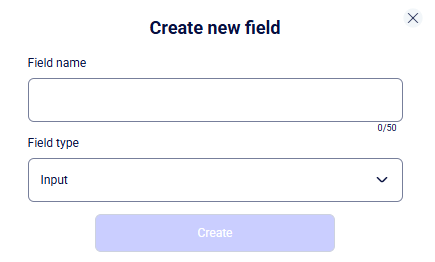
Enter a name for the new field and select its type: Input (a text field for manual data entry) or Dropdown (a selection list with predefined options). If you choose Dropdown, you will need to configure the specific values that will be available for selection.
Once you have finished the setup, click Create, and the new field will appear in the general list.
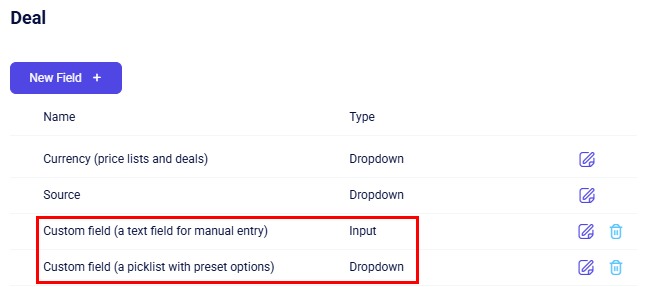
You can edit or delete any custom fields using the tool icons provided.
Funnels
This block is designed for managing deal funnels. You can view their descriptions and modify the settings for each stage.
The Funnel is the path a deal follows from the first interaction to a completed sale. By dividing the process into sequential stages like “Initial contact” and “Contract negotiation,” you can maintain full control over the sales cycle.
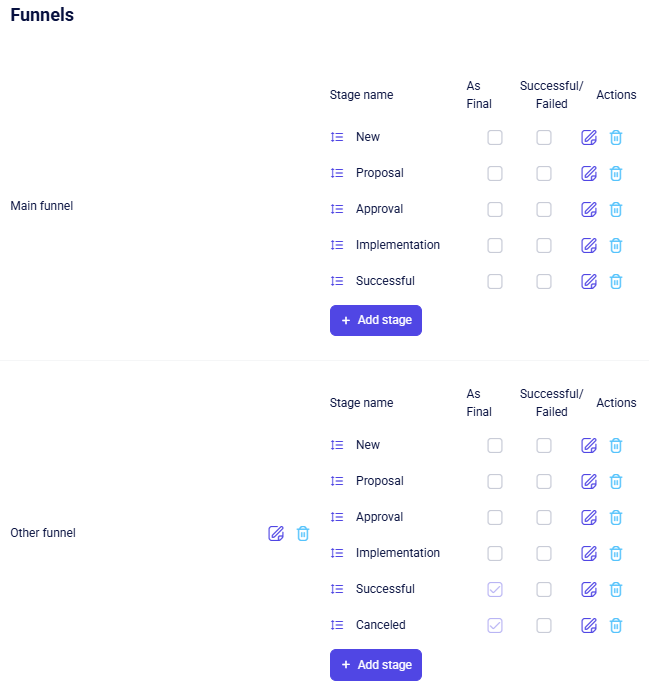
By default, the project includes one funnel named Main funnel, with the following stages:
-
New;
-
Proposal;
-
Approval;
-
Implementation;
-
Successful;
-
Canceled.
The system pipeline Main funnel is a baseline requirement; therefore, it cannot be deleted or renamed. However, you have the flexibility to edit the list of stages within this funnel by modifying or removing them as needed.
To expand the funnel with new stages, click the + Add stage button. A field will then appear for entering the name of the new stage, along with two checkboxes (empty squares) to configure additional parameters for that stage.
To confirm the creation, click the Confirm icon; to cancel, click the X. Keep in mind that the stage name is a required field.
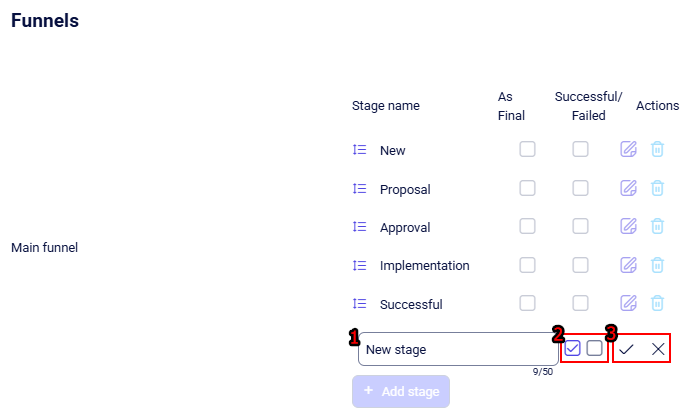
As previously mentioned, you can set additional parameters for each stage:
-
As Final checkbox : Check this box if moving a deal to this stage should automatically send it to the archive.
-
Successful/Failed checkbox: Check this box if moving a deal to this stage should automatically mark it as successful. If left unchecked, the stage is recorded as unsuccessful.
This setting applies only when the As Final checkbox is enabled.
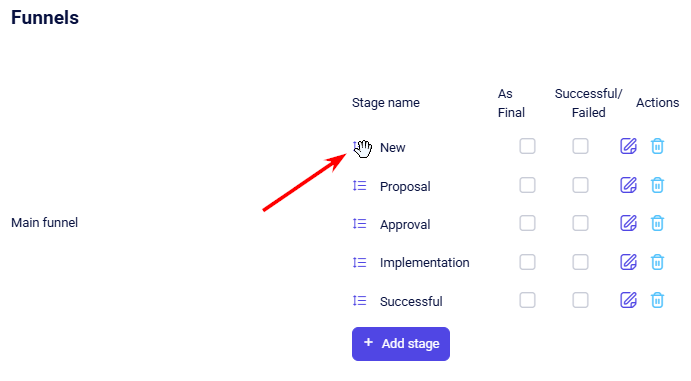
To change the order of stages, use the Drag-and-drop feature. When the cursor turns into a Hand icon, click and drag the stage to its new spot in the list.
At the bottom of the funnel settings page, there is an Add new button - this button allows you to create an additional sales funnel for your business processes.
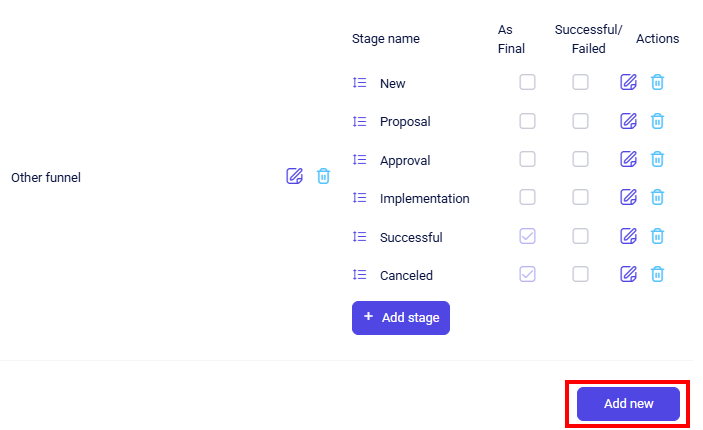
After clicking the funnel creation button, a field for entering the name of the new funnel will appear on the page:

To confirm the creation of the new funnel, click the Confirm icon; to cancel, click the X.
Once saved, the funnel will be listed with default stages that you can rename or remove as needed.
Field Visibility Settings
This section manages field visibility on the deal card. It offers flexible data control, allowing you to hide specific fields from certain user roles.
All fields are visible to every role by default. To hide a specific field, enable the toggle next to it and select the roles that should not have viewing access.
After making all the necessary changes, you can either Save the settings or Reset them using the corresponding buttons.

Task section
This section contains a description of the basic field for the Task module and functionality for adding new fields via the New field + button.
Task
The Task block, where you can manage both primary (system) and additional fields for the client entity:
System fields
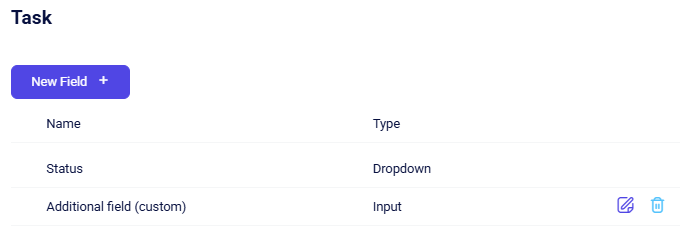
System fields are permanent and cannot be deleted, but you can configure the statuses for this field, as described in the Status management section. Currently, there is one primary field in the Tasks settings - Status.
Custom fields
To create additional fields in this section, use the New field + button. This will open the following creation form:

Enter a name for the new field and select its type: Input (a text field for manual data entry) or Dropdown (a selection list with predefined options). If you choose Dropdown, you will need to configure the specific values that will be available for selection.
Once you have finished the setup, click Create, and the new field will appear in the general list.
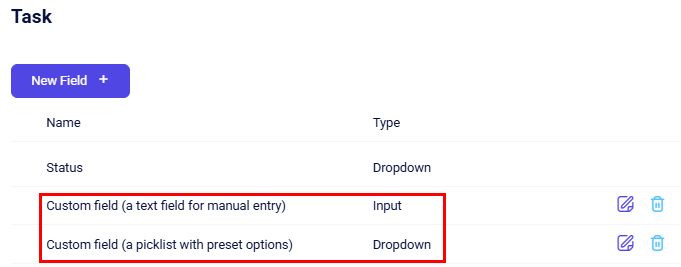
You can edit or delete any custom fields using the tool icons provided.
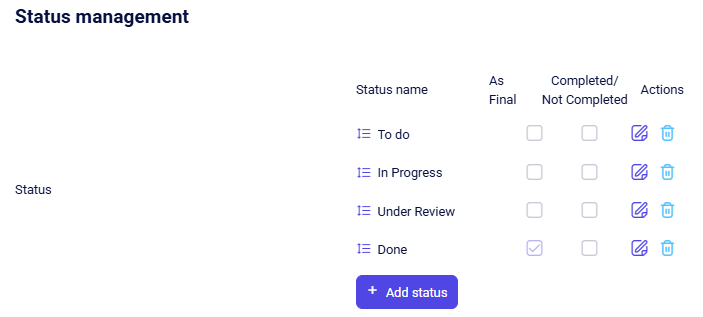
Status management
This section allows you to manage task statuses. You can create new stages or edit the parameters of existing ones. Task status indicates the current progress of a specific task (e.g., "To Do," "In Progress," "Under Review"). It allows the team to see the actual state of work and helps the manager monitor deadlines and employee workload.
To expand the field with new statuses, click the + Add status button. A field will then appear for entering the name of the new status, along with two checkboxes (empty squares) to configure additional parameters for that status.
To confirm the creation, click the Confirm icon; to cancel, click the X.
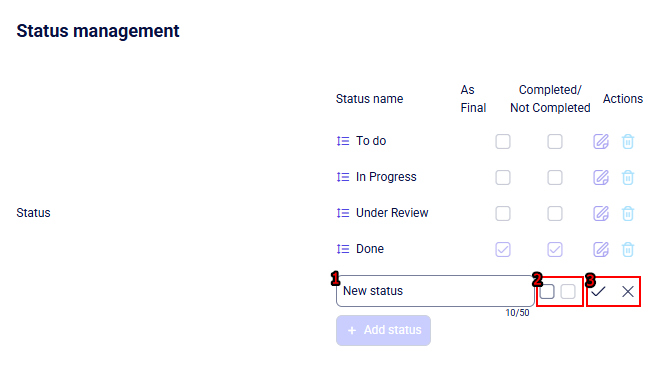
As previously mentioned, you can set additional parameters for each status:
-
As Final checkbox : Check this box if moving a task to this status should automatically send it to the archive.
-
Completed/Not Completed checkbox : Check this box if transitioning to this status should automatically mark task as completed. If left unchecked, the stage is recorded as not completed.
This setting applies only when the As Final checkbox is enabled.
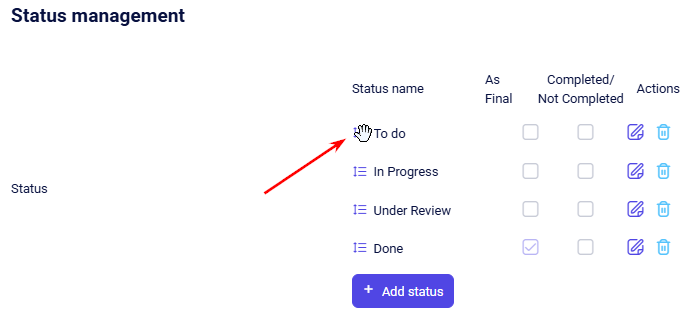
To change the order of statuses, use the Drag-and-drop feature. When the cursor turns into a Hand icon, click and drag the status to its new spot in the list.
Field Visibility Settings
This section manages field visibility on the task card. It offers flexible data control, allowing you to hide specific fields from certain user roles.
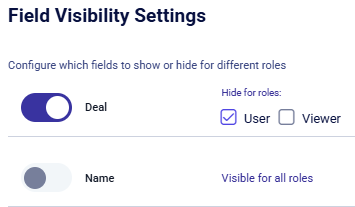
All fields are visible to every role by default. To hide a specific field, enable the toggle next to it and select the roles that should not have viewing access.
After making all the necessary changes, you can either Save the settings or Reset them using the corresponding buttons.

Price-list section
This page contains tools to edit and delete price list fields and manage barcode settings.
Price list
The Price List block allows you to manage the primary (system) and additional fields of the entity:
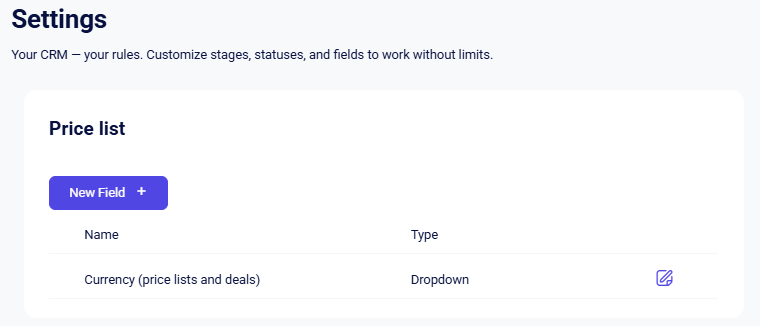
System fields
System fields are permanent and cannot be deleted. However, you can still customize how they function.
To update a field's settings, click the Edit (pencil) icon at the end of the row. This opens a configuration window where you can adjust the following:
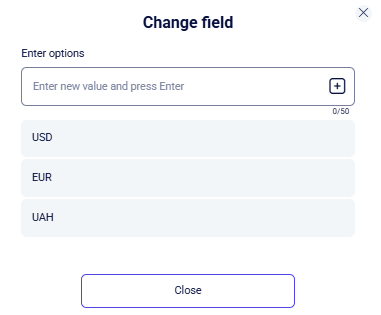
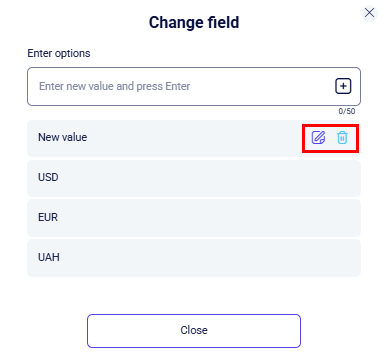
System options within primary fields cannot be edited, but you can expand them by adding your own items.
To do this, type the name of the new value into the Enter options field and press Enter. The new value will then appear in the list, where you can modify or remove it using the corresponding action icons.
Custom fields
To create additional fields in this section, use the New field + button. This will open the following creation form:

Enter a name for the new field and select its type: Input (a text field for manual data entry) or Dropdown (a selection list with predefined options). If you choose Dropdown, you will need to configure the specific values that will be available for selection.
Once you have finished the setup, click Create, and the new field will appear in the general list.
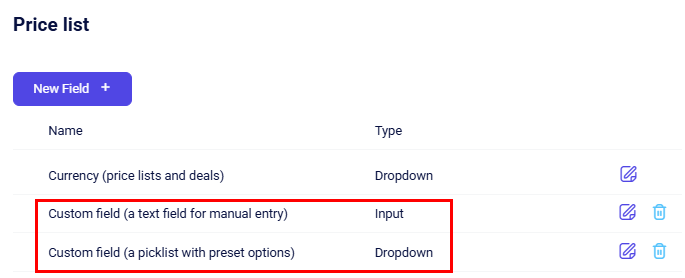
You can edit or delete any custom fields using the tool icons provided.
Barcodes
This block provides instructions for configuring barcodes and allows you to set their symbology parameters and other technical properties.
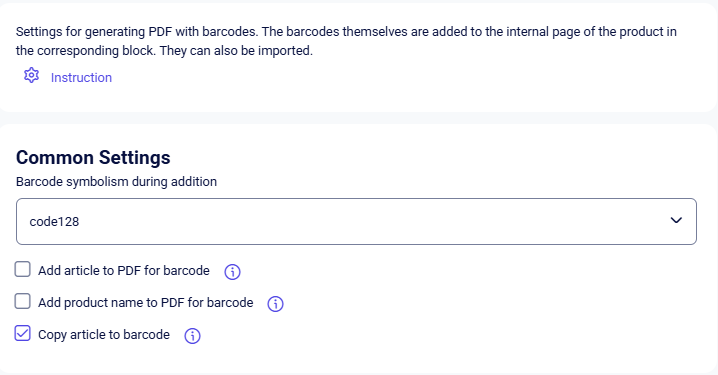
The following properties are available:
-
Select the required barcode symbolism from the dropdown list;
-
Add article to PDF for barcode;
-
Add product name to PDF for barcode;
-
Copy article to barcode.
Field Visibility Settings
This section manages field visibility on the price list. It offers flexible data control, allowing you to hide specific fields from certain user roles.

All fields are visible to every role by default. To hide a specific field, enable the toggle next to it and select the roles that should not have viewing access.
After making all the necessary changes, you can either Save the settings or Reset them using the corresponding buttons.

Block Visibility Settings
This section allows you to manage the visibility of entire blocks within the price list. You can set personalized configurations for each role, determining which specific information blocks will be completely hidden from users.
Currently, the Barcodes block is the only one available in the Price Lists section.
Initially, block is viewable by all users. To limit access, activate the toggle next to the block title and choose the roles you wish to restrict.
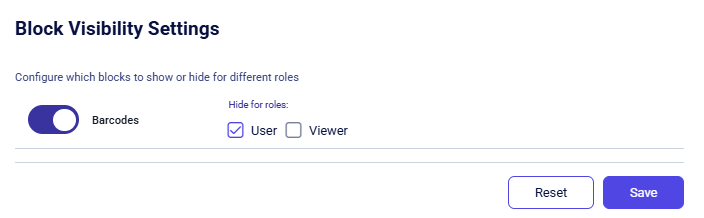
After making all necessary changes, you can either Save the settings or Reset them using the corresponding buttons.
Workspace section
In this section, you can create and configure unique workspaces for your business tasks. Workspaces are necessary for clear distribution of incoming calls and inquiries, allowing you to separate client flows depending on their purpose: for example, to separate a "Sales" department for processing new leads and "Support" for servicing existing clients.

Creating a new department
To create and set up a new department, click the Add new department + button. A pop-up window will appear where you need to configure the following fields:
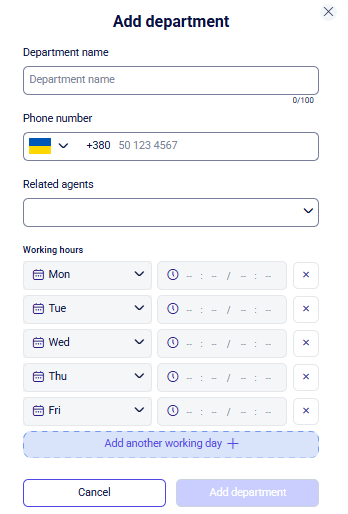
-
Department name: type a clear name for the unit using your keyboard (for example, “Sales Department” or “Technical Support”);
-
Phone number: enter the digits for the incoming number that clients will call to reach this department;
-
Related agents: click on the field to open the drop-down list and select the managers (agents) who will be assigned to this department. These specific employees will handle the incoming inquiries received on this line;
-
Working hours: in this block, you can set up the schedule for the incoming line.
-
Day selection: on the left side of the row, select the required day of the week from the list.
-
Time interval: on the right side, specify the start and end times (for example, 10:00 / 18:00);
-
Additional settings: if you need to set a schedule for another day, click the Add another working day + button. You can create up to 7 such rows (days); to delete settings for a specific day, click the X to the right of the row.
To save the department, click the Add department button. To exit without saving changes, click Cancel or the X in the upper-right corner of the window.
After creating the department, it will automatically appear in the general list of the Departments section. For a quick view of assigned specialists or the work schedule, you don't need to open the settings: simply hover your cursor (without clicking) over the View all label. A pop-up window will instantly display the full information for the selected parameter, allowing you to quickly check data without extra clicks or navigating between pages:
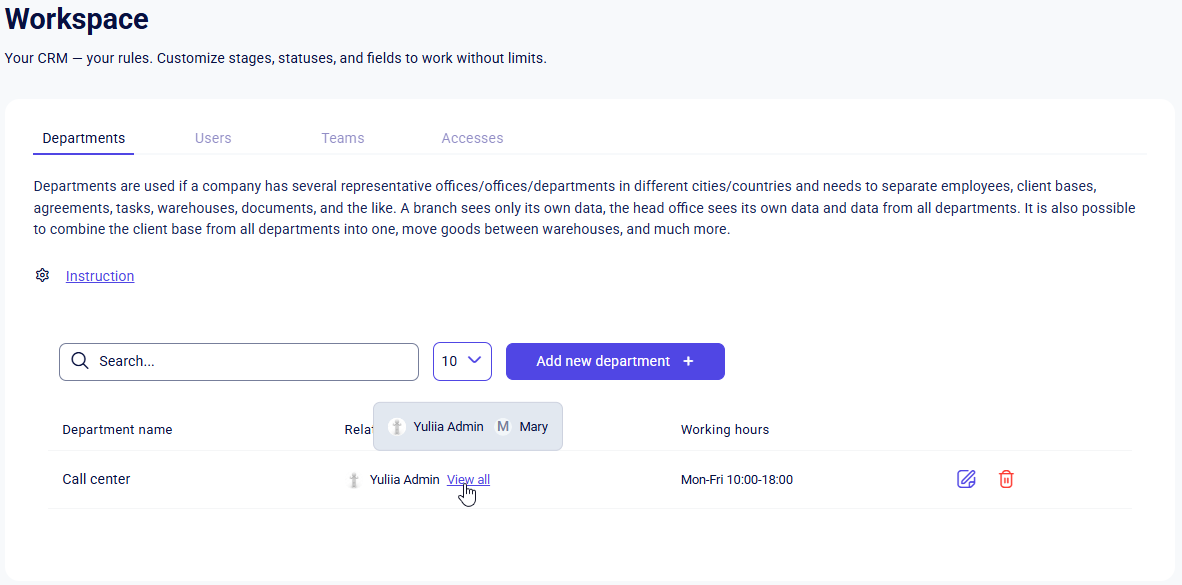
To change the parameters of an existing department, click the Edit icon (pencil symbol) to the right of its name. If the department is no longer relevant and needs to be removed from the list, use the Remove icon (trash can symbol).
Additionally, for your convenience, the page includes:
-
Search bar: allows you to instantly find the required department by its name. Simply start typing the first letters of the name into the field, and the list will automatically filter to show only the options that match your query.
-
Rows per page button: allows you to limit the number of records displayed on a single page. It has the following options:
-
5;
-
10;
-
25;
-
50;
-
100
-
Integrations section
This section lists the external systems that can be synced with Teliqon CRM. At the moment, the portal provides integration options for Email and Nova Poshta.
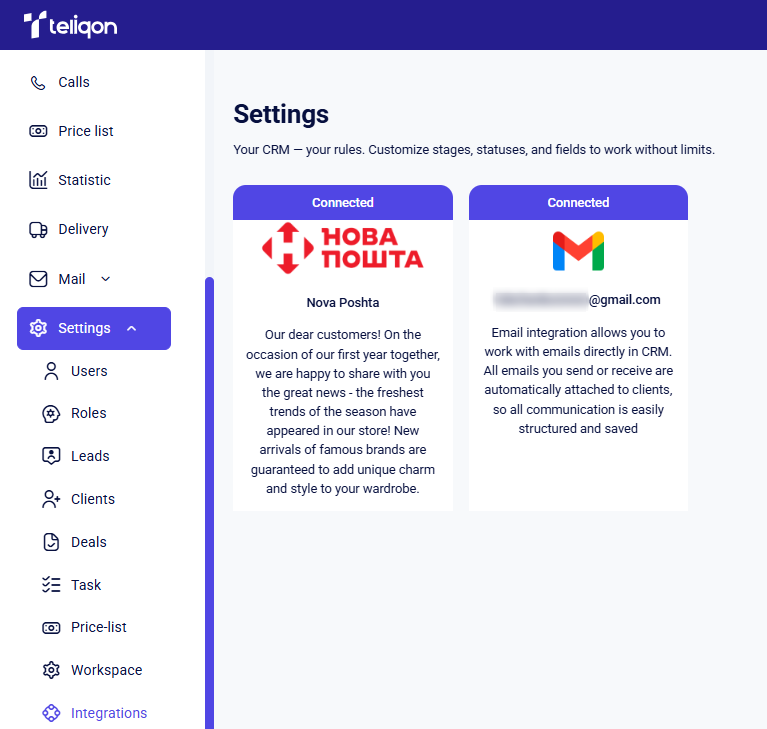
Email Integration
To activate the email integration, click the Email icon. After clicking the icon to activate the email integration, the following pop-up window will appear:
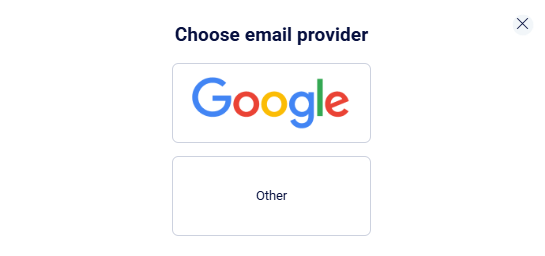
For detailed instructions on Email integration and the differences between each method, please refer to this article.
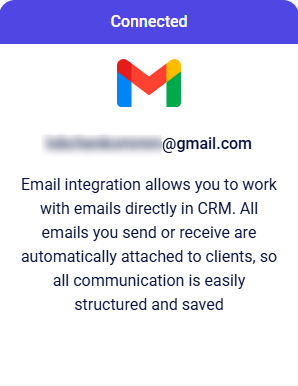
Once connected, the status will update on the integrations page, and the active Email module will be displayed as follows:
Nova Poshta Integration
Connecting Nova Poshta
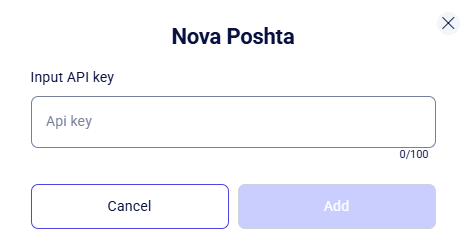
To activate the Nova Poshta integration, click the Nova Poshta icon. After clicking the icon to activate the integration, the following pop-up window will appear:

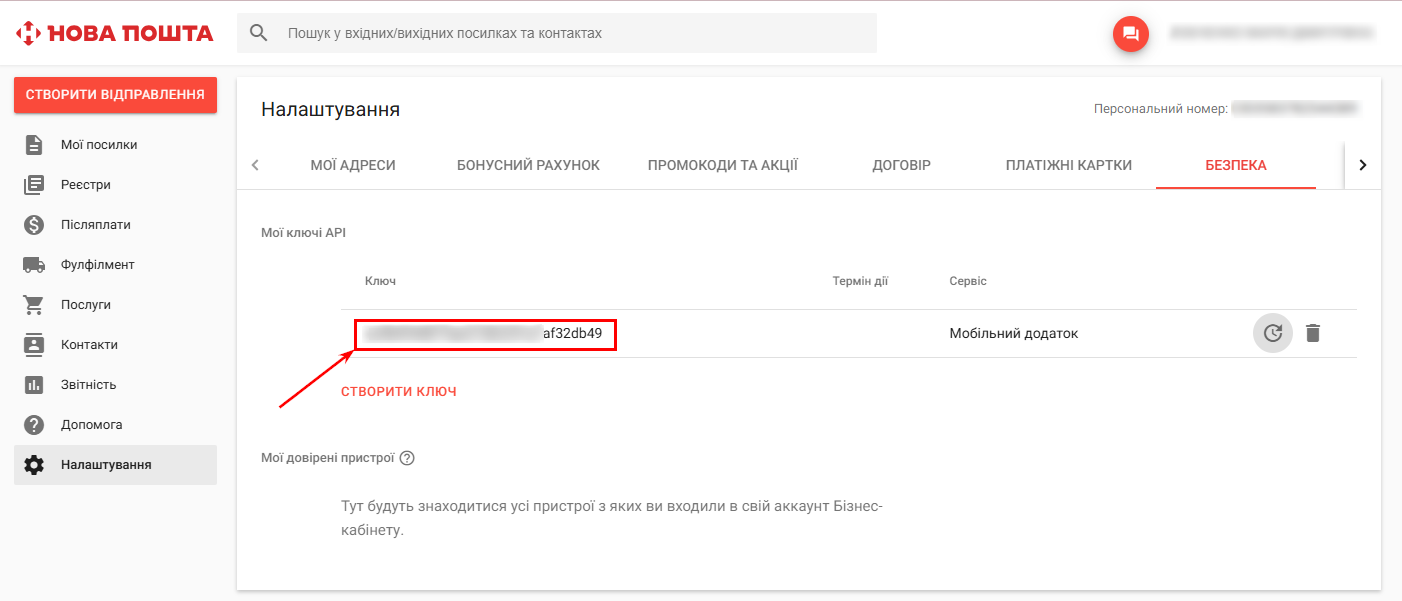
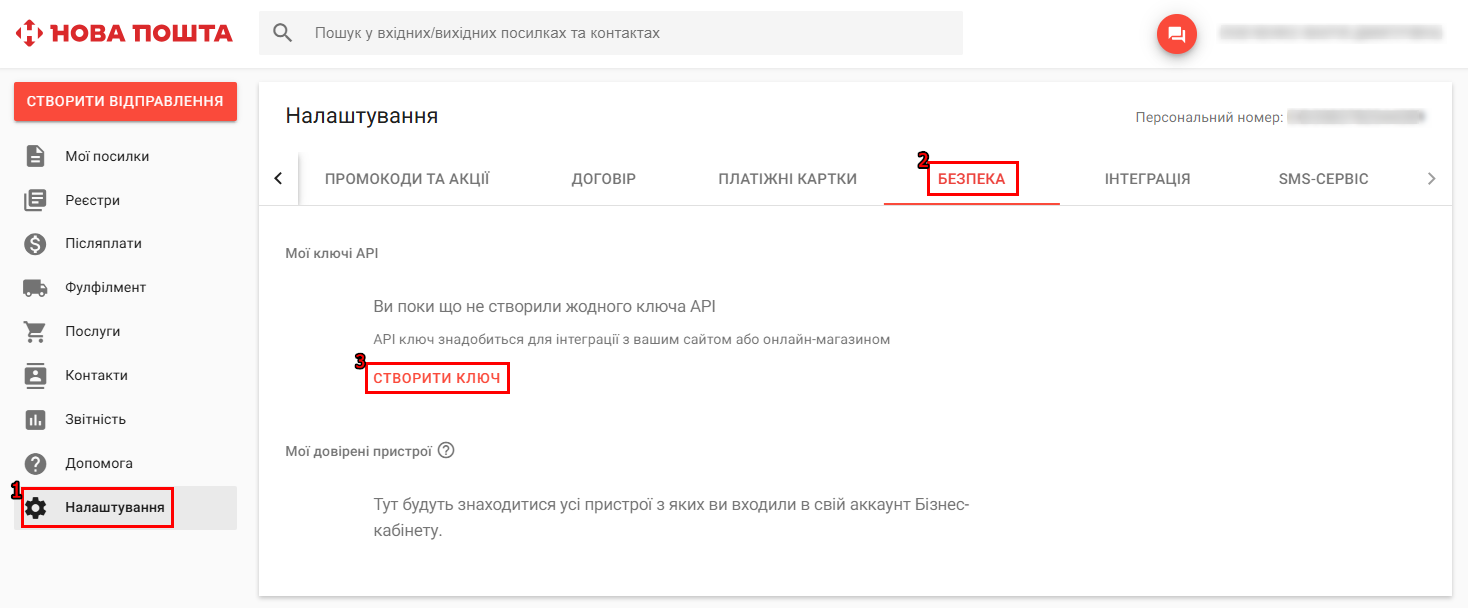
In this window, enter the API key, which can be obtained from your Nova Poshta personal business account at: https://new.novaposhta.ua/dashboard/settings/developers. Alternatively, navigate to the Налаштування → Безпека section:
If you do not have an API key yet, you can learn how to create one here.
Once you have copied the API key from your Nova Poshta personal account and pasted it into the integration settings window, click the Add button to activate the integration. If you wish to interrupt the process, click Cancel to discard the settings.
A successful connection status will update the display of the integrations page. An active Nova Poshta module will look like this:

Creating an API Key
If you do not yet have a Nova Poshta API key, you can generate one in your personal account and use it to activate the integration with Teliqon CRM.
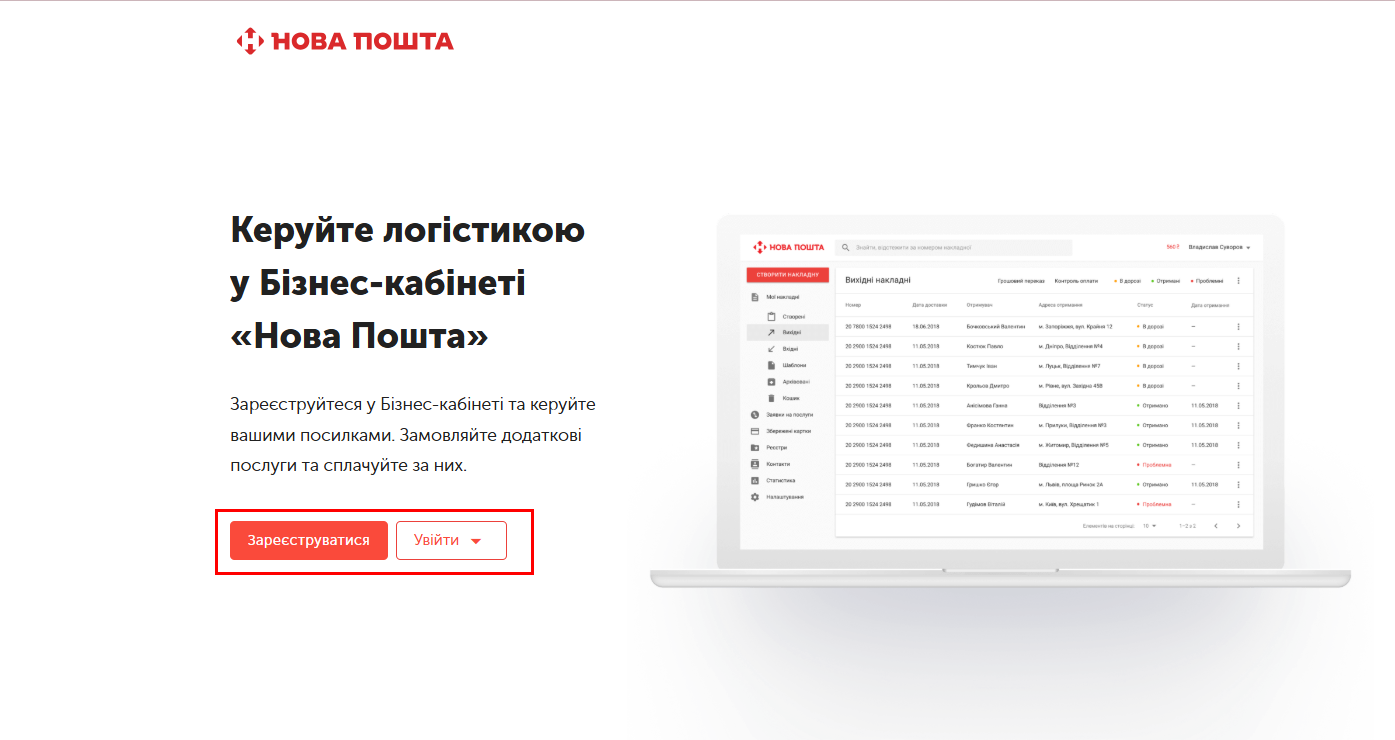
To create an API key, go to the Nova Poshta personal account. Use the link https://new.novaposhta.ua/ to access the dashboard. On the home page, select “Увійти” to authorize in the system or “Зареєструватися” if you do not have a business account yet:
In your Nova Poshta personal account, go to the “Налаштування” section in the left sidebar menu. Next, open the “Безпека” tab and click the “Створити ключ” button to generate a new API key:
After generating your personal key, use it to enable the Teliqon CRM integration.
Integration Settings
After successfully connecting the Nova Poshta module, you can proceed to configure the parameters. To do this, click the icon of the active integration in the general list.
Once clicked, the following page will open:
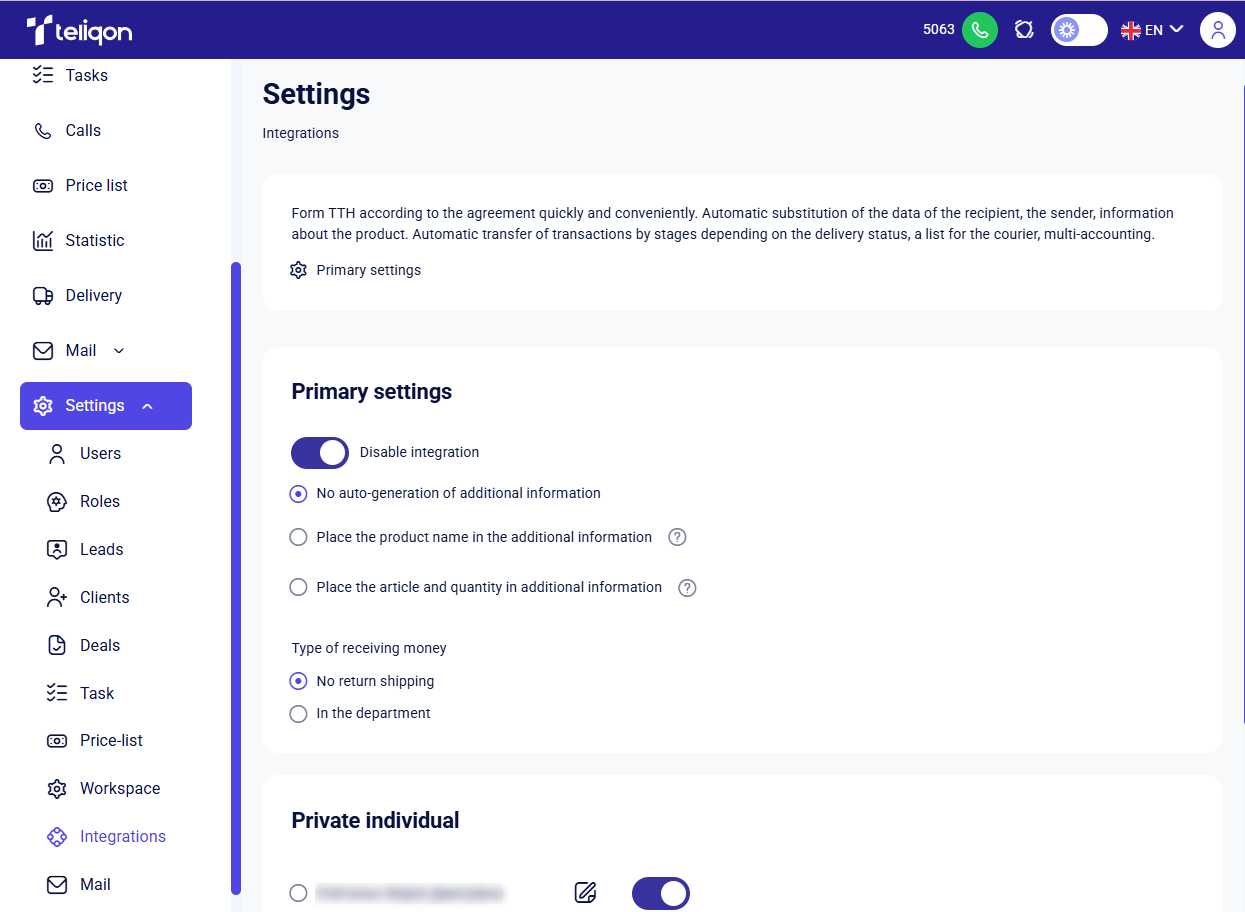
The Nova Poshta Integration Settings page consists of the following blocks:
-
Primary settings;
-
Private individual;
-
Related statuses.
Primary settings
In the Primary Settings block, you can enable or disable the integration using the corresponding Enable integration toggle, which changes to Disable integration once activated.
The enabled Nova Poshta integration operates in three modes:
-
No auto-generation of additional information: No extra data is added to the shipment details.
-
Place the product name in the additional information: The system automatically adds product names to the "Additional Information" field when generating the consignment note.
-
Place the article and quantity in additional information: The system automatically adds the product article, quantity, and unit of measurement to the "Additional Information" field when generating a waybill (TTN). Example: sku12-3pcs.
You can also set the Type of receiving money method by choosing between:
-
No return shipping;
-
In the department.
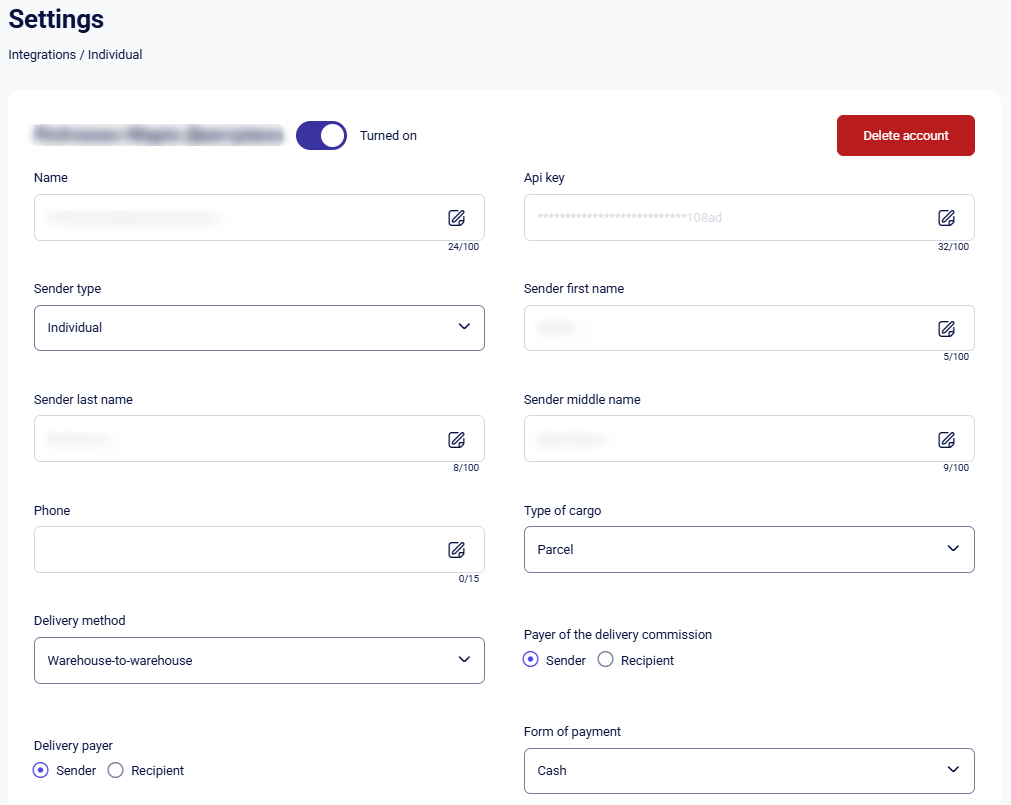
Private individual
In the Private individual block, you can modify the default private individual settings and enable or disable the integration for a specific private individual.
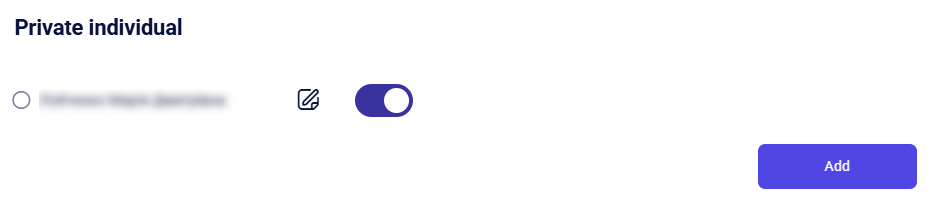
To add another private individual, click the Add button. Once clicked, a pop-up window will appear for data entry:
After entering the API key, the system will automatically populate the Private individual block with the corresponding user details.
Private individual Settings
After clicking the edit button to the right of the private individual's name, a page will open for pre-filling sender data and product information. These values will be automatically applied to new waybills (TTNs), significantly speeding up the creation process:
This page consists of the following blocks:
-
Account settings;
-
Additional info;
-
Number of seats;
-
Delivery size.
In the Account settings on the right, there is a Delete account button. Clicking this will remove the Teliqon CRM integration for the current Private individual.
The following fields are available for editing in the Account settings block:
-
Name;
-
Api key;
-
Sender type;
-
Sender first name;
-
Sender last name;
-
Sender middle name;
-
Phone;
-
Type of cargo;
-
Delivery method;
-
Payer of the delivery commission;
-
Delivery payer;
-
Form of payment;
-
City;
-
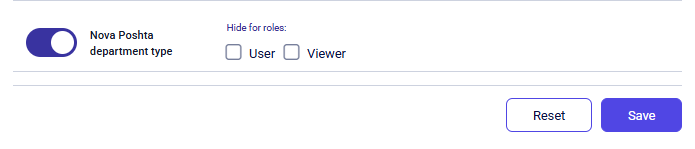
Department type;
-
Sending department;
-
Cargo description;
-
Total weight(kg);
-
Total shipment volume(m3);
-
Package number.
The following fields must be filled in manually using your keyboard:
-
Phone;
-
City;
-
Sending department;
-
Total weight(kg);
-
Package number;
-
Cargo description;
-
Total shipment volume(m3);
The fields Api key, Name, Sender last name, Api key, Sender first name, and Sender middle name contain pre-set values that are automatically loaded from the profile settings. If necessary, you can edit this data manually.
To fill in the fields Type of cargo, Sender type, Delivery method, Form of payment, and Department type, select one of the values provided in the dropdown list.
Once you have selected the necessary parameters, you can proceed to configure the next block.
To complete the process, scroll down the page and click Save to apply the updated Private individual settings. If you wish to exit without saving the changes, use the Cancel button.
Additional info
The following configuration options are available for you to select within this block:
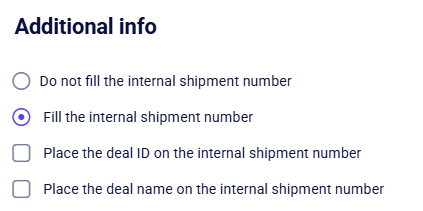
You need to define how the system handles identifiers by selecting one of these two scenarios:
-
Do not fill the internal shipment number;
-
Fill the internal shipment number.
If you select the Fill the internal shipment number scenario, two additional options will become available as checkboxes (mark the empty square):
-
Place the deal ID on the internal shipment number;
-
Place the deal name on the internal shipment number.
This is a required field. These settings cannot be used together, so you must choose only one of the two proposed options.
If you select the Do not fill the internal shipment number option at the previous stage, the additional checkbox options will become inactive and unavailable for selection.
Once finished, scroll down and click Save to confirm your Private individual configuration. To discard your edits and leave the page, simply click Cancel.
Number of seats
In this block, the following configuration options are available for selection:

There are two configuration options for this block:
-
Number of places based on the quantity of goods in the deal. The system analyzes the deal card and calculates the total number of product units. For example, if there are 3 items in the deal, the CRM will automatically add this information when creating a new waybill (TTN) linked to that deal.
-
Fixed number of places. You pre-define a specific number (e.g., "1"). Regardless of whether there is one item or ten added to the deal, the waybill will always indicate "1 package".
Once you are finished, scroll down and click Save to apply the changes to the Private Individual profile. To discard your edits and leave the page, simply click Cancel.
Delivery size
The following settings are available for selection within this section:
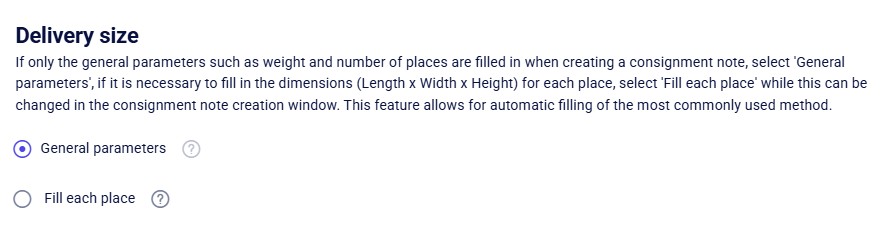
You can configure this block using one of two methods: either set General parameters for the entire shipment or choose to Fill each package individually.
This is a required field. These settings cannot be used together, so you must choose only one of the two proposed options.
Once finished, scroll down and click Save to confirm your Private individual configuration. To discard your edits and leave the page, simply click Cancel.
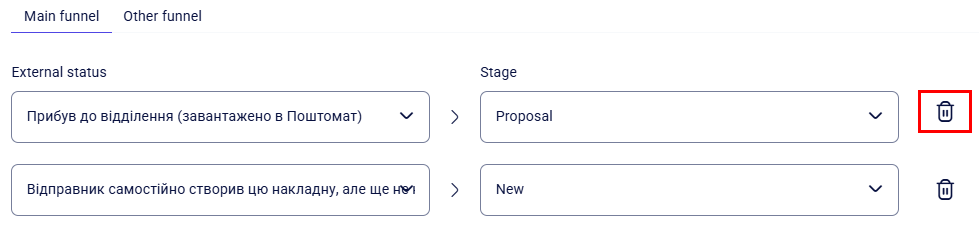
Related statuses
This block allows you to configure the logic for automatic deal transitions to a specific Stage as soon as a corresponding External status is received from Nova Poshta. This removes the requirement for manual status updates by managers whenever a shipment’s state changes.
You can configure separate status mapping rules for each sales funnel individually.
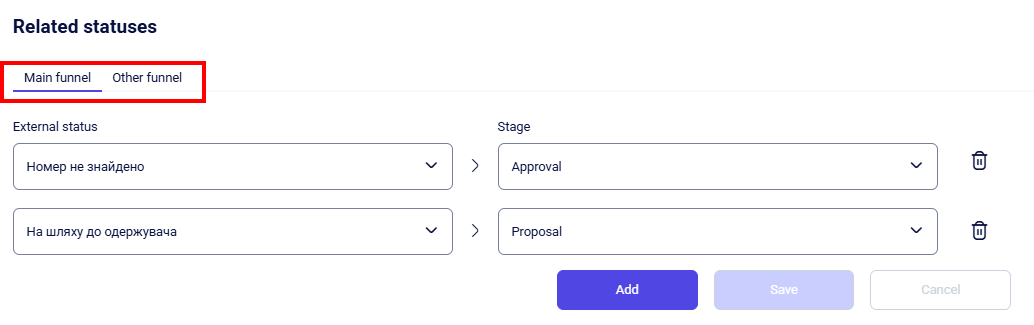
To configure a new mapping, click the Add button. In the row that appears, select the required value from the External status dropdown menu and specify the internal Stage to which the deal should transition.
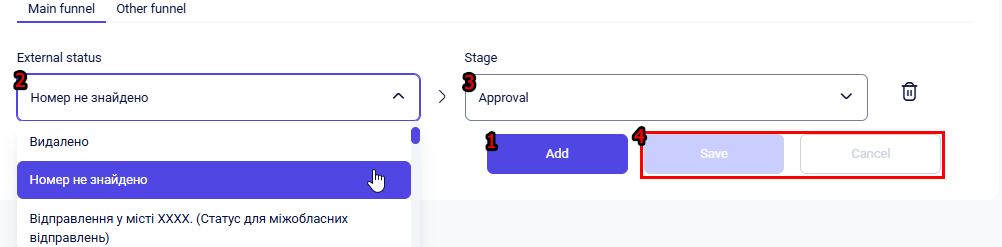
To apply your changes, click the Save button. If you need to revert the changes, click Cancel.
If you need to configure mappings for several different statuses at once, click Add again. You can create an unlimited number of rules, assigning a specific stage to each external status.
To remove an unnecessary rule, click the Delete (trash can) icon next to it. The selected rule will be immediately removed from the list.
Mail section
This section displays your email account information. From here, you can manage the synchronization between your email and Teliqon CRM, or choose to disconnect and remove the account entirely.
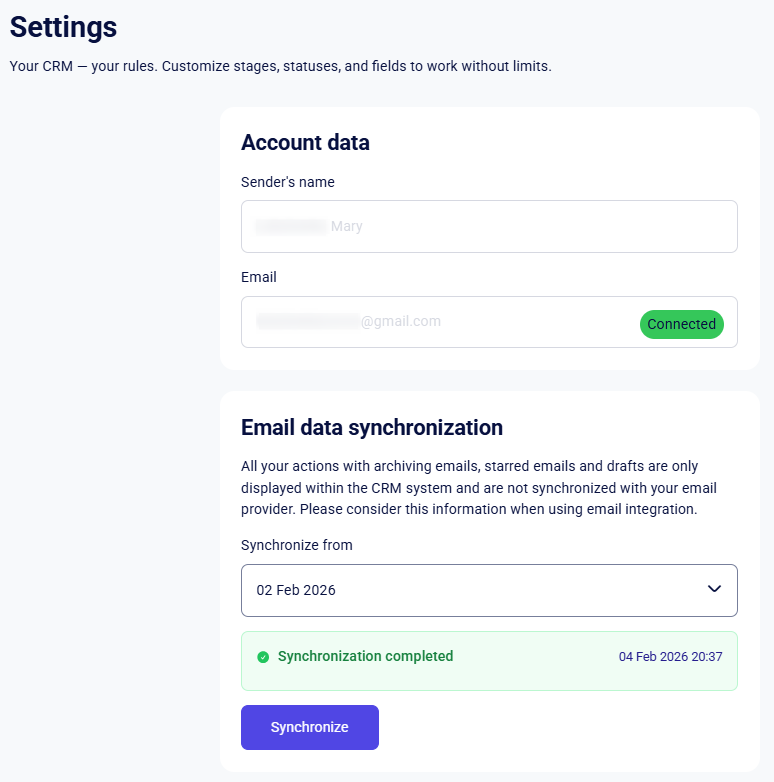
The information in the Account data block is populated automatically and cannot be edited.
In the Email data synchronization block, you can select one of the provided synchronization periods. The available options are:
-
Today;
-
1 month;
-
3 months;
-
6 months.
After you have selected the synchronization period, click the Synchronize button.
To pause the process, click Stop synchronization, or to disconnect the integration entirely, select Delete account respectively.
Personal section
In this section, you can set up two-factor authentication (2FA) to secure your profile.
Additionally, you can manage general alerts and customize notification preferences for specific CRM modules, including Leads, Deals, Clients, Tasks, Price List, and Email.
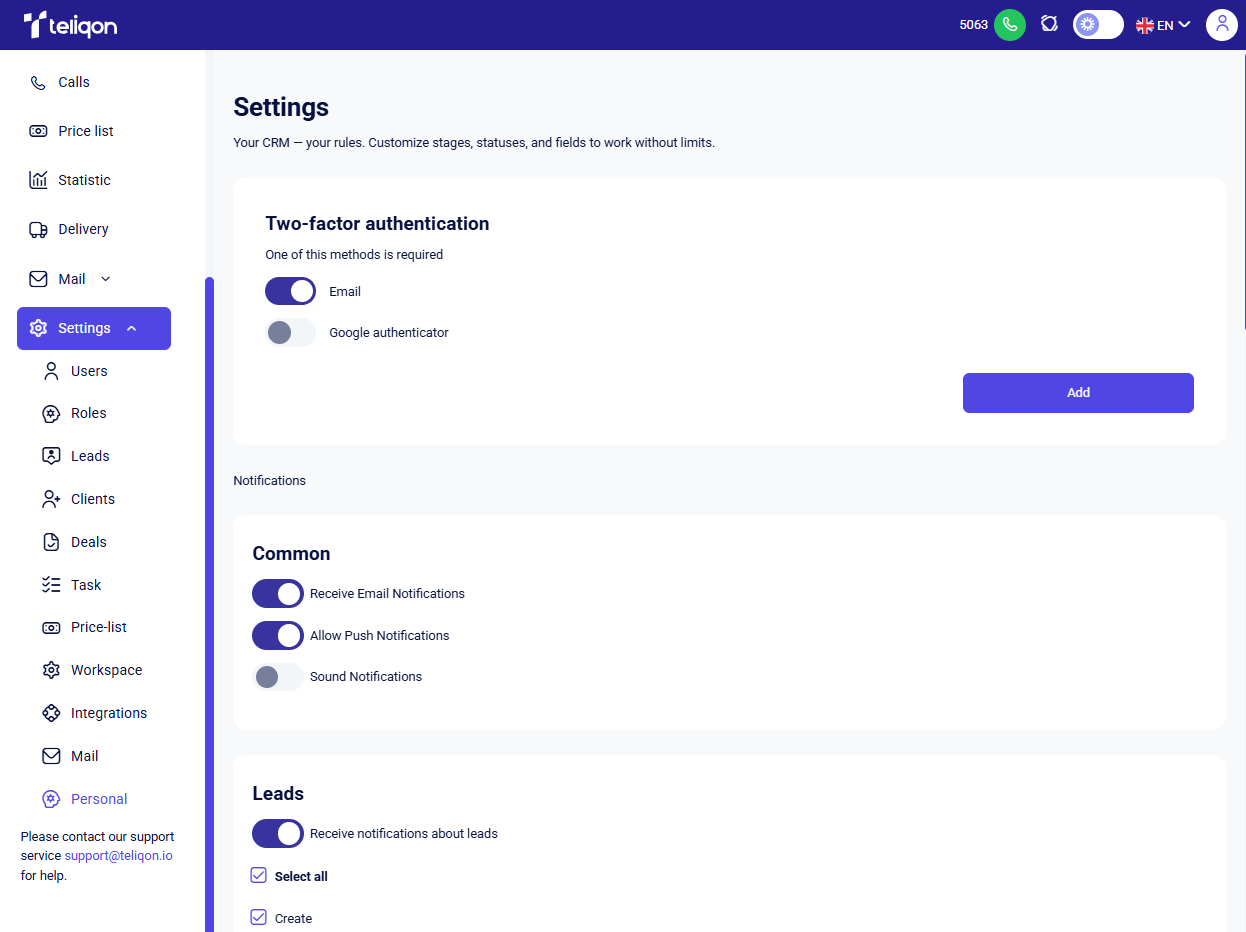
Authentication settings
Enabling at least one method of two-factor authentication (2FA) is mandatory.
Authentication options:
- Email. If you enable authentication via Email, no additional configuration is required.
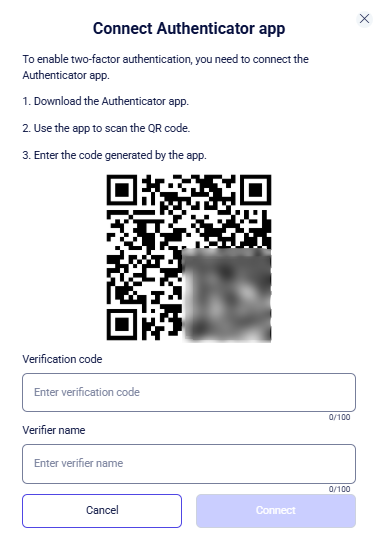
- Google Authenticator. Activating two-factor authentication via Google Authenticator will open a modal window with step-by-step setup instructions:
To generate the password required for the Verification code field, install the Google Authenticator app on your smartphone.
Open the app, sign in to your Google account, then tap the + icon in the bottom right corner of the screen and choose one of the two available setup methods:
-
Scan a QR code;
-
Enter a setup key.
After selecting the QR code scan, a scanning window will appear; you will need to point your camera at the QR code displayed in Teliqon CRM.
Once scanned, you will receive a code for your Teliqon CRM account. This code is temporary and valid for 20 seconds, after which it will automatically refresh.
You may enter any name for the identifier.
Then click Connect to finalize your setup. Keep in mind that the verification code expires quickly; ensure you submit it before the timer in the app runs out, or you’ll have to enter a new one.
If you wish to stop the setup process, click Cancel.
You can connect multiple devices for authentication. To do this, click the Add button and repeat the Google Authenticator setup steps described above.
Notification settings
Below on the same page is the notification management block. You can customize the notification channels for each entity individually:
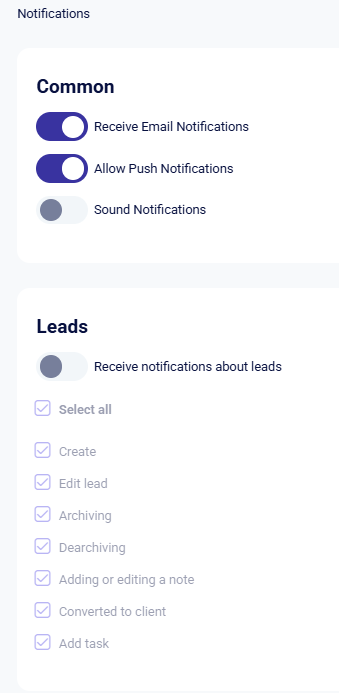
In the Common block, select your preferred notification methods:
-
Receive Email Notifications;
-
Allow Push Notifications;
-
Sound Notifications.
Once you have defined the notification types, you can specify the conditions for receiving them. The system allows you to select specific events that will trigger a notification. The following configuration options are available:
Leads.
Notifications can be triggered by the following lead-related actions:
-
Creating or editing a lead;
-
Archiving or dearchiving lead;
-
Adding or editing a note;
-
Converting a lead into a client;
-
Adding a new task.
Clients.
Notifications can be triggered by the following client-related actions:
-
Creating or editing a client;
-
Archiving or dearchiving client;
-
Adding or editing a note;
-
Adding a new task;
-
Adding a deal.
Deals.
Notifications can be triggered by the following deal-related actions:
-
Creating or editing a deal;
-
Archiving or dearchiving deal;
-
Adding or editing a note;
-
Creating a delivery;
-
Adding a new task;
-
Adding or editing goods/services;
-
Closing a deal.
Tasks.
Notifications can be triggered by the following task-related actions:
-
Creating or editing a task;
-
Archiving or dearchiving a task;
-
Adding or editing a note;
-
Completing a task;
-
Deadline reminder (24 hours in advance).
Price List.
Notifications for the Price List module are triggered by the following events:
-
Creating or editing a product/service;
-
Archiving or dearchiving a product/service;
-
Adding or editing a note;
-
Adding or editing a barcode.
- Receive notifications about new emails.
Your notification settings are saved automatically; no additional steps are needed.
You can view your notification history by clicking the bell icon in the upper right corner of the screen, next to your SIP number:
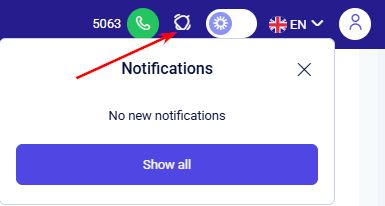
In the window that opens, only new notifications will be displayed. To view the history of all previous or already read messages, as well as your emails, click the Show all button. For more details on how to interact with the notification history, follow this link.
