Leads
This document describes the Leads section in the Teliqon Autodialer Software system. It explains how to manage leads, lead lists, callbacks, blacklist entries, and import processes.
General information
In the Leads section, you can view detailed information regarding your project's leads within Teliqon Autodialer Software:
In the context of Teliqon Autodialer Software, a Lead is a digital customer card containing the minimum set of data (name and phone number) required to automatically connect with an operator at the appropriate time.
This section is divided into the following subsections:
-
Lead lists;
-
Leads;
-
Callbacks;
-
Blacklist;
-
Import leads;
In this section, you can perform the following actions:
-
View complete information about existing lead lists and individual leads;
-
Filter contacts based on their statuses;
-
Manage lead assignments to specific lists or campaigns;
-
Monitor callbacks and modify their settings;
-
Edit the phone number list in the “Blacklist”;
-
Import new customer databases into the system;
-
Delete leads or entire lists from the system.
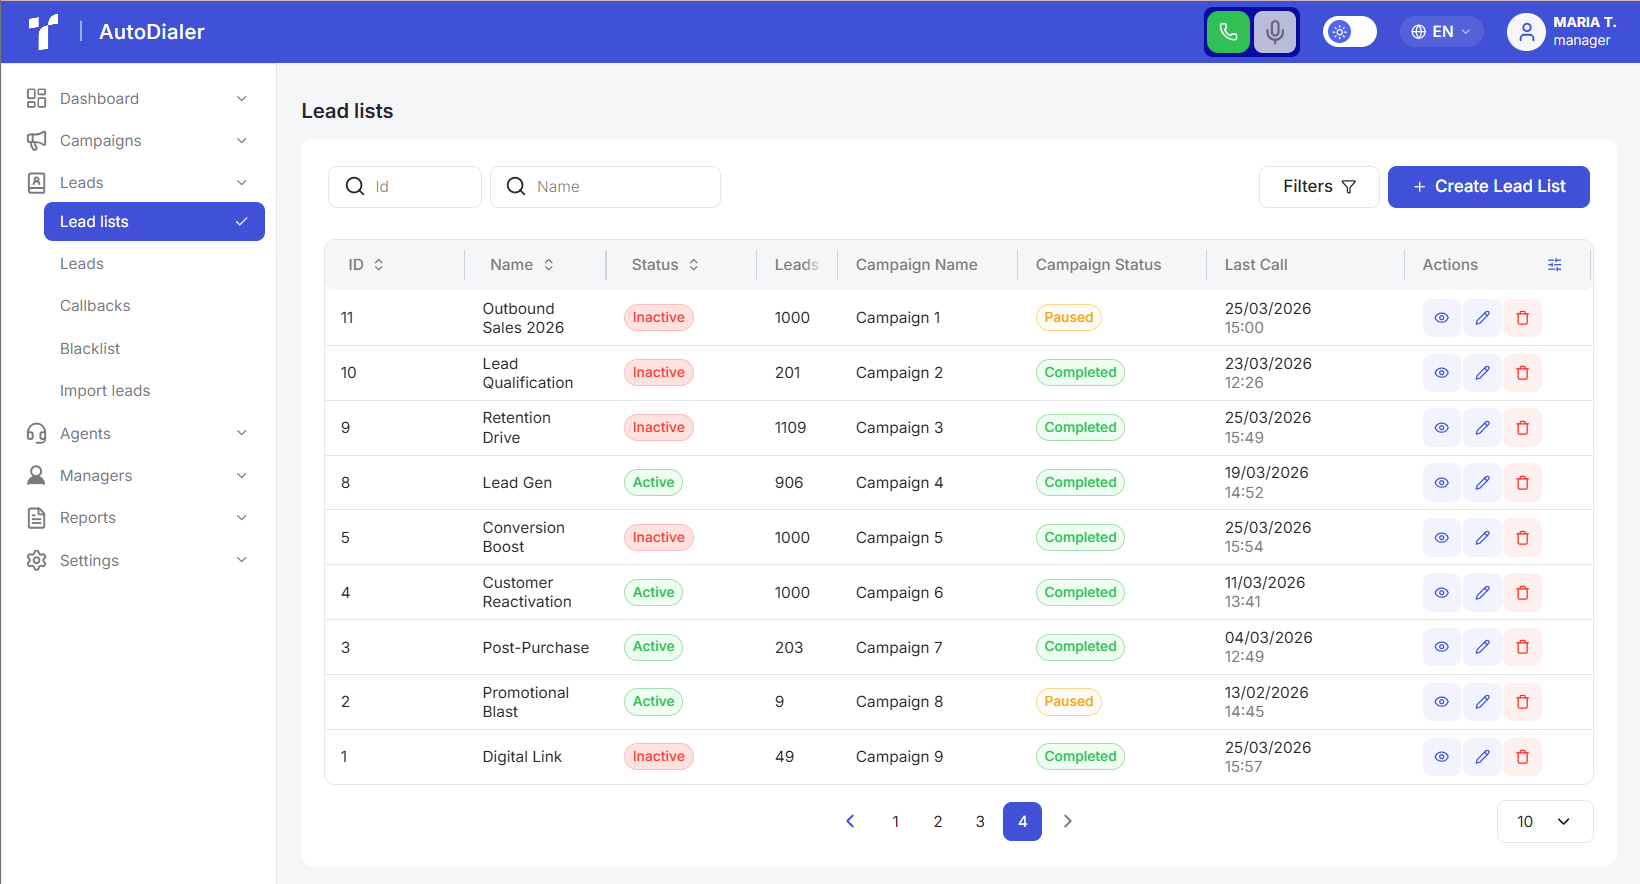
Lead lists
The section contains the following elements:
- Filters.
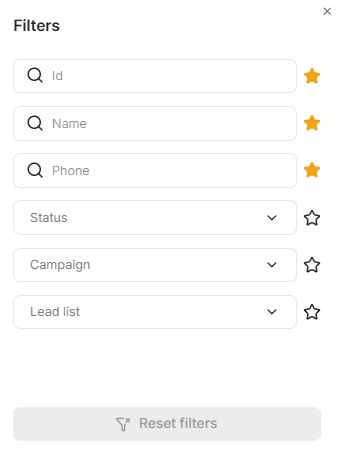
You can configure which filters appear in quick access on the top panel. To do this, click the Filters button to open a pop-up menu where you can add a specific filter to your favorites using the star icon. You can also apply the necessary filters directly within this window:
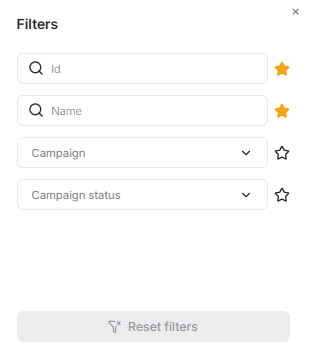
Available filters:
a. Search by ID: A field for quickly finding lists by an exact match in the ID column. Enter the ID number, and the system will automatically filter the records. Search by Name: A field for quickly finding lists by a full or partial match of the lead list name. Simply begin typing the name, and the system will start the search automatically.
b. Campaign: To filter the data by campaign, click the dropdown menu and select one or more options. You can start typing a campaign name to narrow down the list of results. Once selected, the table will only display lead lists belonging to the chosen campaigns.
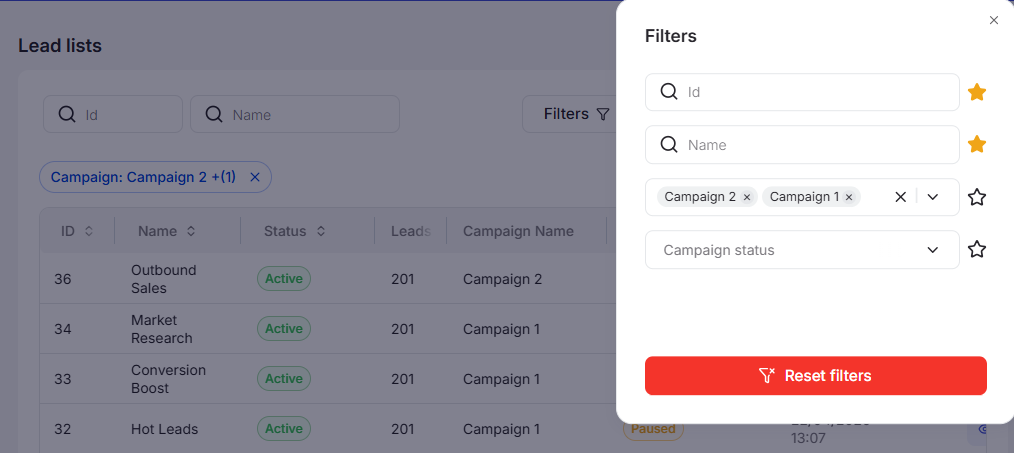
c. Campaign status: Click the dropdown menu to select one or more campaign statuses to filter by. You can start typing a status name to narrow down the available options. Similar to the campaign name filter, the list will update to show only those lead lists belonging to campaigns with the corresponding status.
Additionally, you can combine filters to narrow your search.
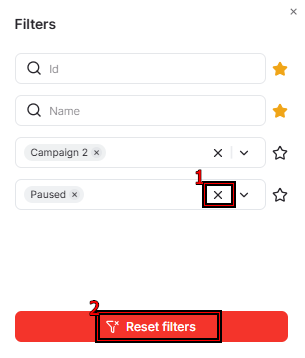
You can reset the configured filters in several ways:
- In the pop-up window - delete each filter individually by clicking the “X” next to the corresponding field (1), or click the “Reset filters” button at the bottom of the window (2) to clear all parameters at once.
- On the top panel - click the “X” next to the name of a specific filter (1) or click the red “Reset filters” button (2) to cancel all active filters.

-
Creating a new Lead list. Detailed description of the button in the corresponding section.
-
The Lead lists table consists of the following columns:
a. ID (list number, assigned automatically);
b. Name;
c. Status (active or inactive);
d. Leads;
e. Campaign Name (the campaign the list is assigned to);
f. Campaign Status;
g. Last Call;
h. Actions.
You can rearrange the column order directly within the table for your convenience. To do this, hover the cursor over the column name. When the cursor changes to a hand icon, press and hold the column with the left mouse button and drag it to the desired position.

A sorting function is also available in the system. To activate this option, click the arrow next to the column name, and the data will automatically be sorted in ascending order. To change the order to descending, click the same arrow again.

Additionally, the system provides the option to individually customize columns; to do this, click the Settings icon:

In the window that opens, you can adjust column widths, use the checkboxes to show or hide specific columns, and change their sequence. To change the order, hover your cursor over the dotted icon. When the cursor changes to a hand icon, press and hold the selected column with the left mouse button and drag it to the desired position:
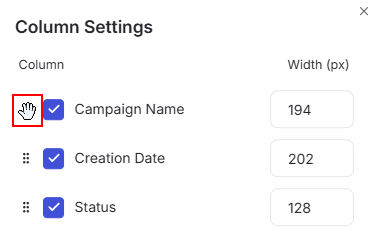
All changes are applied automatically and reflected in the interface instantly. If you wish to revert the column settings to their original parameters, click the Reset to Defaults button.
- Rows per page: Below the table, you can select the number of records to be displayed on a single page. The following options are available:
a. 10;
b. 15;
c. 25;
d. 50;
e. 100.
Creating a new Lead list
To create a new list, click the + Create Lead List button. The following window will appear:
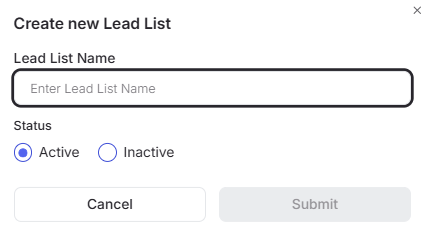
To create a new list, enter a name and select a status. Once confirmed, the new list appears in the main table; however, it is not automatically linked to leads or a campaign. Assign a campaign to this list separately (more details about this are described here and add leads manually (refer to the Leads and Import leads sections for more details).
Viewing an existing Lead list
To view detailed information about a list, double-click the corresponding row or click the View button in the “Actions” column. This will open the details page:
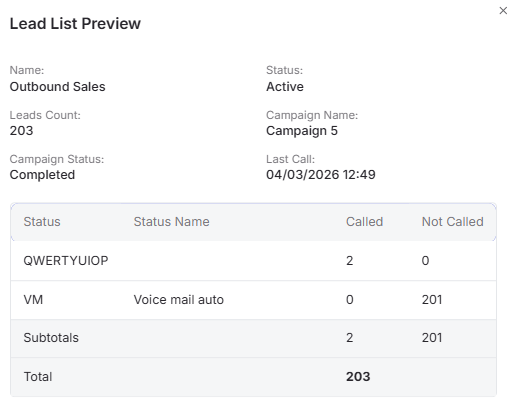
In this window, you can review all fields within the lead list, monitor the completion statuses of calls, and identify which calls have not yet taken place and for what reasons.
Editing an existing Lead list
Clicking the Edit button on the lead lists page opens the following window:
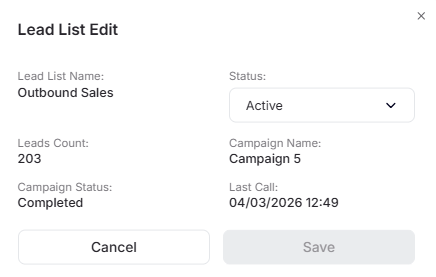
The “Status” parameter in lead lists can be changed by clicking on the corresponding field. A dropdown menu appears where you select the required value. The list status can be active or inactive.
To confirm the chosen status, click Save to update the data in the system. To exit editing mode without saving changes, click the Cancel icon or the X in the top-right corner.
Deleting an existing Lead list
To delete a lead list from the system, click the Delete button on the lead lists page. After clicking, the following pop-up window opens:
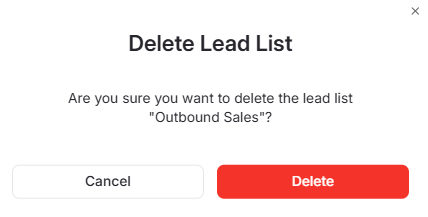
If you change your mind about deleting the lead list, click Cancel or the X icon in the top-right corner of the window. To confirm the action and permanently delete the list, click Delete.
Note: Deleting a lead list is unavailable if it is part of an active campaign.
Leads
The following blocks are available on the leads page:
- Filters.
You can configure which filters appear in quick access on the top panel. To do this, click the Filters button to open a pop-up menu where you can add a specific filter to your favorites using the star icon. You can also apply the necessary filters directly within this window:
Available filters:
a. Search bar by ID: A field for quickly finding leads by an exact character match in the ID column. Enter the ID number, and the system filters the records automatically. Search bar by lead Name: A field for finding leads by a full or partial character match. Simply start typing the name, and the system begins the search automatically.
Search bar by phone number: A field for finding records by a full or partial match in the phone number. Start entering the data, and the system performs the search automatically.
b. Lead status filter. To select the lead status you wish to filter by, click the dropdown list and choose one or multiple values. You can start typing the name of the status to narrow down the list of options. After selecting values from the list, the main table will only show leads with the matching status.
c. Filter by campaign. To select the campaign name associated with the leads, use the dropdown list and choose one or more options. You can start typing the name to quickly find the desired value in the list. Once the selection is confirmed, the main table displays only those lists belonging to the selected campaigns.
d. Lead list filter. To choose a lead list for data filtering, click the dropdown menu and select the required option. You can start typing the name on your keyboard to speed up the search within the list.
Additionally, filters can be combined to narrow down the search.
You can reset filters in two ways: within the filter pop-up window or via the top toolbar. Further details are provided in the Lead lists section.
- Import Leads button. To add all or filtered leads to an existing or new list, click this button and fill in the corresponding fields in the pop-up window:
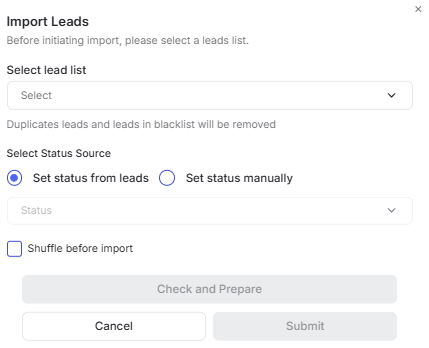
After clicking the Check and Prepare button, the system checks leads for duplicates or blocked numbers and displays the number of leads available for work.
To proceed with the import, click Submit. If you wish to stop the process, click Cancel to discard all pending changes.
- Download Leads button. This button allows you to save all or filtered records to your computer in .csv or .xlsx formats. In the window that appears after clicking, select the desired columns for export and the appropriate file format. The maximum number of records for a single download is 50,000 units.
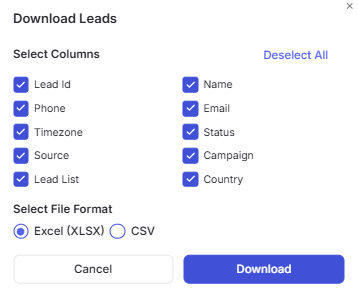
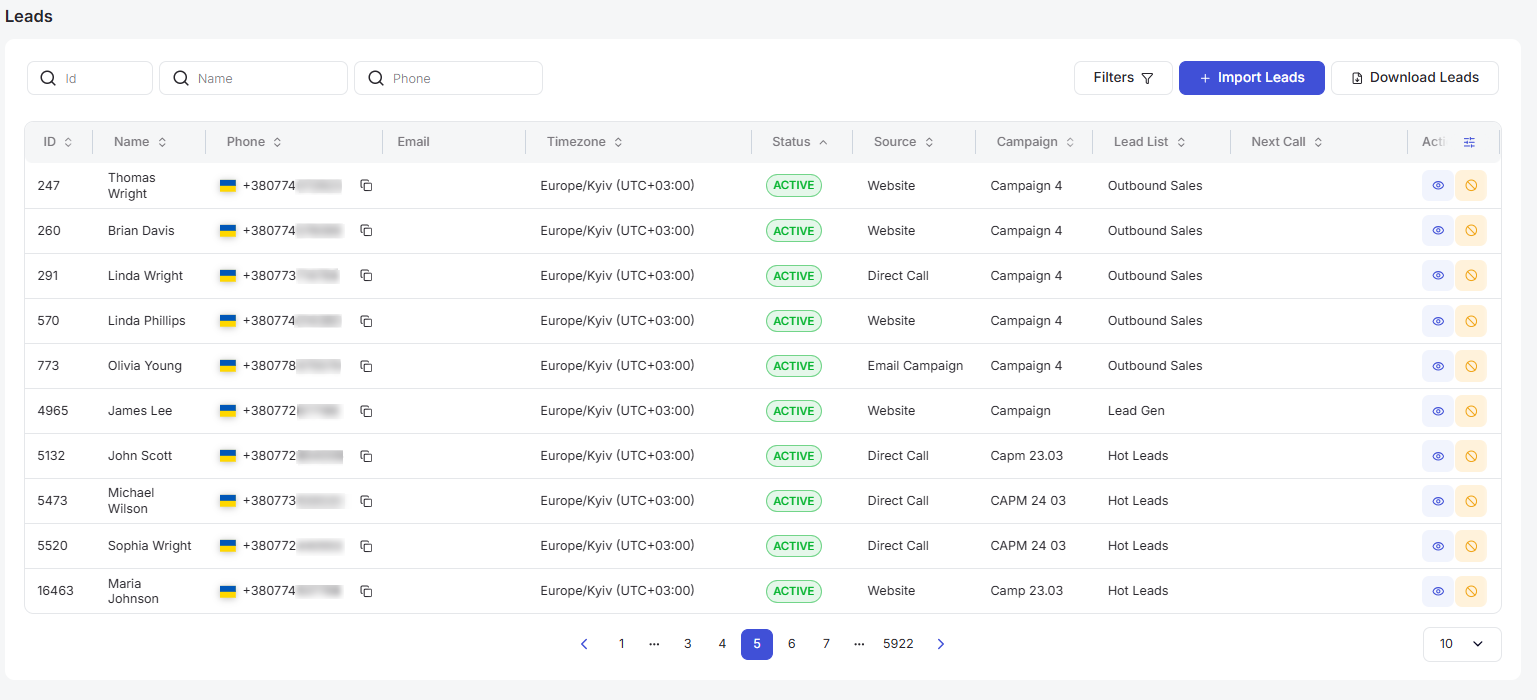
- The Leads table consists of the following columns:
a. ID;
b. Name;
c. Phone;
d. Email;
e. Timezone;
f. Status (it is important to note that the No available agents status is assigned when a customer answers the call but hangs up before a free agent becomes available, or the system automatically disconnects the call due to the timeout limit);
g. Source;
h. Campaign;
i. Lead List;
j. Next Call;
k. Actions.
The leads table can be flexibly customized: you can change the column order, sort records, adjust column widths, and so on. Further details on table management are described in the Lead Lists section.
- Rows per page: Below the table, you can select the number of records to be displayed on a single page. The following options are available:
a. 10;
b. 15;
c. 25;
d. 50;
e. 100.
Viewing an existing lead
To view detailed information about a lead, double-click the corresponding row or click the View button in the “Action” column. Following this, the page with details opens:
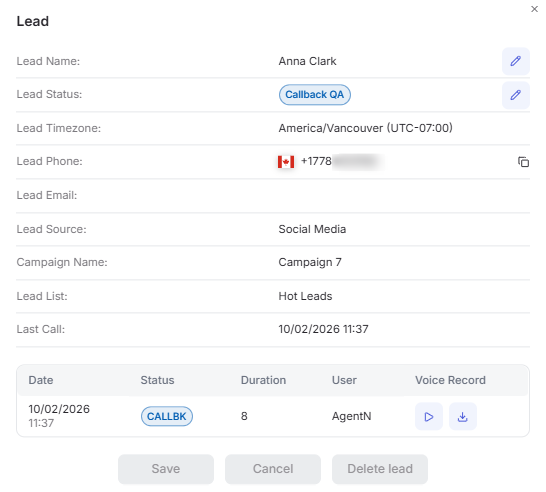
The window displays all contact information, including the timezone, source, and campaign affiliation. To change the name or status, click the edit icon next to the corresponding field. The phone number can be copied using the dedicated buttons.
The bottom part of the window contains the call history, which includes the date, call status, duration, and the name of the agent who handled the call. Each recording can be played back or downloaded to your computer.
To confirm the updated data, click the Save button. If you need to remove the lead from the system, click the Delete lead button.
Note: If the lead belongs to a completed campaign, deleting it while viewing is unavailable. Furthermore, the deletion occurs instantly without requiring additional confirmation.
Blocking an existing lead
To block a lead, click the corresponding button in the “Action” column. A pop-up window will appear:
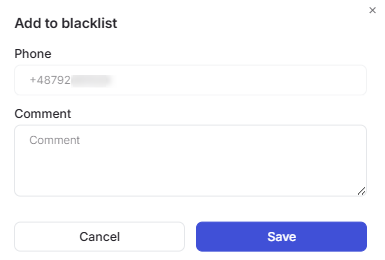
Optionally, you can add a comment to the phone number. To confirm the block, click the Save button. Following this, the number is added to the Blacklist section, from which it can be removed at any time. Detailed information on managing this section is available via the link provided here.
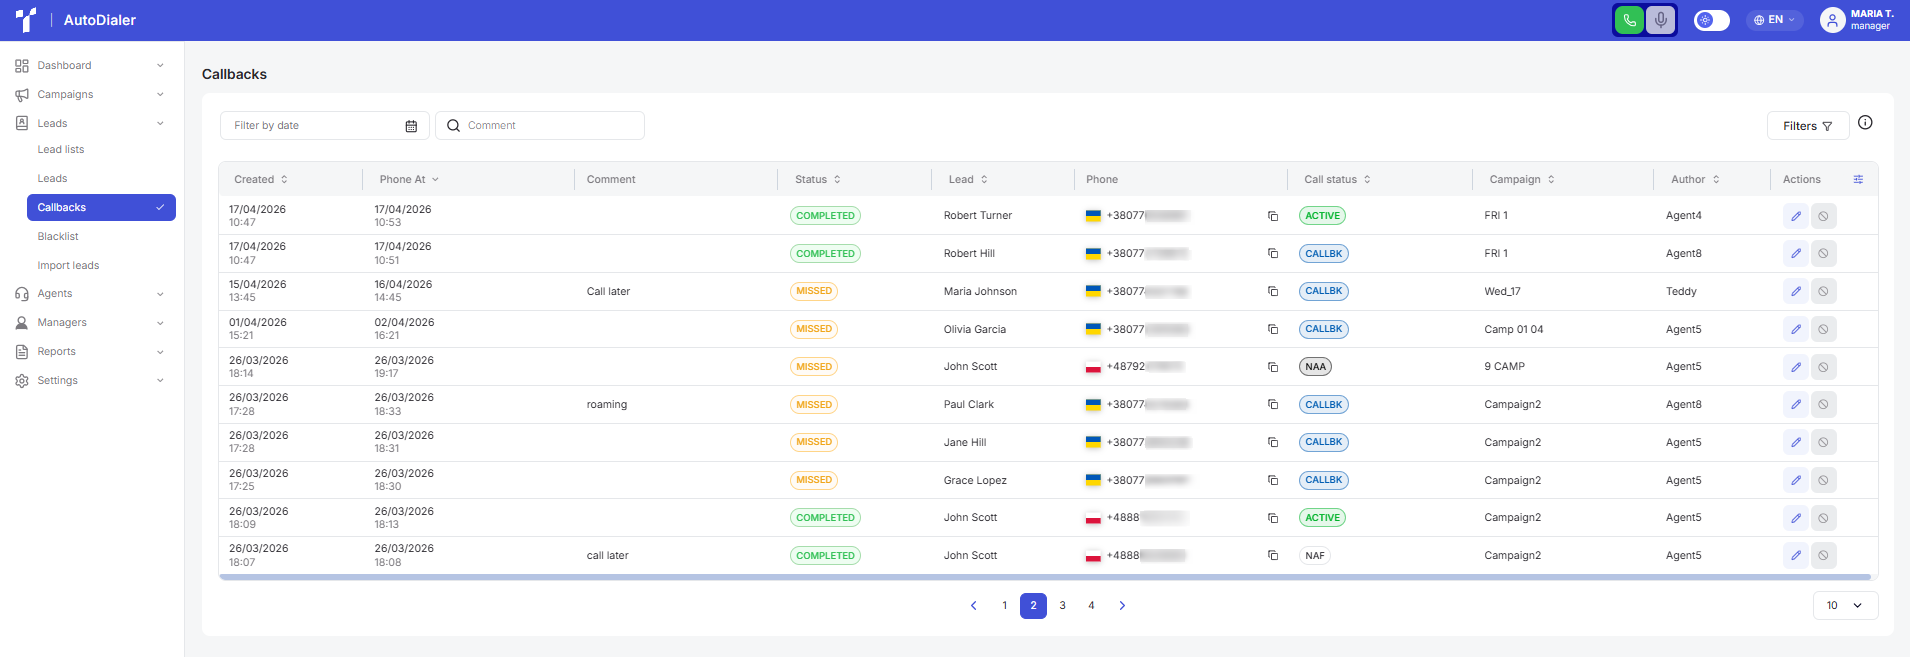
Callbacks
A callback is a scheduled repeat call that an agent creates via the “results menu” to contact a customer. After the date and time are selected in the pop-up window, the system automatically dials the number and connects the customer with a manager at the designated moment. The call is recorded and displayed as a callback within this section.
The Callbacks page includes the following blocks:
- Filters.
You can configure which filters appear in quick access on the top panel. To do this, click the Filters button to open a pop-up menu where you can add a specific filter to your favorites using the star icon. You can also apply the necessary filters directly within this window:
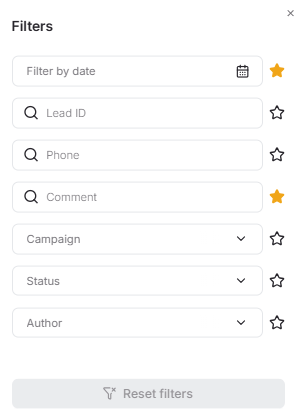
Available filters:
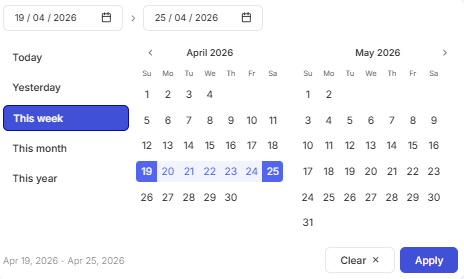
a. Filter by date opens a calendar used to select a date range for callbacks based on the "when to call back" date. After clicking the calendar icon, a pop-up window will appear to select the required period. To set a date range, use one of the following methods:
-
Click the dates on the calendar to select the start and end dates;
-
Select one of the presets (“Today”, “Yesterday”, “This Week”, “This Month”, “This Year”).
To apply the changes, click the Apply button. If you change your mind, you can close the calendar by clicking anywhere outside the window or reset the selected dates using the Clear button.
b. Search bar by lead ID. A field for quickly finding leads based on an exact character match in the ID column. To obtain results, enter the ID number, after which the system will automatically filter the records.
Search bar by lead Phone number. A field for quickly finding records based on a full or partial character match in the phone number. To use the search bar, simply begin entering the data, and the system will automatically initiate the search. Search bar by comment. A field for quickly finding records based on a full or partial character match in the Comment field. To use the search bar, simply begin entering characters, and the system will automatically initiate the search.
c. Campaign. To select the name of the campaign to which leads are linked, use the dropdown list and select one or more options. You can begin typing a name to quickly locate the desired value in the list. After confirming the selection, the main table will display only the records belonging to the selected campaigns.
d. Callback status filter. To select a callback status for filtering, click the dropdown list and select one or more values. You can begin typing the status name to narrow down the list of available options. After selecting the values from the list, the main table will display only the callbacks with the corresponding status.
e. Agent (Author) filter. To select the name of the agent who created the callback, click the dropdown list and select one or more options. You can begin typing the name to speed up the search within the list. After selecting the values, the main table will display only the calls assigned to the selected agents.
Additionally, you can combine filters to narrow your search.
You can reset filters in two ways: within the filter pop-up window or on the top toolbar. Further details are provided in the Lead Lists section.
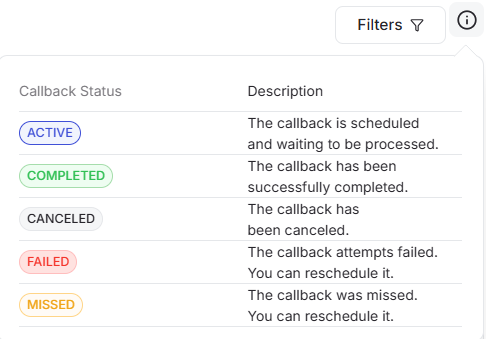
- An Information icon providing a tooltip that outlines the existing callback statuses upon interaction:
- The Callbacks table includes the following columns:
a. Created;
b. Scheduled Time;
c. Comment;
d. Status;
e. Lead;
f. Phone;
g. Call status (from the agent);
h. Lead campaign;
i. Author (agent who created the callback);
j. Actions.
The callback table can be flexibly customized in the same way: you can change the column order, sort, adjust column sizes, and so on. Further details on table management are described in the Lead Lists section.
- Rows per page: Below the table, you can select the number of records to be displayed on a single page. The following options are available:
a. 10;
b. 15;
c. 25;
d. 50;
e. 100.
Editing a Callback
To edit a callback, double-click the corresponding row or click the Edit button in the “Actions” column. This will open the callback details page:

In this window, you can modify the scheduled call time provided that the corresponding campaign has not yet ended, and use the available field to add or update comments for the call. Additionally, the window displays reference information such as the campaign name, lead data, the assigned agent's name, and the time of the last call.
To apply the updated parameters, click the Save changes button, or use the Cancel button if you wish to exit editing mode without saving any changes.
Canceling a Callback
You can cancel a callback if the campaign has not yet ended. To do this, click the corresponding button in the “Actions” column, and a pop-up window will appear:
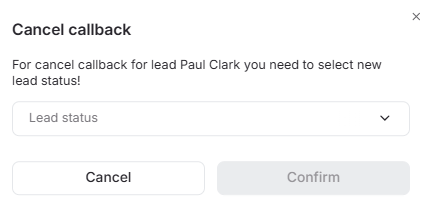
In this form, you need to select a lead status and confirm the changes. Once completed, the callback record will be assigned the “Cancelled” status, and the lead will be updated with your selected status. As a result, the system will not initiate an automatic callback to the client.
Blacklist
On the Blacklist page, you can add phone numbers that the system will automatically ignore during lead list processing. This allows you to exclude unwanted contacts from the dialing process, regardless of the current campaign settings.
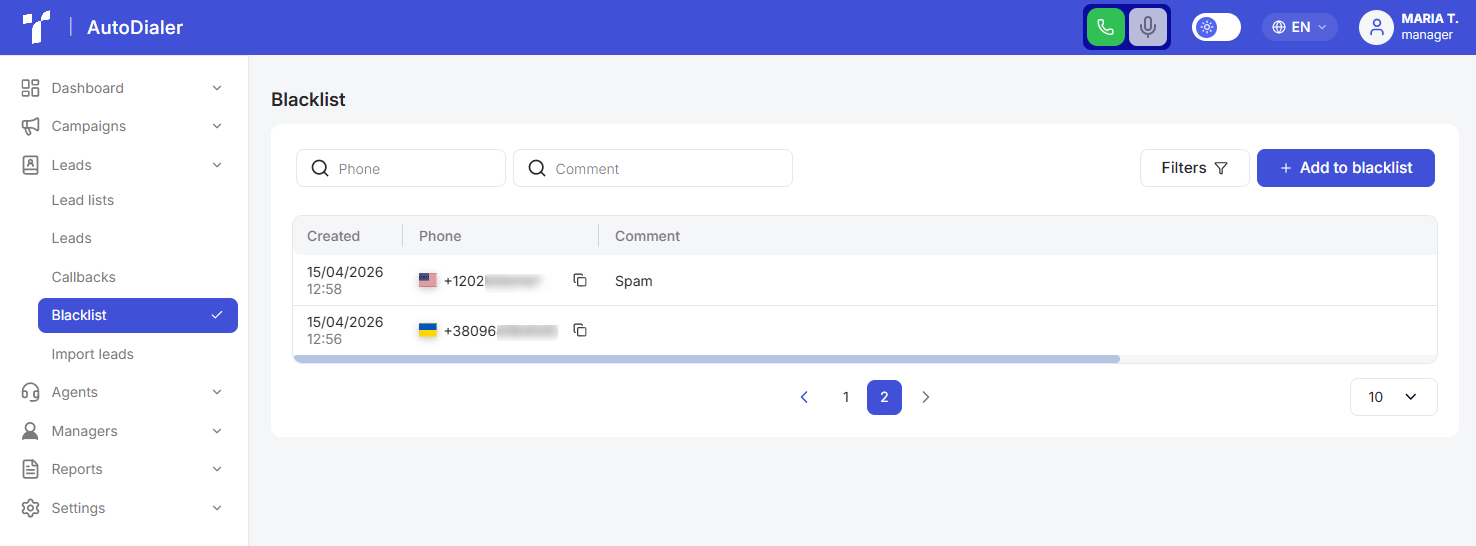
The page features:
- Filters.
You can configure which filters appear in quick access on the top panel. To do this, click the Filters button to open a pop-up menu where you can add a specific filter to your favorites using the star icon. You can also apply the necessary filters directly within this window:
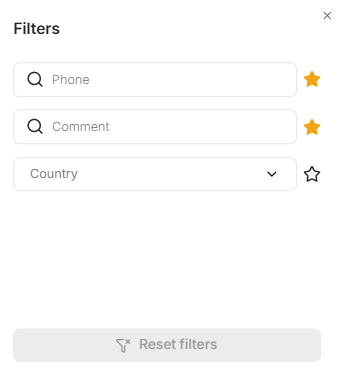
Available filters:
a. By phone;
b. By comment;
c. By country.
Detailed instructions on the configuration and operation principles of filters are provided in the previous sections of the documentation.
- Add to Blacklist button. Clicking this button opens a window where you need to enter the phone number and, if necessary, leave a comment:
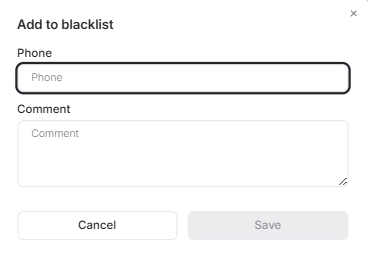
You can also quickly add a lead's number to the blacklist through the “Leads” section.
- Blocked numbers table. The table consists of the following columns:
a. Created;
b. Phone;
c. Comment;
d. Actions. To remove a number from the blacklist, click the delete icon. To change information about a blocked contact, use the edit icon or double-click the contact.
The blocked numbers table can be flexibly customized: you can change the column order, sort, adjust column sizes, and so on. Further details on table management are described in the Lead Lists section.
- Rows per page: Below the table, you can select the number of records to be displayed on a single page. The following options are available:
a. 10;
b. 15;
c. 25;
d. 50;
e. 100.
Import leads
On this page, you can upload new contacts to the system using a dedicated form:
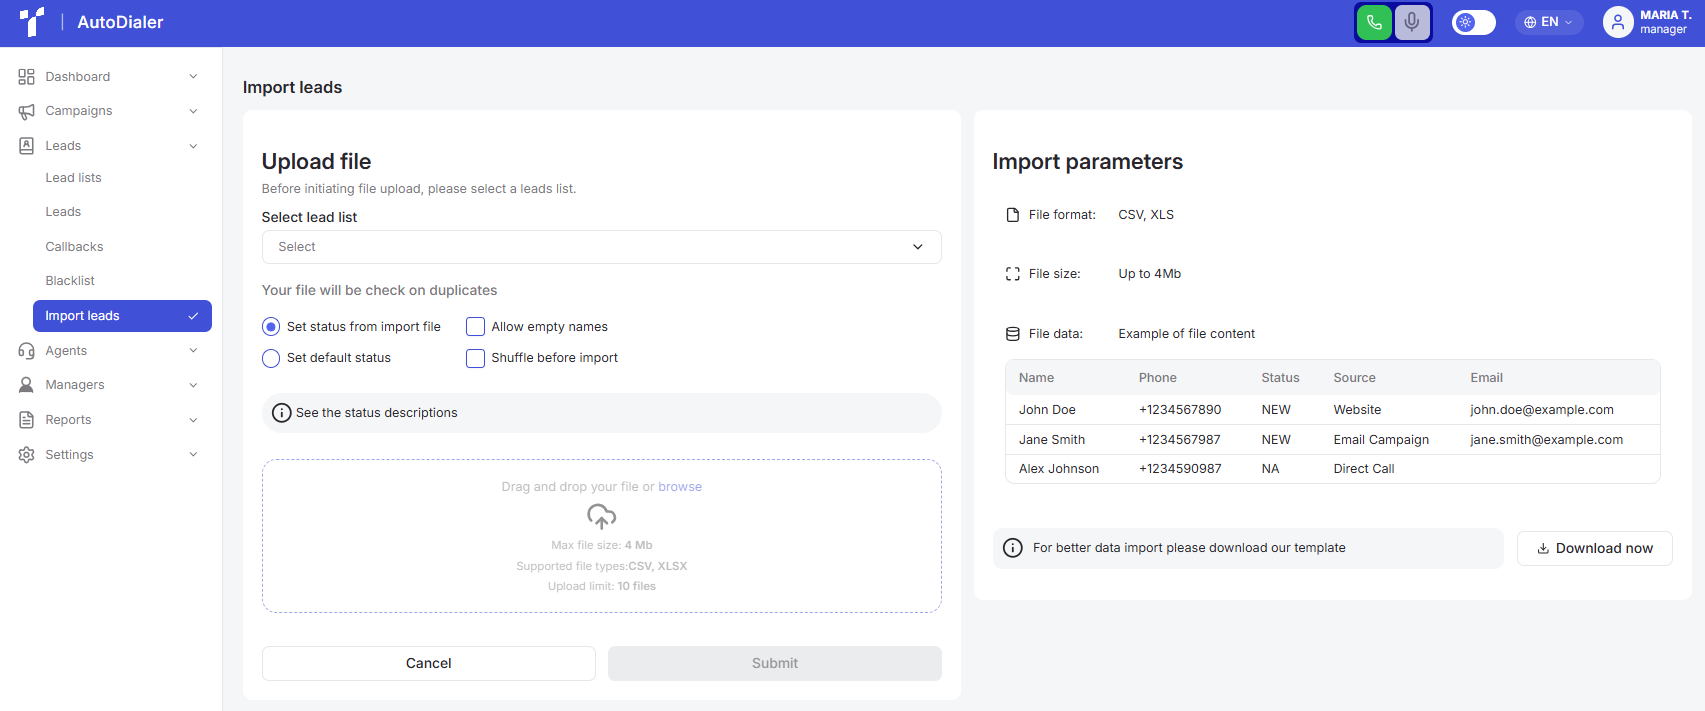
Before starting to upload leads to the system, review the import parameters displayed in the respective window. You can prepare the file yourself by following the specified requirements or use a ready-made template. To save a sample to your computer, click the Download now button:
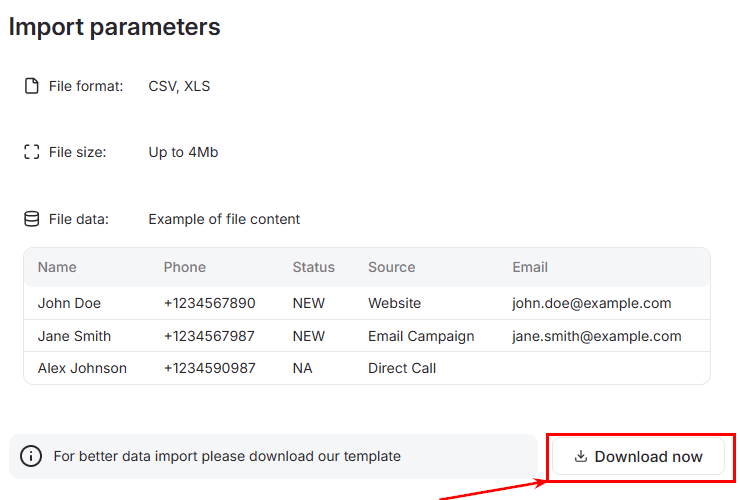
The file can contain multiple columns, but only two of them are required to be filled. Any additional data not included in the list below will be ignored by the system during the upload process.
-
Name. A required field with a maximum length of 64 characters. The column must be named exactly this way, though the system accepts any letter case and the use of spaces. Other symbols or translations of the word are not supported. Examples: name, NAME, NaMe, etc.
-
Phone. A required parameter, limited to 16 characters. The system strictly recognizes this word, but you can alter its case or add spaces. Other symbols or translations of the word are not supported. Examples: phone, PHONE, PhoNe, etc.
-
Status. An optional column that holds up to 12 characters. The word must remain unchanged, but any letter case and the use of spaces are allowed. Examples: status, STATUS, statuS, etc.
-
Source. An optional field with a maximum length of 70 characters. The column must be named exactly like this, but you can change the letter case and include spaces. Examples: SOURCE, source, etc.
-
Email. An optional parameter that is not required. The name must feature the word “email”, where you are only allowed to change the case or use spaces. Examples: email, EMAIL, emaiL, etc.
To ensure correct data processing, check that column names and value lengths match the requirements before starting the import. Once the data is structured and the file is fully prepared, you can proceed to the next stage - importing leads directly into the dialer system. For a successful upload, verify that all parameters in the file align with the requirements specified in the Import parameters window.
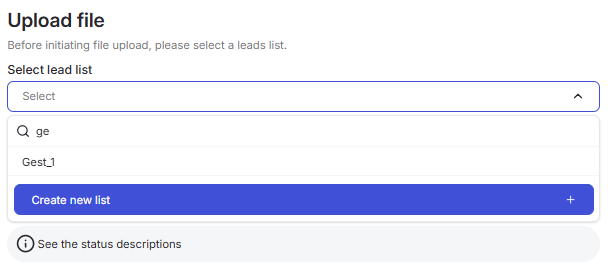
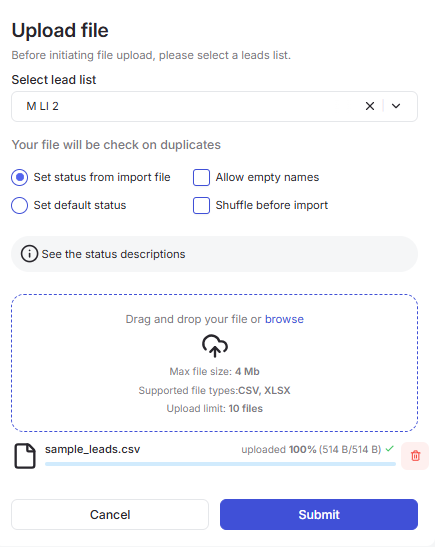
To import leads into the system, you need to:
- Select the lead list where the leads will be imported. Leads can be imported into an existing list or uploaded to a new one. Use the search bar for a quick search within the database.
To quickly create a new list, click the lead list dropdown menu and select Create new list +:
- Select a status assignment option - either set the status directly from the import file or apply a default status (NEW):
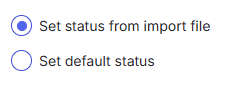
You can view lead statuses and their descriptions by clicking the See the status descriptions button:
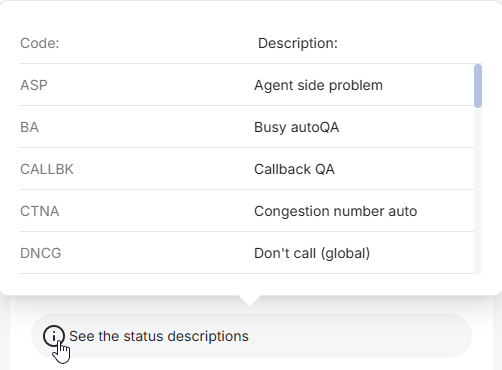
Instructions on how to configure statuses are described in this article.
- If necessary, use one of two options to improve lead importing, specifically:
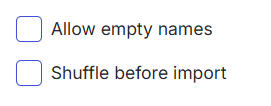
a. Allow empty names. This option permits uploading contacts even if the Name field is blank. You must activate this setting before starting the import process (uploading the file). Keep in mind that the Name column must still exist in your .csv file, even if it is empty.
b. Shuffle before import. This function randomizes the order of leads before they are added to the system. You can enable this either before or after selecting the file for import. Note that shuffling occurs only within each individual .csv file; if you upload multiple documents, the contacts inside each will be reordered, but the files themselves will not be mixed together.
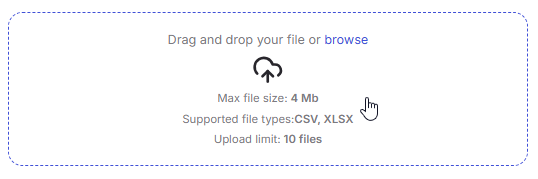
- Next, upload the contact file by clicking the designated field or dragging the files into the upload area:
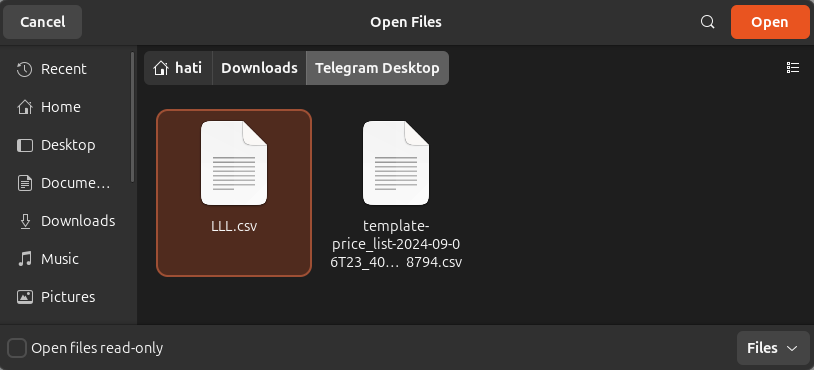
- In the next step, select the required document from your device using the system's standard dialog box. Note that the appearance of this window may vary depending on your operating system (Ubuntu, Windows, or macOS). Once you have selected the file, click Open to confirm and proceed to the next step:
- Once the file has been selected and uploaded, you can Confirm the import:
- Done: After the upload is complete, the new lead list will be displayed on the Lead lists page.
Please note that the “Duplicate Number Check” option is always active by default. This means that before a file is uploaded, the system scans for phone numbers already present in that specific lead list. If any matches are found, the import will be canceled and an error message will appear. However, keep in mind that the same number can still be added to different lead lists without any restrictions.
Potential Lead Import Issues
If the system detects issues during file processing, such as validation errors, duplicate numbers, or unknown statuses, corresponding messages will appear on the screen. To proceed with the import, you must resolve the identified errors:
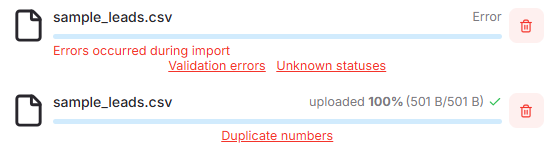
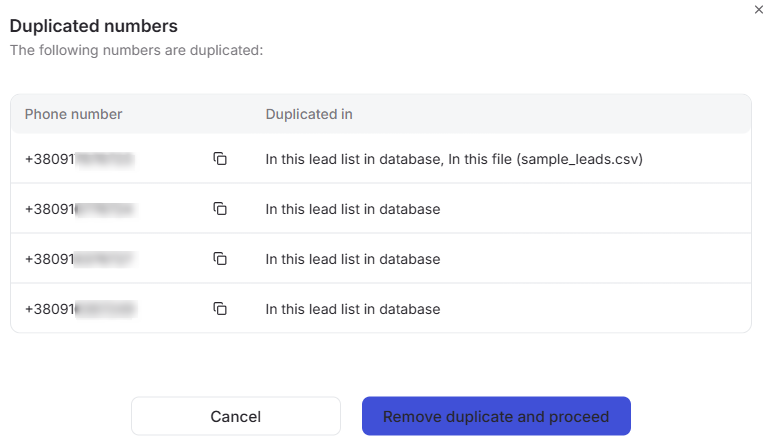
To remove duplicate contacts, use the Duplicate numbers button. After clicking it, a window will open with a full list of identified duplicates and tools for their removal. Further lead uploading will only be possible after the list is completely cleared of copies:
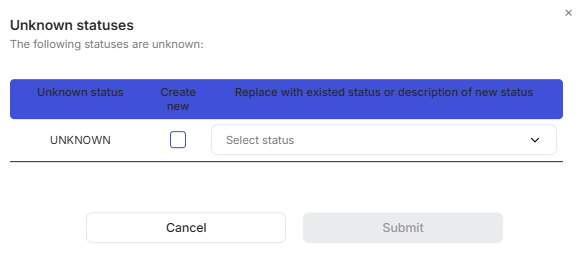
To fix errors related to unknown statuses, click the Unknown statuses button. In the window that appears, you need to choose one of two options to resolve the issue: automatically create new statuses based on the data from the file or replace all current values with those already existing in the database.
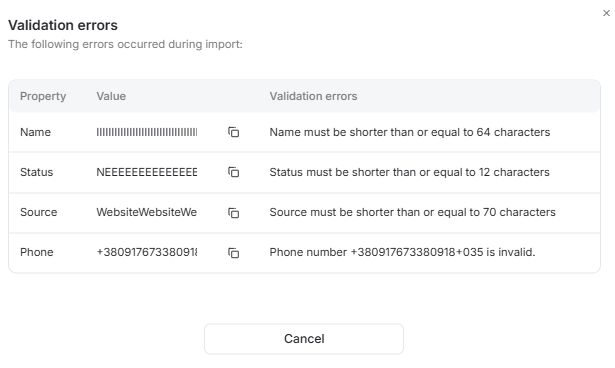
To resolve validation errors, click the corresponding button. The system will then highlight the specific fields where issues were found, allowing you to make corrections and proceed with the import:
After all identified errors have been resolved, you will be able to continue uploading contacts.
Campaigns
This document describes the Campaigns section in Teliqon Autodialer Software and explains how to view, filter, create, edit, and delete campaigns. It covers campaign lists, filters, campaign settings, recycle rules, callback settings, routes, and lead list management.
Agents
This document describes the Agents section in the Teliqon Autodialer Software system. It explains how to view, create, edit, block, and delete agents. It also covers agent groups and explains how agents can be organized without duplicates.
