Campaigns
This document describes the Campaigns section in Teliqon Autodialer Software and explains how to view, filter, create, edit, and delete campaigns. It covers campaign lists, filters, campaign settings, recycle rules, callback settings, routes, and lead list management.
General information
The Campaigns section contains information about your project's campaigns in Teliqon Autodialer Software:

Campaign - a separate project for automatic calls to your customer base. In this section, you can view information about existing campaigns, manage their statuses, create new campaigns, and edit or delete them.
Campaign list
The Campaign list tab contains the following elements:
- Filters. You can configure which filters appear in quick access on the top panel. To do this, click the Filters button to open a pop-up menu where you can add a specific filter to your favorites using the star icon. You can also apply the necessary filters directly within this window:
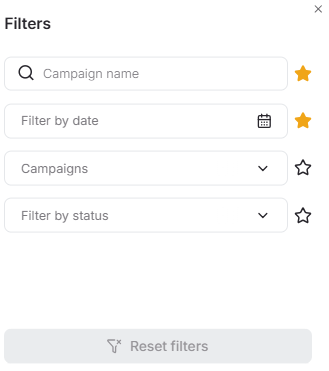
Available filters:
a. Search Bar - provides a convenient search for campaigns by full or partial matching of characters in the campaign name. To use it, simply enter the campaign name and the system will automatically start the search. The search is case-sensitive, so you need to enter the name with correct capitalization to get accurate results.
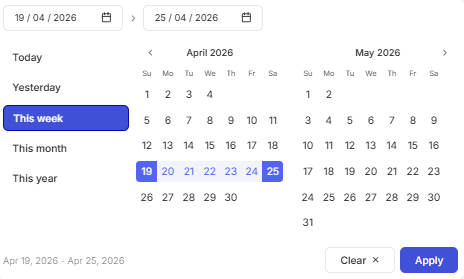
b. Filter by date opens a calendar used to select a date range for when campaigns were created. After clicking the calendar icon, a pop-up window will appear to select the required period. To set a date range, use one of the following methods:
-
Click the dates on the calendar to select the start and end dates;
-
Select one of the presets (“Today”, “Yesterday”, “This Week”, “This Month”, “This Year”).
To apply the changes, click the Apply button. If you change your mind, you can close the calendar by clicking anywhere outside the window or reset the selected dates using the Clear button.
c. Campaigns. To select a campaign name to filter the data, click the dropdown list and choose one or more options. You can start typing the campaign name to narrow down the list of available values. Once selected, only the corresponding campaigns will be displayed in the general list.
d. Filter by status. To select a status to filter by, click the dropdown list and choose one or more values. You can start typing the status name to narrow down the list of options. Similar to the campaign name filter, once the values are selected, only campaigns with the corresponding status will be displayed in the general table.
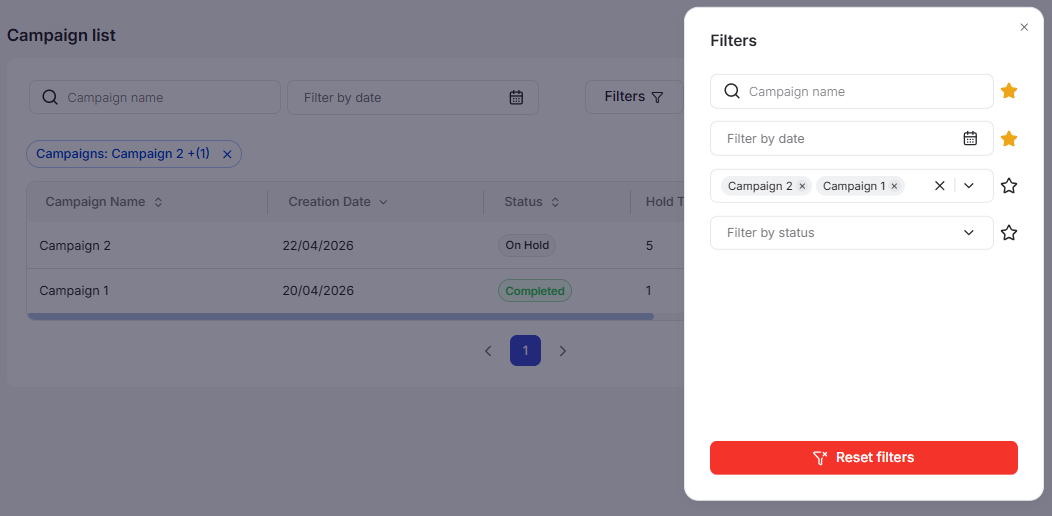
Additionally, you can combine filters to narrow your search. You can reset the configured filters in several ways:
- In the pop-up window - delete each filter individually by clicking the “X” next to the corresponding field (1), or click the “Reset filters” button at the bottom of the window (2) to clear all parameters at once.
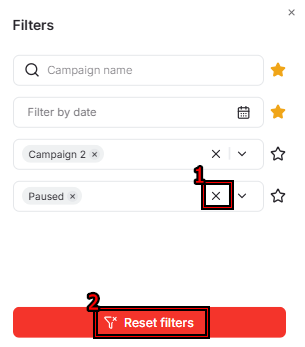
- On the top panel - click the “X” next to the name of a specific filter (1) or click the red “Reset filters” button (2) to cancel all active filters.

-
Adding a new Campaign. Detailed description of the button in the corresponding section.
-
The Campaign table consists of the following columns:
a. Campaign Name;
b. Creation Date;
c. Status;
d. Hold Time;
e. Mode;
f. Work Hours;
g. Leads for Calling;
h. Postponed (this row displays calls that were not completed because the campaign's working hours ended, as well as unprocessed callbacks and recycle attempts);
i. Agents;
j. Action (you can start or pause a campaign using the action controls. Additionally, you can view, edit, or delete a campaign).
You can find more detailed information about these parameters in the Adding a new Campaign section. You can rearrange the column order directly within the table for your convenience. To do this, hover the cursor over the column name. When the cursor changes to a hand icon, press and hold the column with the left mouse button and drag it to the desired position.

A sorting function is also available in the system. To activate this option, click the arrow next to the column name, and the data will automatically be sorted in ascending order. To change the order to descending, click the same arrow again.

Additionally, the system provides the option to individually customize columns; to do this, click the Settings icon:

In the window that opens, you can adjust column widths, use the checkboxes to show or hide specific columns, and change their sequence. To change the order, hover your cursor over the dotted icon. When the cursor changes to a hand icon, press and hold the selected column with the left mouse button and drag it to the desired position:
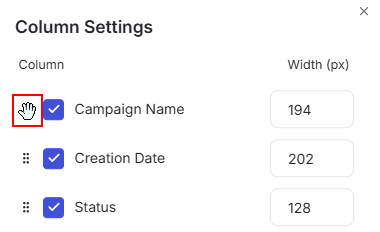
All changes are applied automatically and reflected in the interface instantly. If you wish to revert the column settings to their original parameters, click the Reset to Defaults button.
- Rows per page: Below the table, you can select the number of records to be displayed on a single page. The following options are available:
a. 10;
b. 15;
c. 25;
d. 50;
e. 100.
Adding a new Campaign
When you click the + Add new Campaign button, the following form with parameters will open:
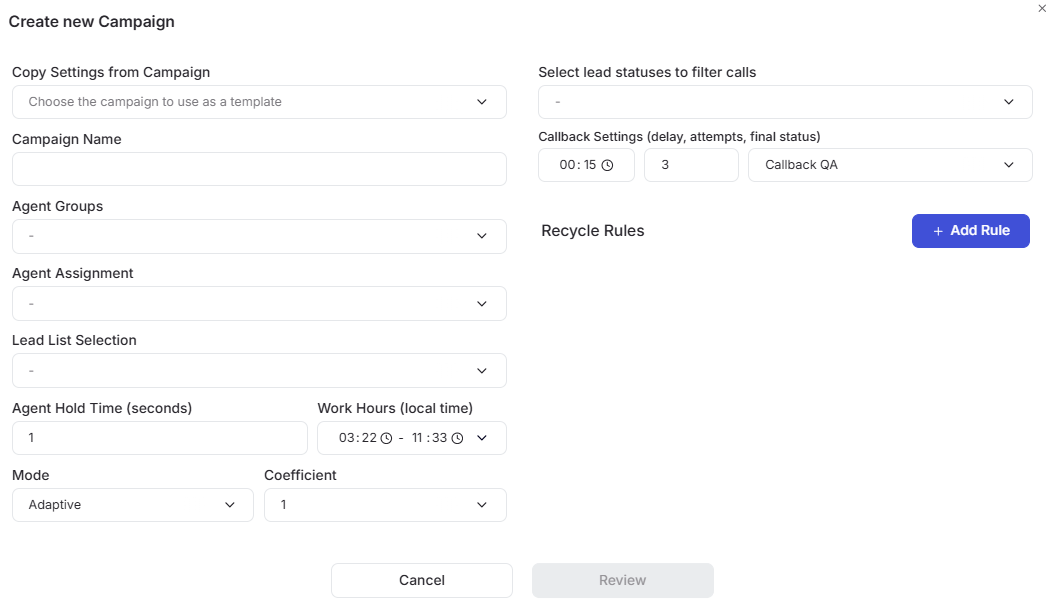
a. Copy Settings from Campaign. You can select a previously created campaign whose settings will be automatically copied for the new one. These parameters can be edited if desired. This field is optional;
b. Campaign Name *;
c. Agent Groups;
d. Agent Assignment *;
e. Lead List Selection;
f. Agent Hold Time (seconds) *;
g. Mode;
h. Coefficient;
i. Work Hours (local time);
j. Select lead statuses to filter calls *;
l. Callback Settings *;
Recycle Rules.
All fields marked with an asterisk ( * ) are required.
Agent Groups - preconfigured sets of operators managed in the “Agents” → “Agent groups” section. Using groups allows for the quick assignment of a team to handle calls. Agent Assignment - provides the ability to select specific employees from the list individually. You can select a predefined group and then use the Agent Assignment field to add extra agents who are not members of that group. Lead List Selection - a set of contacts that the system will use to make calls. You can find more details on how this section works in the Leads block.
Agent Hold Time (seconds) - the period during which an agent remains between “active calls”. This means they are not interacting with a client but stay on the line in real-time, ready to continue working.
You can choose one of two options for the Mode:
- Fixed. The dialer calls a set number of leads simultaneously, regardless of how quickly agents become available. Example: If the system is set to make 3 calls at once, it will perform exactly that number of calls without considering whether operators are busy or free. Risks:
a. If all agents are busy, calls may be stuck in a queue or missed.
b. If all agents are free, there may not be enough calls, causing operators to wait for a connection.
- Adaptive. In this mode, the system analyzes the number of available agents and the call processing speed. Based on this data, the dialer automatically determines how many numbers to dial simultaneously. Key points:
a. If agents are busy, the system reduces the number of calls.
b. If agents become available, the system increases the number of calls.
This mode is suitable for dynamic workflows where it is essential to distribute calls efficiently and minimize customer wait times.
Coefficient. This is a multiplier used to determine the number of calls relative to the number of agents. For example, if you have 10 agents in a campaign and select a coefficient of 2, the system will attempt to initiate 2 calls for every agent:
-
Fixed mode - the system will always initiate 20 calls (Total agents in the list × Coefficient).
-
Adaptive mode - the number of calls is calculated dynamically based on availability (Number of free agents × Coefficient).
Work Hours - this is the time interval based on the lead's local time during which the system is permitted to make calls.
Select lead statuses to filter calls - these are the specific lead statuses that will be included in the campaign. Example: If your lead list contains contacts with the status “Not Interested”, but you do not specify this status when creating the campaign, the system will skip these leads and they will not be dialed.
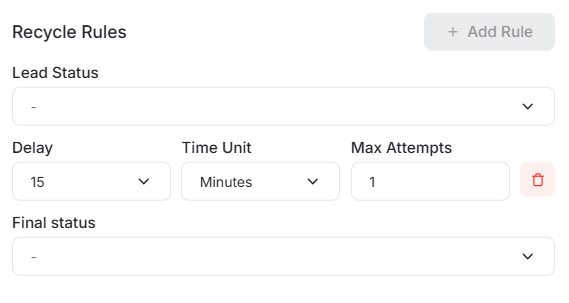
Recycle Rules define the conditions under which the system automatically schedules a redial for a lead after an agent has assigned them a specific status following a call. When adding a rule, you need to fill in the following parameters:
-
Lead Status: if an agent assigns a specific status to a lead after a call, the system identifies that this lead is subject to a redial rule.
-
Delay: determines the amount of time the system waits before attempting to call the lead again (e.g., 15 minutes or 2 hours). Note: The available values in the "Delay" field change based on the selected Time Unit.
-
Time Unit: specifies the unit of measurement for the delay interval. You need to choose one of the available options: Minutes, Hours, Days, Weeks, or Months.
-
Max Attempts: indicates the total number of times the system will attempt to redial a single lead (e.g., a maximum of 3 attempts).
-
Final Status: if the agent continues to select the same triggering status after the redial attempts are exhausted, the system automatically changes it to this “final status” to prevent an infinite dialing loop.
The Callback Settings parameter defines the conditions under which the system will perform callbacks. It typically includes the following elements:

-
Delay: determines how long the system waits after the initial call before attempting to call the lead back (e.g., 15 minutes or 2 hours).
-
Attempts: specifies the total number of times the system will try to dial the number again (e.g., a maximum of 3 attempts).
-
Final Status: if the agent assigns the same status again after a callback attempt, the system automatically changes it to this final status to prevent an endless dialing loop.
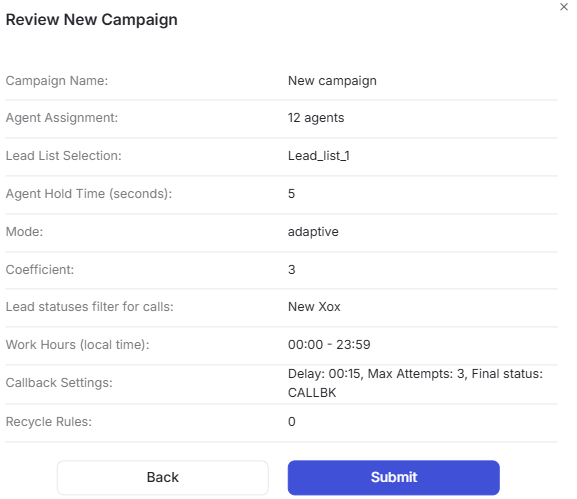
After filling in all the campaign fields, the system will prompt you to review the selected parameters. If all information is correct, click the Submit button to complete the setup process. The Back button allows you to return to the settings to make any necessary edits.
Viewing an existing Campaign
To view detailed information about a campaign, double-click the corresponding row or click the View button in the “Action” column. After this, a page with details will open:
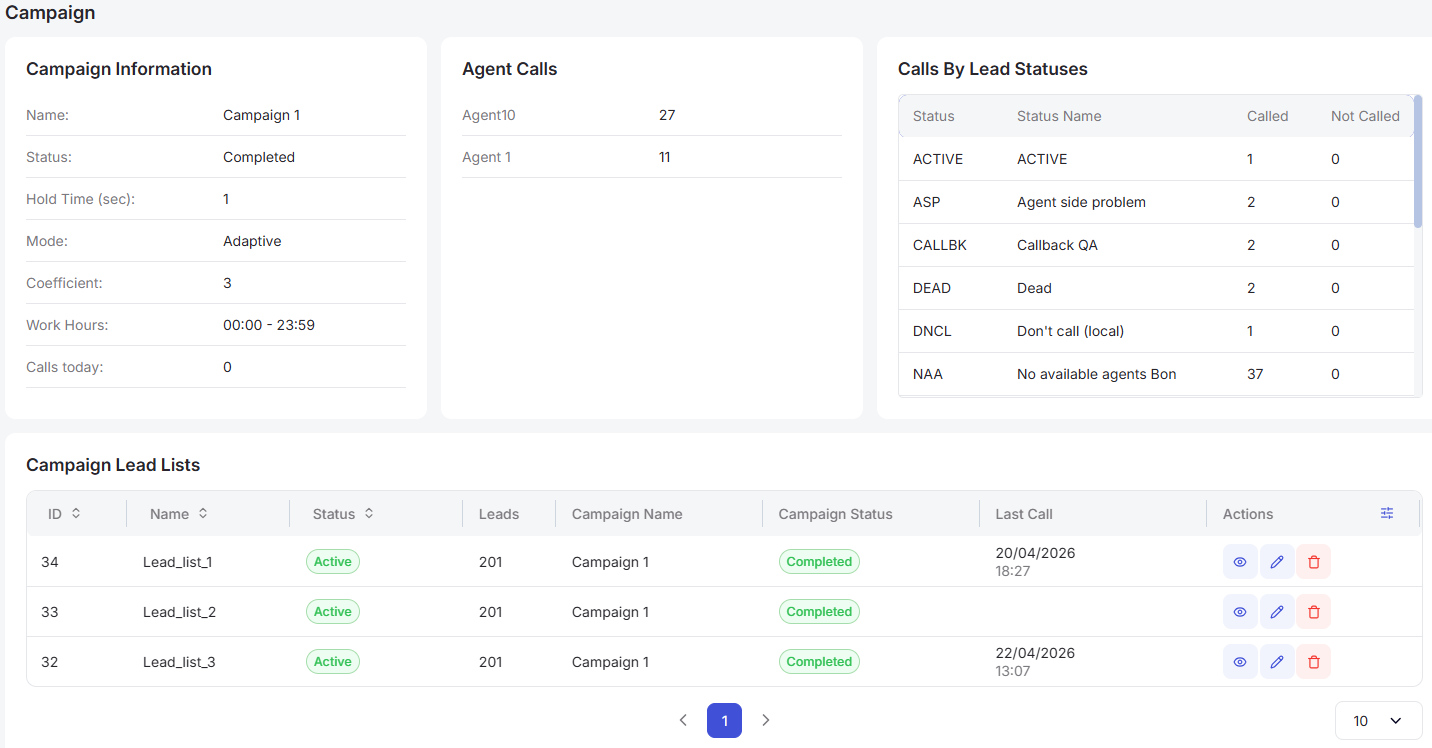
On this page, you can view campaign information, including the number of calls processed by each individual agent, the lead count broken down by status, and the lead lists associated with the campaign. The “Campaign Lead Lists” block can also be viewed, edited, or deleted, and you can further customize the column width and order by clicking the settings icon: You can find more detailed information regarding the Lead list settings in this section.

Deleting an existing Campaign
Upon clicking the Delete icon in the campaign row, a window will open where you need to choose one of three options:
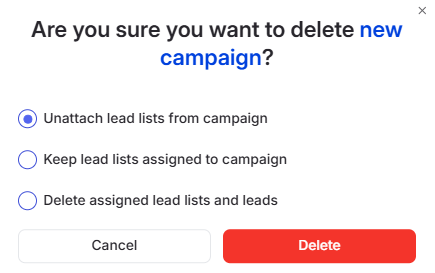
-
Unattach lead lists from campaign. In this case, the lead lists will remain in the system as separate objects, while the campaign itself is deleted.
-
Keep lead lists assigned to campaign. The campaign will be deleted, but the lead lists will remain in the system associated with the deleted campaign.
-
Delete assigned lead lists and leads. This option results in the complete removal of the campaign along with all linked lead lists and the leads themselves.
To delete a record, click Delete. To cancel the deletion, click Cancel.
Editing an existing Campaign
Upon clicking the Edit icon in the campaign row, the following window will open:
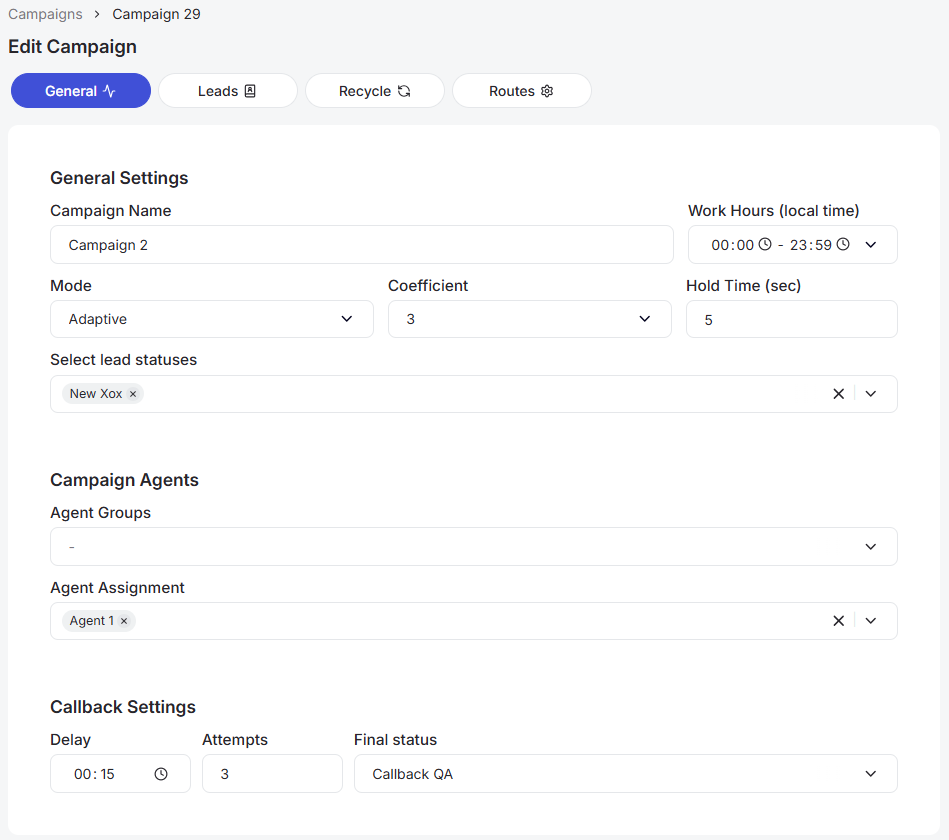
In this window, you can edit campaign data. For your convenience, the following tabs are available:
-
General - general campaign settings.
-
Leads - a list of leads and lead lists within the campaign.
-
Recycle - rules for automatic redialing.
-
Routes - call routing (settings determining which phone number will be used for outbound calls).
General
In this tab, you can edit the primary campaign parameters, including:
-
Campaign Name;
-
Hold Time (sec);
-
Mode;
-
Coefficient;
-
Work Hours;
-
Lead Status Selection;
-
Callback Settings;
-
Agent Groups;
-
Agent Assignment.
More detailed information regarding these parameters is provided above.
Leads
In this tab, you can edit the lead lists for the selected campaign:
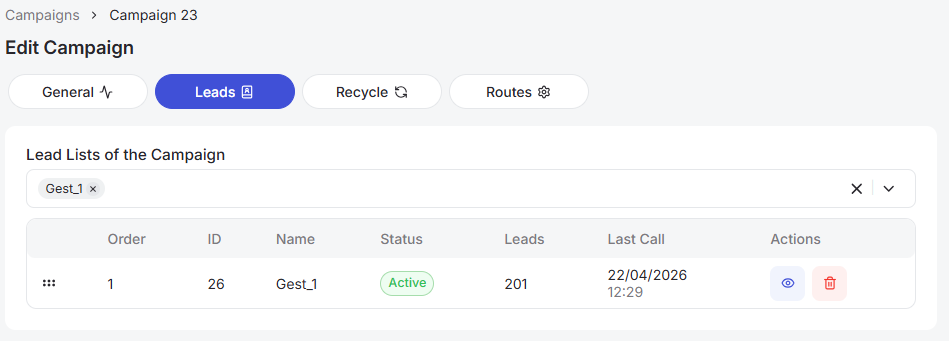
You can select from the available lead lists. To quickly find the one you need, start typing the list name in the dropdown field:
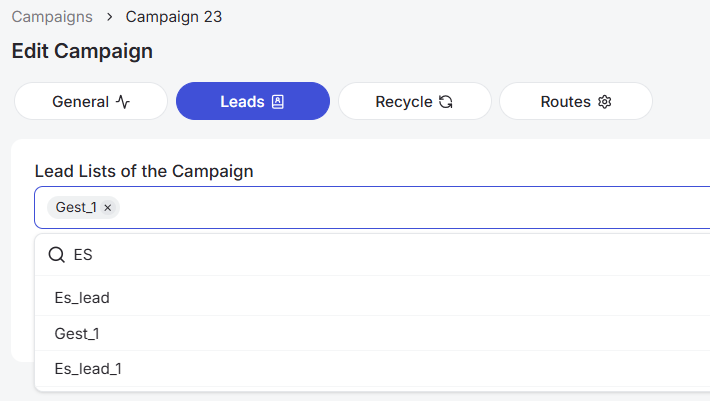
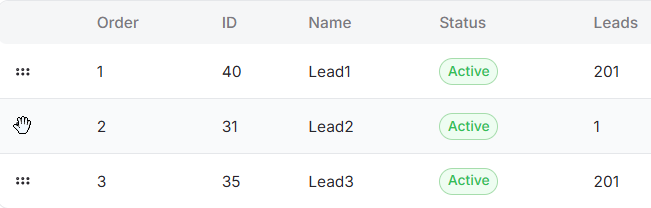
If three or more lead lists are added to a campaign, you can manually determine the sequence in which the system makes calls. The system loads contacts in batches of 50 records. Consequently, if you change the priority while a campaign is running, the current group of leads will be completed first. The system will then begin pulling contacts from the newly prioritized list. Once the cursor changes to a hand icon, click and hold the list to drag it to the desired position.
To quickly remove all lead lists added to the campaign, click the “X” icon on the right side of the “Campaign Lead Lists” dropdown menu:

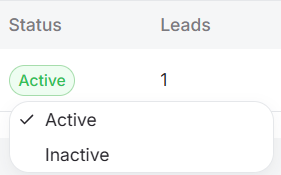
Additionally, on this page you can:
- Change lead list status (Active/Inactive);
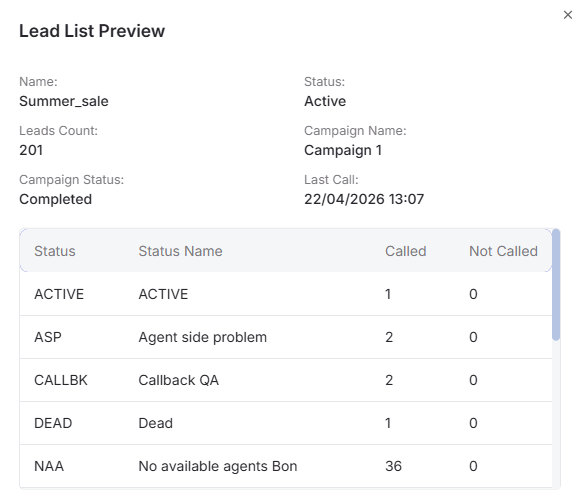
- View lead list information by clicking the View button;
- Delete a lead list from the campaign by clicking the Delete button.
After making any changes to the campaign, a Save button will appear at the top to apply them. To discard the changes, click Cancel.
Recycle
In this tab, you can edit the recycle rules for the selected campaign:
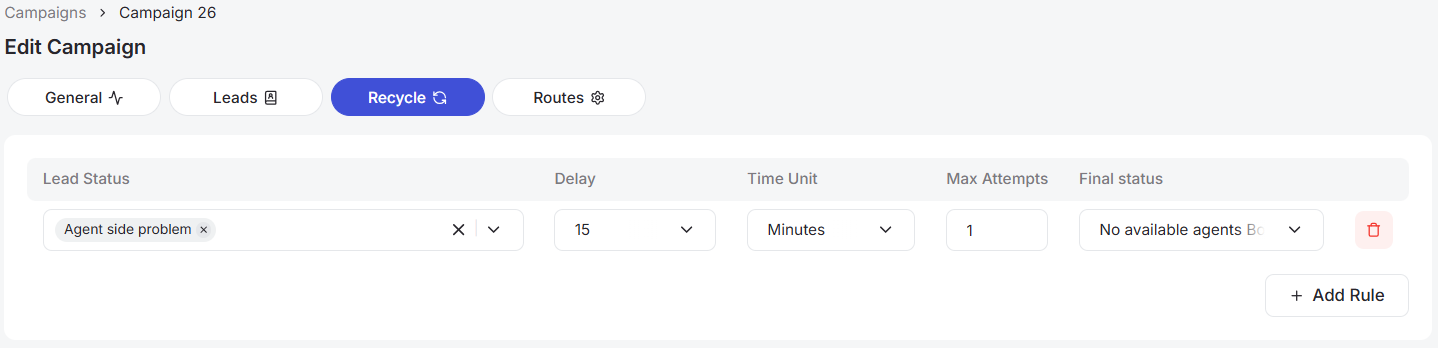
These settings define the conditions for automatic redial attempts once an agent assigns a specific status to a lead. Detailed information about the Recycle Rules parameters is provided above.
You can delete a rule by clicking the trash icon to the right of it or add a new rule by clicking the + Add Rule button.
Once you have made the necessary changes, click Save. If you change your mind and do not want to apply the changes, click Cancel.
Routes
In this section, you can flexibly configure outbound call parameters. Routes allow the system to automatically select a specific outbound number based on the prefix (area code) of the customer's phone number. This ensures that relevant local numbers are displayed when placing calls to different regions or various telecom operators.
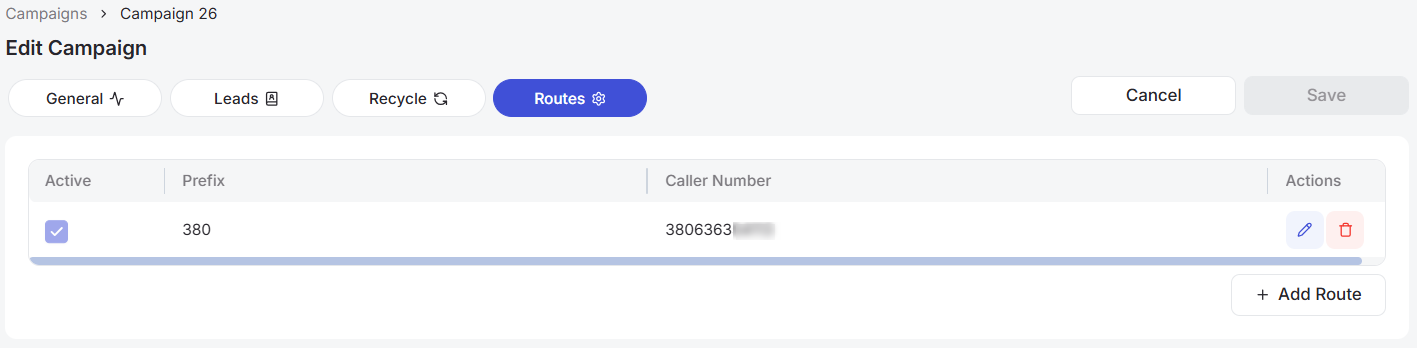
To create a new rule, click the + Add Route button, enter the prefix, and select the number that will be used for outbound calls for that specific code. Once the fields are filled, click the Save icon.
The following options are available for managing routes:
-
Activity status: use the checkbox in the Active column to enable or disable specific rules without deleting them.
-
Editing and Deletion: dedicated buttons in the Actions column allow you to modify existing route parameters or remove them from the system entirely.
Dashboard
This document explains that the dashboard consists of three pages: Active Campaigns, Active Agents, and real-time Call Statistics. It also describes available functions and possible interactions with agents’ calls, such as Spy, Whisper, and Barge (different modes of joining a live call).
Leads
This document describes the Leads section in the Teliqon Autodialer Software system. It explains how to manage leads, lead lists, callbacks, blacklist entries, and import processes.
