CRM Integrations
This document explains how to integrate supported CRM systems with Teliqon Cloud PBX, configure each CRM integration, and enable user association, contact synchronization, and call logging.
General Information
You can connect any of the following CRM integrations to your purchased Cloud PBX solution on the Teliqon Portal:
Cloud PBX provides ready-made solutions that integrate easily with the popular CRM systems listed above, allowing you to configure the integration quickly and effortlessly without requiring technical expertise.
Before starting the integration process, make sure that you already have an active Cloud PBX subscription and that your CRM meets the requirements described in the section dedicated to each specific CRM.
You can verify your Teliqon Cloud PBX subscription in your personal Teliqon Portal account. To do this, sign in to the system and navigate to the Cloud PBX section:
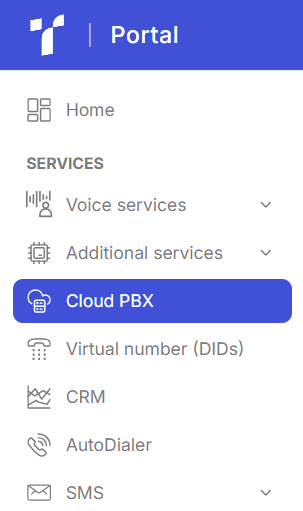
If you already have an active Cloud PBX subscription, it will be displayed on this page:

If Cloud PBX has not yet been activated, you will see a list of available Cloud PBX plans. You can select any plan independently or contact Teliqon Portal Technical Support for assistance with activation, configuration, and further setup.

Next, to access Cloud PBX management dashboard, click the pencil icon in the “Actions” column:

Then use the domain specified in the settings to open your personal Teliqon Cloud PBX dashboard:

If your Cloud PBX subscription is configured correctly, you will be redirected to Cloud PBX dashboard:

If you encounter any issues during the steps above, please contact Teliqon Portal technical support.
Why Integrate CRM
Each CRM system has its own unique features. However, in general, the following benefits can be highlighted when integrating a CRM with Cloud PBX:
- Call Automation - Incoming calls immediately display the customer’s CRM card, including name, company, and communication history. If the contact is new, the system can automatically create a new lead. There is no need to manually record who called or the details of the conversation.
- Automatic Communication History Logging - All calls (incoming, outgoing, and missed) are logged in the CRM under the corresponding customer record. If call recording is enabled, a link to the audio recording is attached. This is highly useful for quality control and analytics.
- Improved Agent Productivity - Managers can place calls directly from the CRM with a single click (click-to-call). Incoming call pop-ups help agents respond faster and personalize conversations. Calls can be assigned to specific managers or leads can be distributed automatically.
- Analytics and Reporting - The CRM collects detailed call data, including the number of calls made, agent performance, call duration, missed calls, and more. This provides a comprehensive view of sales or support team effectiveness.
- Enhanced Customer Service - When a customer calls, the agent can immediately see the interaction history, previous requests, deals, and notes. This creates a personalized experience and increases customer loyalty.
- Reduced Manual Work and Errors - Less routine data entry is required, as information is synchronized automatically. This minimizes the risk of omissions or incorrect data entry.
- Triggers and Automation Capabilities - Automated workflows can be created, such as assigning a “call back” task after a missed call or creating a deal after a successful call.
Dynamics 365
How to Integrate Dynamics 365
To enable this integration, Microsoft 365 must have one of the following subscriptions: Business Basic, Business Standard, Business Premium, or Apps for Business. Additionally, Microsoft Dynamics 365 Sales must be used as the CRM system. The user performing the integration must have “Global Administrator” privileges in Microsoft 365.
Once you have confirmed that these requirements are met, you can proceed with activating and configuring the integration:
Step 1
To integrate the PBX system with Microsoft Dynamics 365 CRM, you need to add it as a channel provider using the Channel Integration Framework (CIF). This allows the PBX system to function as a plugin embedded in the Dynamics 365 CRM interface, providing seamless access and interaction.
-
Log in to your Dynamics 365 account via the web interface (e.g., at https://[your-organization].crm.dynamics.com) using an administrator account. Replace [your-organization] with your Dynamics 365 web domain.
-
On the top toolbar, click the current app name:

-
On the Apps page, locate “Channel Integration Framework” and select it from the list:

You will be redirected to the Channel Integration Framework app.
-
At the top of the toolbar, click “Create” to add a new channel provider.

-
On the “Channel Provider Configuration” tab, configure the following settings:

-
Name - Enter a name that helps you identify the channel, e.g., “Cloud PBX System”.
-
Label - Enter the label displayed as the channel name, e.g., “Cloud PBX for Dynamics 365”.
-
Channel URL - Enter the URL that connects the PBX system to Dynamics 365 in the following format: https://{{PBX_domain}}/dyncrm?base={{CRM_base_url}}, where:
-
{{PBX_domain}} - Teliqon Cloud PBX system domain.
-
{{CRMbase_url}} - the Dynamics 365 web interface URL. _Example: https://example-domain-cloud-pbx.com/dyncrm?base=https://example-domain.crm.dynamics.com
-
Enable Outbound Communication - Select “Yes” to allow users to make calls from Dynamics 365 via this channel.
-
Channel Order - Specify the order in which this channel appears in the channel list.
-
Select Unified Interface Apps for the Channel - Find and select “Sales Hub”, making the channel available in the Dynamics 365 CRM interface.
-
Select the Roles for the Channel - Choose the user role(s) allowed to access the channel.
-
At the top of the page, click “Save & Close”. The channel is now created and displayed in the list of channel providers.
-
Next, you need to activate this channel:

-
In the channel providers list, select the newly created channel.
-
At the top of the page, click Activate.
-
In the popup window, confirm by clicking Activate.
-
The channel is now active and ready for use in Dynamics 365 CRM.
Step 2
After adding the channel provider, you need to assign the "Channel Access" role to specific users for security purposes. This ensures that users with the roles specified in the channel configuration will have access to the channel.
-
Log in to the Microsoft Power Platform Admin Center. (https://admin.powerplatform.microsoft.com/environments)
-
On the “Environments” page, select your “Sales Hub” environment and click “Settings”:

-
Navigate to "Users + permissions" → click "Users":

-
Click the “three dots” next to a user and select “Manage security” roles.

-
In the right panel, select “Channel Access" and click “Save”.

-
Now the users have access to the channel.
The channel is successfully configured. Users with the assigned security roles can see the embedded plugin named “Cloud PBX for Dynamics 365” within their “Sales Hub” app and use it to manage calls directly in Dynamics 365 CRM.
How to authorize in the created application using Teliqon Cloud PBX credentials
After the administrator completes the Dynamics 365 CRM integration, users will be able to access the "Cloud PBX for Dynamics 365" plugin and use it directly within the Dynamics 365 interface, providing seamless access to the main PBX communication features without switching systems.
-
Log in to your Dynamics 365 account via the web interface (for example, at https://[your-organization].crm.dynamics.com) using an administrator account. Here, [your-organization] is your Dynamics 365 web interface domain.
-
On the right toolbar, click the “puzzle” icon:

-
The “Cloud PBX for Dynamics 365” plugin will appear as a fixed side panel.
-
Within this application, you can log in using one of the following methods:

-
Log in using your Extension account in Teliqon Cloud PBX. Enter the following fields:
-
Username - the email address of your PBX Extension account.
-
Password - the password of your PBX Extension account.
-
Log in using Microsoft SSO (if SSO has been enabled in Cloud PBX).
-
Log in using Google SSO (if SSO has been enabled in Cloud PBX).
-
Once logged in, you can successfully access the plugin and use various PBX calling features directly within the Dynamics 365 CRM interface.
HubSpot
How to Integrate HubSpot
To connect this integration, HubSpot must have one of the following subscription plans: Free CRM Tool, Starter, Professional, or Enterprise. Additionally, the user who will configure the integration must have “Super Administrator” access in HubSpot.
Once you have confirmed that these requirements are met, you can proceed with activation and configuration of the integration:
Step 1
To configure the HubSpot application, you first need to locate and save the Redirect URI provided by the Teliqon Cloud PBX system:
-
Log in to the Cloud PBX portal by accessing your personal Cloud PBX account and using the portal management navigation button:

-
On the page that opens, select “Integrations” → “CRM” from the menu

-
Select “HubSpot” from the list of available integrations:

-
Save the value of the “Authorized Redirect URI” parameter, as it will be required when creating the application in HubSpot:

Step 2
The next step in connecting the integration is to create an application for Teliqon Cloud PBX within your HubSpot CRM.
To create the application, you need a developer account in HubSpot (https://app.hubspot.com/signup-hubspot/developers).
A developer account is used to create and manage applications, integrations, and test developer accounts. Note that developer accounts and their associated test accounts cannot synchronize data or resources with other HubSpot accounts.
-
Log in to HubSpot using your developer account (https://app.hubspot.com/signup-hubspot/developers)
-
Select “Create an app”:

-
In the “App Info” tab, enter the basic information about the application. In the “Public app name” field, provide the name that will be displayed to HubSpot users wherever your app appears:

-
Go to the “Auth” tab and locate the “Redirect URLs” section. Paste the redirect URL obtained from PBX at the end of Step 1.

-
In the same Auth tab, define the “Scopes” to specify the data and operational permissions your app requires in HubSpot. Click “Add new scope” on the right side of the page:

-
In the pop-up window, select the required access permissions:
-
CRM block:

-
Settings block:

-
Click “Create APP”.
-
The HubSpot CRM application is now created. You can view and manage the app on the “Apps” page.
-
Before proceeding to the next step, navigate to the “App credentials” section on the “Auth of the application” page to obtain the Client ID and Client Secret needed for the integration.

Step 3
To directly connect HubSpot CRM to Teliqon Cloud PBX, the integration must be authorized using a HubSpot user account with Super Administrator rights.
-
Access Teliqon Cloud PBX personal account and use the button to open the portal management system:

-
On the page that opens, select “Integrations” → “CRM” from the menu

-
Select “HubSpot” from the list of available integrations:

-
In the “Authorization” section, enter the Client ID and Client Secret obtained in the previous step when creating the HubSpot application:

-
Click “Save”.
-
A pop-up window will appear prompting you to select the account for integration. Choose a standard HubSpot account with Super Administrator rights and click “Choose Account”:

-
On the next page, review the requested permissions, check the liability waiver box, and click “Connect app” to complete the authorization process.

-
You will be redirected back to the PBX management portal, where a pop-up window will display the authentication result:

-
Click “OK” to confirm. The “Status” field should display “Connected”, indicating that the HubSpot CRM integration has been successfully configured.
Step 4
The final step is to associate HubSpot CRM users with PBX Extensions.
-
Access Teliqon Cloud PBX personal account and use the button to open the portal management system:

-
On the page that opens, select “Integrations” → “CRM” from the menu:

-
You will be redirected to the HubSpot integration settings page.
-
On this page, click the refresh icon next to “HubSpot User” to synchronize the latest list of HubSpot CRM users.

-
You can link users to Extensions either automatically or manually:
-
Automatically - If users have the same email address in both their HubSpot account and PBX Extension, you can automatically link their accounts:

-
Click "Associate Automatically".
-
In the pop-up window, click "OK".
-
Manually - If users have different email addresses in HubSpot and PBX Extension, manual linking is required:
-
In the Extension dropdown next to the desired HubSpot user, click the pencil icon.
-
In the pop-up window, select the corresponding PBX Extension.
-
Click “Confirm”.
-
After completing the associations, click “Save”.
-
The setup is complete. HubSpot users can now make and receive calls through their PBX Extensions.
How to Synchronize Contacts with HubSpot
After integrating with HubSpot CRM, you can enable one-way contact synchronization to sync HubSpot CRM contacts with a specific phonebook in Cloud PBX. To do this, follow these steps:
-
Log in to the Cloud PBX portal by accessing your personal account and using the button to open the portal management system:

-
On the page that opens, select “Integrations” → “CRM” from the menu:

-
You will be automatically redirected to the HubSpot integration settings page.
-
Enable the "Synchronize Contacts Automatically" option.
-
In the “Synchronize Contacts From” dropdown, select the type(s) of contacts to synchronize from HubSpot CRM:

-
In the “Synchronize to Phonebook” dropdown, select an existing empty phonebook or create a new one to store the synchronized contacts. Note: the phonebook must be empty.

-
In the “Always Query CRM” option, choose whether to search contacts in CRM in real time. Important: Enabling this option increases API usage, so be sure to monitor your API quota accordingly. Real-time lookup is not supported when masked numbers are enabled:

-
If enabled, the PBX will query the CRM for contact information by phone number in real time and support real-time CRM contact lookup.
-
If disabled, the PBX will query the CRM only when no matching contact is found in the PBX phonebooks.
-
Click “Save”.
Once configured, whenever users receive an incoming call from a contact type in HubSpot CRM or make an outgoing call to a contact, PBX will automatically search for the contact in CRM and synchronize the matched contact information to the designated phonebook in Teliqon Cloud PBX.
How to set up automatic Contact creation in HubSpot
After you have successfully integrated HubSpot with the Cloud PBX system, you can configure the creation of CRM contacts for incoming and outgoing calls to unknown numbers.
-
To do this, log in to your Teliqon Cloud PBX personal account and use the button to access the portal management system:

-
On the page that opens, select “Integrations” → “CRM” from the menu:

-
You will be automatically redirected to the page of the already connected HubSpot integration.
-
On the CRM integration page, enable the “Create New Contact” option.
-
Next, select how contacts should be created:
-
Automatically - In the Create Method section, select Automatically, then in the Call Type dropdown choose when a contact should be created in the CRM:

-
Inbound - An incoming call from an unknown number that does not match an existing contact, lead, or business partner in the CRM.
-
Outbound - An outgoing call to an unknown number that does not match an existing contact, lead, or business partner in the CRM.
-
Manually - Select Manually if you want to allow users of associated extensions to create CRM contacts manually during a call.
-
Click “Save” to apply the changes.
How to set up Call Journal in HubSpot
After successfully integrating HubSpot with Teliqon Cloud PBX, you can configure call logs to automatically record all call-related activities in HubSpot CRM when an associated user makes or receives calls with CRM contacts.
-
To configure this, log in to Cloud PBX account and use the button to access the portal management system:

-
On the page that opens, select “Integrations” → “CRM” from the menu:

-
You will be redirected to the already connected HubSpot integration page.
-
Pay attention to the Call Logs section, which is enabled and configured by default:

-
Depending on your requirements, you can customize the Description of the call records that will be created in HubSpot. Additionally, you can enable the following options: “Play Call Recording” - when enabled, users associated with the call will be able to listen to call recordings stored in Cloud PBX, and “Disable Display Missed Call Records in Unanswered Agents” - when enabled, for queue calls and ring group calls, the PBX system will synchronize call logs only with the CRM record of the agent who answered the call, while missed call records for the same call will not be synchronized with the CRM records of agents who did not answer.
-
Click “Save” to apply the changes.
Odoo
How to Integrate Odoo
To enable this integration, Odoo must meet the following requirements: it must use the Odoo Enterprise plan and be hosted on “Odoo Online”. In addition, the user who performs the integration must have “Administrator” access to the Odoo database.
Before starting the integration process, make sure you have the following information:
- The database name where Odoo CRM is installed;
- The database domain name where Odoo CRM is hosted.
Once you have confirmed that all requirements are met, you can proceed with the activation and configuration of the integration:
Step 1
First, you need to generate an API key in Odoo:
-
Go to the “Odoo Database Manager” (https://www.odoo.com/my/databases) and sign in using an administrator account.
-
Click "Connect" next to the database where Odoo CRM is installed.

-
In the Odoo dashboard, click the user account icon in the upper-right corner and select “Preferences”:

-
In the pop-up window, open the "Account Security" tab and click "New API Key".
-
On the "New API Key", enter a description for the API key and click "GENERATE KEY".

-
Save the generated API key and click “DONE” to close the page. This API key will be used to authorize Teliqon Cloud PBX to access your Odoo user data and CRM data via the API. (Important: You will need this API key in the next steps to complete the Odoo CRM integration)
Step 2
Next, use the API key generated in the previous step to connect the integration:
-
First, log in to the Cloud PBX portal. To do this, access Cloud PBX personal account and use the button to navigate to the portal management system:

-
On the page that opens, select “Integrations” → “CRM” from the menu:

-
From the list of available integrations, select “Odoo”:

-
Fill in the authentication details obtained from Odoo:

-
Your Odoo Address: Enter the domain name of the database where Odoo CRM is installed.
-
Database Name: Enter the name of the database where Odoo CRM is installed.
-
Administrator Login Name: Enter the email address used to log in to the Odoo administrator account.
-
API Key: Paste the API key created in Step 1.
-
Click “Save”.
-
In the pop-up window, click “OK”:

-
Done. If the integration with Odoo CRM is successfully completed, the integration status will change to “Connected”.
Step 3
As the final step, you need to associate Odoo CRM users with Extensions in Teliqon Cloud PBX.
-
First, sign in to the Cloud PBX customer portal and use the button to access the portal management system:

-
On the page that opens, select “Integrations” → “CRM” from the menu

-
You will be automatically redirected to the configuration page of the already connected Odoo CRM integration.
-
On the CRM integration page, click the refresh icon next to “Odoo User” to retrieve the most up-to-date list of Odoo CRM users.

-
You can associate users with PBX Extensions either automatically or manually, depending on your setup:
-
Automatically - If users use the same email address for both their Odoo CRM accounts and PBX Extensions, you can automatically associate their accounts as follows:

-
Click "Associate Automatically".
-
In the pop-up window, click "OK".
-
Manually - If users use different email addresses for their Odoo CRM accounts and PBX Extensions, you must associate them manually:
-
In the Extension dropdown next to the required Odoo user, click the pencil icon.
-
In the pop-up window, select the appropriate PBX Extension for the user.
-
Click “Confirm”.
-
After completing the configuration, click “Save”.
-
Done. Odoo users can now make and receive calls through their assigned PBX Extensions.
How to Synchronize Contacts with Odoo CRM
After integrating with Odoo CRM, you can enable one-way contact synchronization to sync Odoo CRM contacts with a specific phonebook in Teliqon Cloud PBX. To do this, follow the steps below:
-
First, log in to the Cloud PBX portal by accessing Cloud PBX personal account and using the button to navigate to the portal management system:

-
On the page that opens, select “Integrations” → “CRM” from the menu

-
You will be automatically redirected to the Odoo integration settings page.
-
On the CRM integration page, enable the “Synchronize Contacts Automatically” option.
-
From the “Synchronize Contacts From” dropdown list, select the contact types that should be synchronized:

-
Individual - an external contact type stored in your database.
-
Leads - potential customers or unqualified sales opportunities stored in your database.
-
Company - an external company contact type stored in your database.
-
From the “Synchronize to Phonebook” dropdown list, select an existing empty phonebook or create a new phonebook to store contacts synchronized from Odoo CRM. Important: The selected phonebook must be empty.

-
In the “Always Query CRM” option, choose whether to search contacts in CRM in real time. Important: Enabling this option increases API usage, so be sure to monitor your API quota accordingly. Real-time lookup is not supported when masked numbers are enabled.

-
If enabled, the PBX will query the CRM for contact information by phone number in real time and support real-time CRM contact lookup.
-
If disabled, the PBX will query the CRM only when no matching contact is found in the PBX phonebooks.
-
Click “Save”.
Done. Now, when users receive an incoming call from a specific type of Odoo CRM contact or place an outbound call to such a contact, the PBX will search for the contact information and automatically synchronize the matching contact data from the CRM to the corresponding phonebook in Teliqon Cloud PBX.
How to set up automatic Contact creation in Odoo
After successfully integrating Odoo CRM with the Cloud PBX system, you can configure automatic contact creation in the CRM for inbound and outbound calls to unknown numbers.
-
To do this, log in to the Teliqon Cloud PBX personal account and use the button to access the portal management system:

-
On the page that opens, select “Integrations” → “CRM” from the menu

-
You will be automatically redirected to the page of the already connected Odoo integration.
-
On the CRM integration page, enable the “Create New Contact” option.
-
In the “Create Contact or Lead” dropdown, select the type(s) of records to be created.
-
Contacts: Save the unknown number as a contact.
-
Leads: Save the unknown number as a lead.
-
Next, select how contacts or leads should be created:
-
Automatically - In the Create Method section, select Automatically, then in the Call Type dropdown choose when a contact should be created in the CRM:

-
Inbound: An incoming call from an unknown number that does not match an existing contact, lead, or business partner in the CRM.
-
Outbound: An outgoing call to an unknown number that does not match an existing contact, lead, or business partner in the CRM.
-
Manually - If this method is selected, a dedicated button for creating a contact or lead in the CRM will be available during the call.
-
Click “Save” to apply the settings.
How to set up Call Journal in Odoo
After you have successfully integrated Odoo with Teliqon Cloud PBX, you can configure call logging to automatically record all call-related activities in Odoo CRM when an associated user makes or receives calls with CRM contacts.
-
To do this, log in to the Cloud PBX portal by accessing Cloud PBX personal account and using the button to navigate to the portal management system:

-
On the page that opens, select “Integrations” → “CRM” from the menu

-
You will be redirected to the page of the already connected Odoo integration.
-
Pay attention to the Call Log section, which is enabled and configured by default:

-
Depending on your requirements, you can customize the Subject and Description of the calls that will be created in Odoo CRM.
-
Click “Save” to apply the changes.
Salesforce
How to Integrate Salesforce
To enable this integration, Salesforce must be on one of the following editions: Enterprise Edition, Unlimited Edition, Developer Edition, or Performance Edition. Additionally, the user who will configure the integration must have System Administrator privileges in Salesforce.
Once you have confirmed that these requirements are met, you can proceed with activating and configuring the integration:
Step 1
To configure the Salesforce application in subsequent steps, you must first obtain and save the redirect URI from the Teliqon Cloud PBX system:
-
First, sign in to the Cloud PBX portal. You can do this by accessing Cloud PBX personal account and using the button to navigate to the portal management system:

-
On the page that opens, select “Integrations” → “CRM” from the menu

-
Choose “Salesforce” from the list of available integrations:

-
Save the value of the “Authorized Redirect URI” parameter. You will need this value when creating the application in Salesforce:

Step 2
The next step in setting up the integration is to create an application for Teliqon Cloud PBX in your Salesforce CRM.
To create the application, you must have a System Administrator account in Salesforce.
-
Sign in to Salesforce CRM using your System Administrator account (https://login.salesforce.com/):
-
In the top-right corner of the Salesforce interface, click the gear icon (Settings), then select “Setup” to open the Setup Home page.

-
In the left navigation menu, go to PLATFORM TOOLS → Apps → App Manager.
-
In the top-right corner of the “App Manager” page, click “New External Client App” to create a new application for the integration.

-
In the “Basic Information” section, provide the following details:

-
External Client App Name - A name that helps you identify the application
-
(the API Name will be generated automatically based on the app name).
-
Contact Email - A contact email address.
-
Distribution State - Leave the default value unchanged.
-
In the API (Enable OAuth Settings) section, select the “Enable OAuth” checkbox and complete the following steps in the “App Settings” section:

-
Callback URL - Paste the authorized redirect URI obtained from the Cloud PBX web portal.
-
OAuth Scopes - Move the following scopes from “Available OAuth Scopes” to “Selected OAuth Scopes”:
-
Full access (full)
-
Manage user data via APIs (api)
-
Manage user data via Web browsers (web)
-
Access unique user identifiers (openid)
-
Access the identity URL service (id, profile, email, address, phone)
-
Perform requests at any time (refresh_token, offline_access)
-
In the same API (Enable OAuth Settings) section enable the checkbox “Require Proof Key for Code Exchange (PKCE) extension for Supported Authorization Flows” under Security:

-
Click “Save” at the bottom of the application creation page. After a short processing time, the application will be created successfully.
-
Next, configure Salesforce user access for the newly created application. By default, access is set to “All users can self-authorize”, which allows all Salesforce users in the organization to authorize the app. If the current settings differ from the default, follow these steps to adjust them:
-
Navigate to Apps → External Client App → External Client App Manager, and find the newly created application. Click the “three-dot” menu next to the application and select “Edit Policies”:

-
In the “OAuth Policies” section, set Permitted Users to "All users may self-authorize":

-
Click “Save”.
-
After configuring access permissions, you must obtain the authorization credentials required to connect the integration in Teliqon Cloud PBX:
-
Go to Apps → External Client App → External Client App Manager, and find the newly created applicationClick the “three-dot” menu next to the application and select “Edit Settings”:

-
In the “OAuth Settings” section, click “Consumer Key and Secret”:

-
A verification code will be sent to your email address. Enter the code in the verification form and click “Verify”:

-
In the “Consumer Details” section, your Consumer Key and Consumer Secret will be displayed. Save these values, as they will be required later to complete the Salesforce integration with Teliqon Cloud PBX.

-
Done. You now have the Consumer Key and Consumer Secret for your Salesforce CRM application, which are required to proceed with the Teliqon Cloud PBX integration.
Step 3
To directly connect Salesforce CRM to Teliqon Cloud PBX, the integration must be authorized using a Salesforce user account with System Administrator privileges:
-
First, sign in to the Cloud PBX portal by accessing Cloud PBX personal account and using the button to navigate to the portal management system:

-
On the page that opens, select “Integrations” → “CRM” from the menu

-
Choose “Salesforce” from the list of available integrations:

-
In the “Authorization section”, enter the Consumer Key and Consumer Secret obtained in the previous step when the Salesforce application was created:

-
Click “Save”.
-
A pop-up window will appear asking you to confirm the following permissions for the application:

-
Click “Allow” to grant Teliqon Cloud PBX access to your Salesforce CRM account.
-
You will then be redirected back to the PBX management portal, where the authentication result will be displayed in a pop-up window:

-
Click “OK” to confirm. The “Status” field should display “Connected”, indicating that the Salesforce CRM integration has been successfully configured.
Step 4
As a final step, you must associate Salesforce CRM users with PBX Extensions.
-
First, log in to the Cloud PBX portal by accessing your personal Cloud PBX account and using the button to navigate to the portal management system:

-
On the page that opens, select “Integrations” → “CRM” from the menu

-
You will be automatically redirected to the Salesforce integration configuration page.
-
On the CRM integration page, click the “refresh” icon next to “Salesforce User” to synchronize the latest list of Salesforce CRM users.

-
You can associate users with PBX Extensions either automatically or manually. Both options are described below:
-
Automatically - If users use the same email address for their Salesforce account and their PBX Extension account, you can enable automatic association as follows:

-
Click "Associate Automatically".
-
In the pop-up window, click "OK".
-
Manually - If users use different email addresses for their Salesforce account and their PBX Extension account, you must associate them manually:
-
In the Extension drop-down list next to the required Salesforce user, click the pencil icon.
-
In the pop-up window, select the appropriate PBX Extension for the user.
-
Click “Confirm”.
-
After completing the configuration, click “Save”.
-
Done. Salesforce users can now make and receive calls through their assigned PBX Extensions.
How to Synchronize Contacts with Salesforce
After integrating with Salesforce CRM, you can enable one-way contact synchronization to sync Salesforce CRM contacts with a specific phonebook in Cloud PBX. To do this, follow the steps below:
-
First, log in to the Cloud PBX portal by accessing Teliqon Cloud PBX personal account and using the button to navigate to the portal management system:

-
On the page that opens, select “Integrations” → “CRM” from the menu

-
You will be automatically redirected to the Salesforce integration configuration page.
-
On the CRM integration page, enable the “Synchronize Contacts Automatically” option.
-
From the “Synchronize Contacts From” dropdown list, select the contact type(s) you want to synchronize from Salesforce CRM:

-
From the “Synchronize to Phonebook” dropdown list, select an existing empty phonebook or create a new phonebook to store contacts synchronized from Salesforce CRM. Important: the selected phonebook must be empty.

-
In the “Always Query CRM” setting, choose whether contact lookups in the CRM should be performed in real time. Important: Enabling this option increases API usage, so be sure to monitor your API quota accordingly. Real-time lookup is not supported when masked numbers are enabled.

-
If enabled, the PBX will request contact information from the CRM in real time and support real-time CRM contact lookups. (Note: enabling this option increases API usage in your CRM.)
-
If disabled, the PBX will query the CRM only when no matching information is found in the PBX company contacts.
-
Click “Save”.
Done. Now, when users receive an incoming call from a specific type of Salesforce CRM contact or make an outgoing call to such a contact, the PBX will search for the contact information and automatically synchronize the matched contact data from the CRM to the corresponding phonebook in Teliqon Cloud PBX.
How to set up automatic Lead / Contact creation in Salesforce
After successfully integrating Salesforce with the Cloud PBX system, you can configure the automatic creation of leads and contacts in the CRM for inbound and outbound calls to unknown phone numbers.
-
To do this, log in to the Teliqon Cloud PBX personal account and use the button to navigate to the portal management system:

-
On the page that opens, select “Integrations” → “CRM” from the menu

-
You will be automatically redirected to the page of the already connected Salesforce integration.
-
On the CRM integration page, enable the “Create New Contact” option:

-
In the “Create Contact or Lead” drop-down list, select the type(s) of entities to be created.
-
Contacts: Save an unknown number as a contact.
-
Leads: Save an unknown number as a lead.
-
In the “Create Method” section, choose the appropriate creation method based on your requirements:
-
Automatically - If this method is selected, choose when the entity should be created in the CRM using the “Call Type” drop-down list: 1. Inbound
- An incoming call from an unknown number that does not match an existing contact, lead, or business partner in the CRM. 2. Outbound - An outgoing call to an unknown number that does not match an existing contact, lead, or business partner in the CRM.
-
Manually - If this method is selected, a dedicated button for creating a contact or lead in the CRM will be available during the call.
-
Click “Save” to apply the settings.
How to set up Call Journal in Salesforce
After you have successfully integrated Salesforce with Teliqon Cloud PBX, you can configure call logging to automatically record all call-related activities in Salesforce CRM when an associated user makes or receives calls with CRM contacts.
-
To do this, sign in to the Cloud PBX portal by accessing your personal Cloud PBX account and using the button to navigate to the portal management system:

-
On the page that opens, select “Integrations” → “CRM” from the menu

-
You will be redirected to the page of the already connected Salesforce integration.
-
Pay attention to the Call Log section, which is enabled and configured by default:

-
Depending on your requirements, you can customize the “Subject” and “Description” of the calls that will be created in Salesforce. Additionally, you can enable the option “Disable Display Missed Call Records in Unanswered Agents.” This option allows the PBX system, for queue calls and ring group calls, to synchronize call logs only with the CRM record of the agent who answered the call, while missed call records for the same call will not be synchronized for agents who did not answer.
-
Click “Save”.
Zoho
How to Integrate Zoho
You can integrate with Zoho CRM via API (Zoho Free Edition). However, please note the following important considerations:
- The Zoho CRM edition must be Free, Standard, Professional, Enterprise, or Ultimate.
- The integration is supported only for the Zoho CRM application and is not supported for other related Zoho applications such as Zoho One, Zoho Mail, Zoho Recruit, etc.
- The integration must be connected using a Super Administrator account in Zoho CRM.
Once you have confirmed that these requirements are met, you can proceed with activating and configuring the integration:
How to Integrate Zoho CRM using API
Step 1
To configure the Zoho CRM application at a later stage, you must first locate and save the redirect URI from the Teliqon Cloud PBX system:
-
First, sign in to the Cloud PBX portal by accessing Teliqon Cloud PBX personal account and using the button to navigate to the portal management system:

-
On the page that opens, select “Integrations” → “CRM” from the menu

-
From the list of available integrations, choose “Zoho”:

-
In the pop-up window, select “Zoho Free Edition” and click “Confirm”:

-
You will be redirected to the integration configuration page. Save the value of the “Authorized Redirect URI” parameter, as it will be required when creating the application in Zoho:

Step 2
The next step in connecting the integration is to create an application for Teliqon Cloud PBX in your Zoho CRM.
-
Log in to the Zoho CRM API Console using a System Administrator account at https://api-console.zoho.com/, then click Get Started.:

-
Select “Server-based Applications” as the application type:

-
On the “Create New Client” page, enter the PBX details to register the application as a new CRM client:

-
Client Name - Enter the application name.
-
Homepage URL- Enter the PBX homepage URL (the domain of your Teliqon Cloud PBX portal).
-
Authorized Redirect URI - Enter the PBX authorized redirect URI obtained at the end of Step 1 of the integration setup.
-
Click “Create”. In the pop-up window, the newly generated Client ID and Client Secret will be displayed. Save these values, as they will be required for further integration configuration:

Step 3
To establish a direct connection between Zoho CRM and Teliqon Cloud PBX, the integration must be authorized using a Zoho CRM account with Super Administrator privileges.
-
Navigate to Cloud PBX personal account and use the button to access the portal management system:

-
On the page that opens, select “Integrations” → “CRM” from the menu

-
Choose “Zoho” from the list of available integrations:

-
In the “Authorization” section, enter the Client ID and Client Secret obtained in the previous step when creating the application in Zoho CRM. Additionally, verify the following two parameters:

-
Account Server Address - Enter the CRM account server URL. The default value may not be applicable if your account is registered in a different region. For example, for Europe, use: https://accounts.zoho.eu
-
Zoho CRM Address - Enter the Zoho CRM URL. The default value may also differ depending on your account region. For example, for Europe, use: https://crm.zoho.eu
-
Click “Save”.
-
A pop-up window will appear requesting permission to access Zoho CRM data. On the authorization page, select the checkbox and click “Accept” to grant PBX access to your Zoho account data:

-
You will then be redirected back to the PBX management portal, where a pop-up window will display the authentication result:

-
Click “OK” to confirm. The “Status” field should display “Connected”, indicating that the Zoho CRM integration has been successfully configured.
Step 4
Final step: associate Zoho CRM users with PBX Extensions.
-
First, sign in to the Cloud PBX user portal and use the button to navigate to the portal management system:

-
On the page that opens, select “Integrations” → “CRM” from the menu

-
You will be automatically redirected to the Zoho integration configuration page.
-
On the CRM integration page, click the refresh icon next to “Zoho User” to synchronize the latest list of Zoho CRM users.

-
You can associate users with Extensions either automatically or manually. Both options are described below:
-
Automatically - If users use the same email address for their Zoho CRM accounts and PBX Extensions, you can automatically associate their Zoho accounts with PBX Extensions as follows:

-
Click "Associate Automatically".
-
In the pop-up window, click “OK”.
-
Manually - If a user uses different email addresses for their Zoho CRM account and PBX Extension, you must associate them manually. To do this:
-
In the Extension drop-down list next to the required Zoho user, click the pencil icon.
-
In the pop-up window, select the appropriate Extension for the user.
-
Click “Confirm”.
-
After completing the configuration, click “Save”.
-
Done. Zoho users can now make and receive calls using their PBX Extensions.
How to Synchronize Contacts with Zoho (API)
After integrating with Zoho CRM, you can enable one-way contact synchronization to sync Zoho CRM contacts with a specific phonebook in Cloud PBX. To do this, follow these steps:
-
First, log in to the Cloud PBX portal by accessing Cloud PBX account and using the button to enter the portal management system:

-
On the page that opens, select “Integrations” → “CRM” from the menu

-
You will be automatically redirected to the Zoho settings page.
-
On the CRM integration page, enable the “Synchronize Contacts Automatically” option.
-
In the “Synchronize Contacts From” dropdown menu, select the type(s) of contacts you want to synchronize from Zoho CRM:

-
In the “Synchronize to Phonebook” dropdown, select an existing empty phonebook or create a new phonebook to store the contacts being synchronized from Zoho CRM. It is important that the phonebook is empty.

-
In the “Always Query CRM” setting, choose whether contact lookups in the CRM should be performed in real time. Important: Enabling this option increases API usage, so be sure to monitor your API quota accordingly. Real-time lookup is not supported when masked numbers are enabled.

-
If enabled, the PBX will request contact information from the CRM in real time and support real-time CRM contact lookups. (Note: enabling this option increases API usage in your CRM.)
-
If disabled, the PBX will query the CRM only when no matching information is found in the PBX company contacts.
-
Click “Save”.
Done. Now, when users receive an incoming call from a Zoho CRM contact type or make an outgoing call to a contact, PBX will automatically search for contact information and synchronize matching CRM contact information to the corresponding phonebook in Teliqon Cloud PBX.
How to set up automatic Lead / Contact creation in Zoho (API)
After successfully integrating Zoho with the Cloud PBX system, you can configure the automatic creation of leads and contacts in the CRM for inbound and outbound calls to unknown phone numbers.
-
To do this, log in to the Teliqon Cloud PBX personal account and use the button to navigate to the portal management system:

-
On the page that opens, select “Integrations” → “CRM” from the menu

-
You will be automatically redirected to the page of the already connected Zoho integration.
-
On the CRM integration page, enable the “Create New Contact” option:

-
In the “Create Contact or Lead” drop-down list, select the type(s) of entities to be created.
-
Contacts: Save an unknown number as a contact.
-
Leads: Save an unknown number as a lead.
-
In the “Create Method” section, choose the appropriate creation method based on your requirements:
-
Automatically - If this method is selected, choose when the entity should be created in the CRM using the “Call Type” drop-down list: 1. Inbound
- An incoming call from an unknown number that does not match an existing contact, lead, or business partner in the CRM. 2. Outbound - An outgoing call to an unknown number that does not match an existing contact, lead, or business partner in the CRM.
-
Manually - If this method is selected, a dedicated button for creating a contact or lead in the CRM will be available during the call.
-
Click “Save” to apply the settings.
How to set up Call Journal in Zoho (API)
After you have successfully integrated Zoho with Teliqon Cloud PBX, you can configure call logging to automatically record all call-related activities in Zoho CRM when an associated user makes or receives calls with CRM contacts.
-
To do this, sign in to the Cloud PBX portal by accessing your personal Cloud PBX account and using the button to navigate to the portal management system:

-
On the page that opens, select “Integrations” → “CRM” from the menu

-
You will be redirected to the page of the already connected Zoho integration.
-
Pay attention to the Call Log section, which is enabled and configured by default:

-
Depending on your requirements, you can customize the Description of the call records that will be created in Zoho. Additionally, you can enable the following options: “Play Call Recording” - when enabled, users associated with the call will be able to listen to call recordings stored in Cloud PBX, and “Disable Display Missed Call Records in Unanswered Agents” - when enabled, for queue calls and ring group calls, the PBX system will synchronize call logs only with the CRM record of the agent who answered the call, while missed call records for the same call will not be synchronized with the CRM records of agents who did not answer.
-
Click “Save”.
Pipedrive
How to Integrate Pipedrive
To enable this integration, Pipedrive must be on one of the following plan editions: Enterprise, Unlimited, Developer, or Performance Edition. Additionally, the user who sets up the integration must have Administrator rights in Pipedrive.
Once you have confirmed that these requirements are met, you can proceed with activating and configuring the integration:
Step 1
To set up the Pipedrive integration, you need an integration template - a special XML file containing setup instructions to connect your system with the CRM. Сontact Teliqon Portal technical support to obtain this file before proceeding.
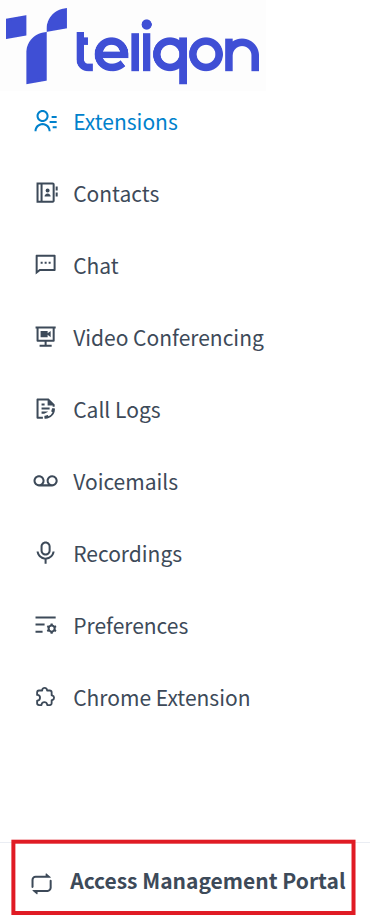
- Log in to the Cloud PBX portal by accessing Teliqon Cloud PBX personal account and using the button to navigate to the portal management system:
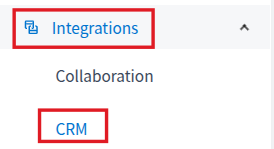
- On the page that opens, select “Integrations” → “CRM” from the menu:
- Click Custom +:
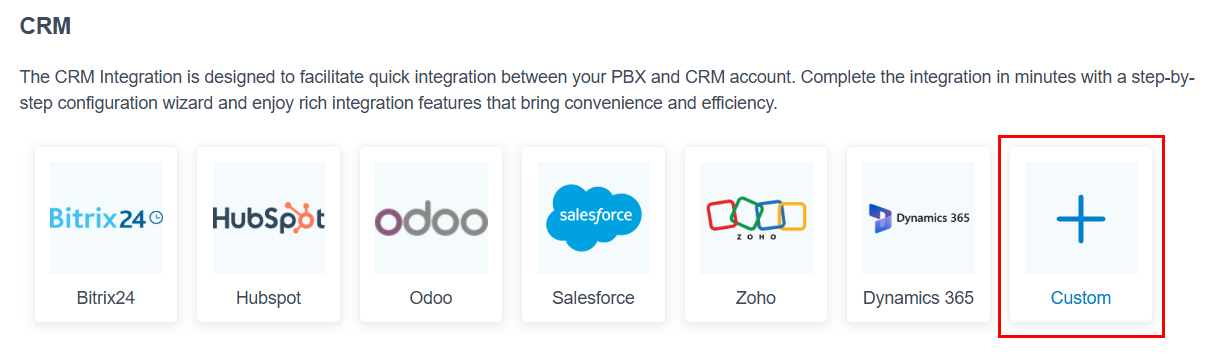
- Then upload the Pipedrive template xml file: click Upload → Browse (select template file), and Save.
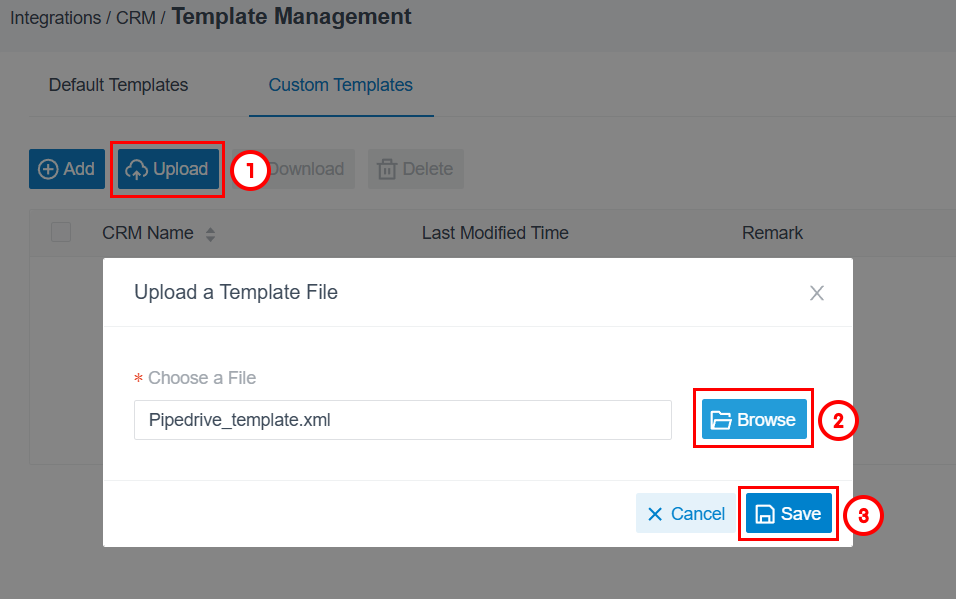
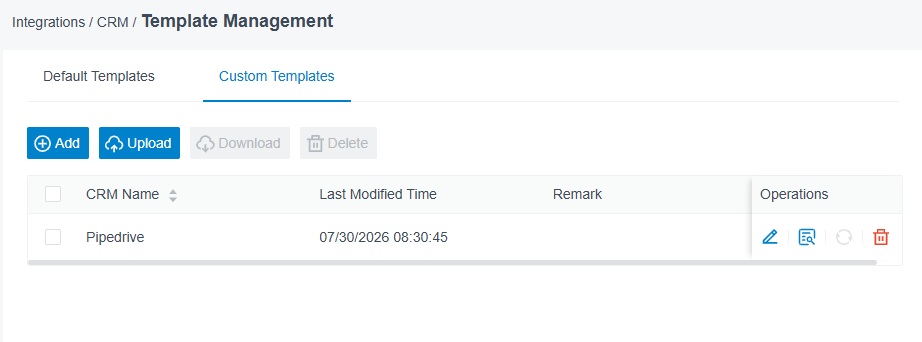
- Once uploaded, the Pipedrive template will be displayed under the Custom Template section:
Step 2
Next, you need to obtain your API Token and Base URL from your Pipedrive CRM account:
- Log in to your Pipedrive CRM account via the web interface.
- Click My Account icon in the top-right corner and select Personal preferences.
- Navigate to the API tab. Under Your personal API token, click Generate new token (or copy your existing token if one is already generated).
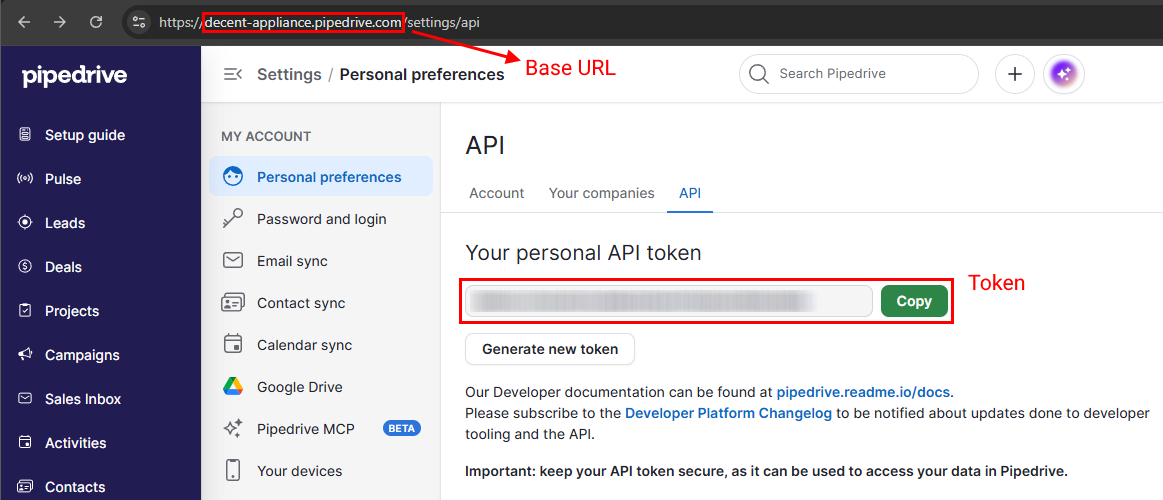
- Copy both your API Token and the Base URL shown on the page. Note: Please keep your API token secure, as it grants full access to your Pipedrive CRM data.
Step 3
Now connect Pipedrive CRM directly to Teliqon Cloud PBX using the credentials obtained in the previous step:
- Navigate to Cloud PBX personal account and use the button to access the portal management system:
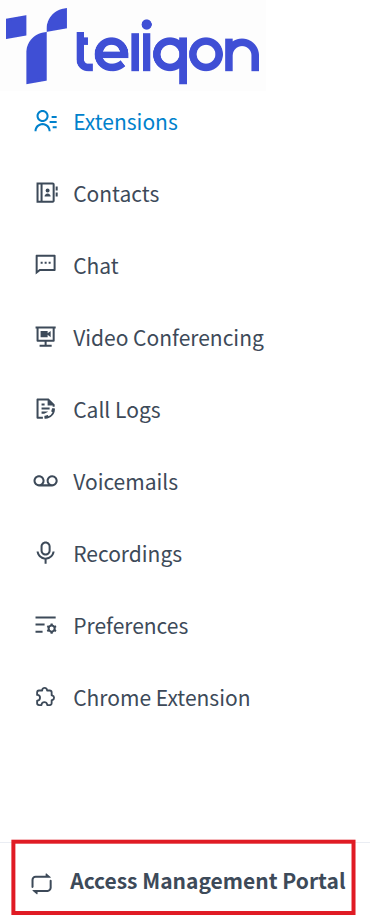
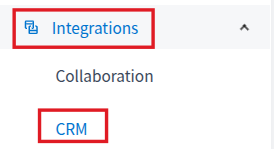
- On the page that opens, select “Integrations” → “CRM” from the menu
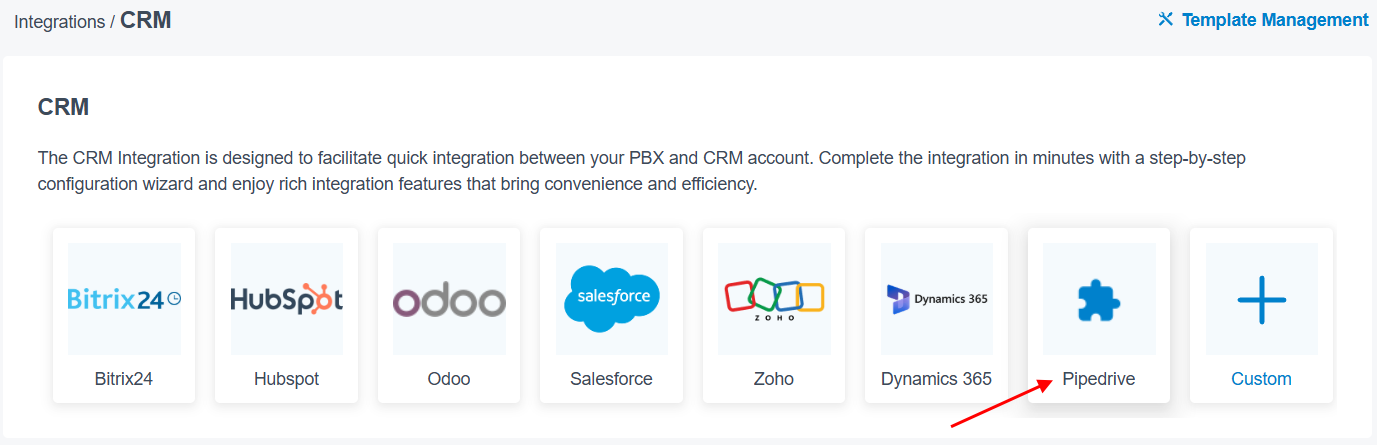
- Select Pipedrive from the list of available integrations.
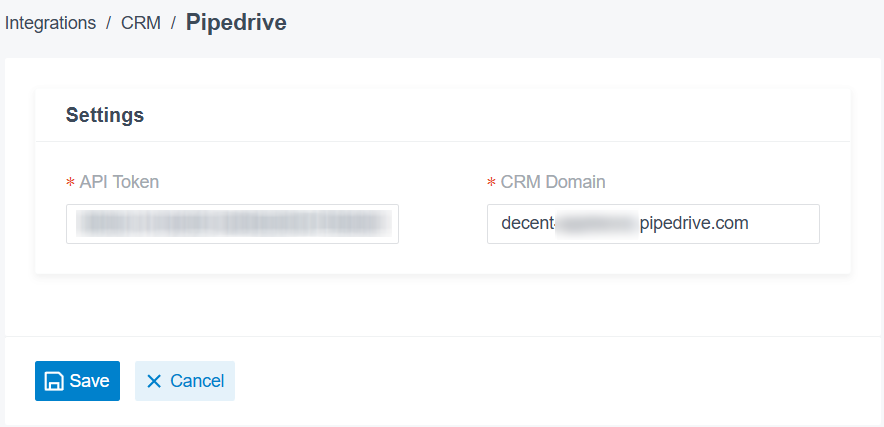
- In the configuration settings window, enter the API Token and Base URL copied from Pipedrive.
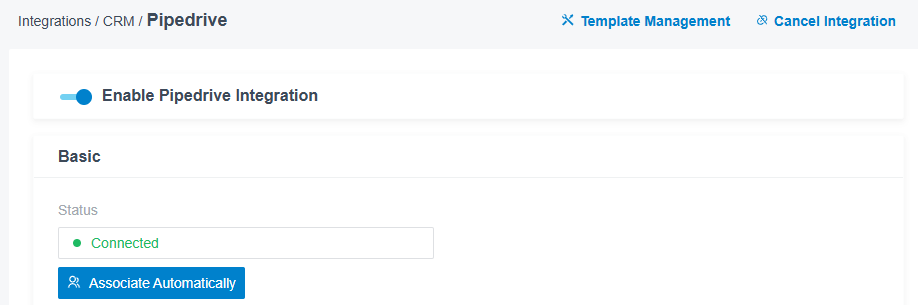
- Click Save. Once authorized, the integration Status field will display Connected:
Step 4
The final step is to associate Pipedrive CRM users with PBX Extensions.
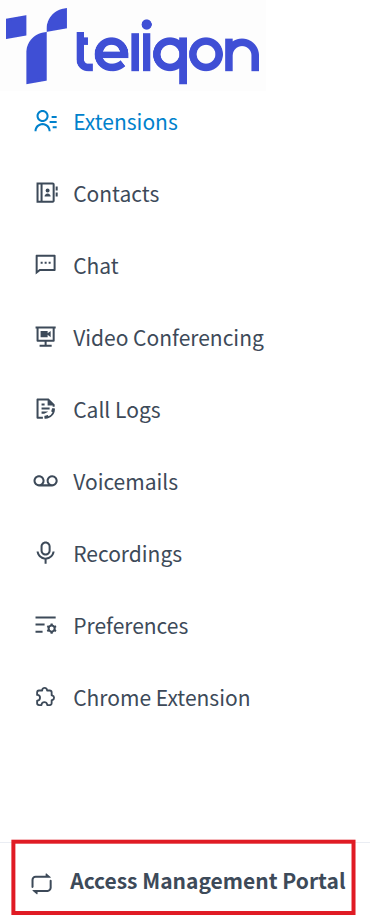
- Access your Cloud PBX personal account and use the button to open the portal management system:
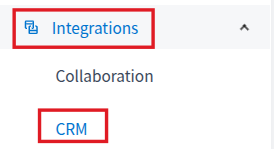
- On the page that opens, select “Integrations” → “CRM” from the menu
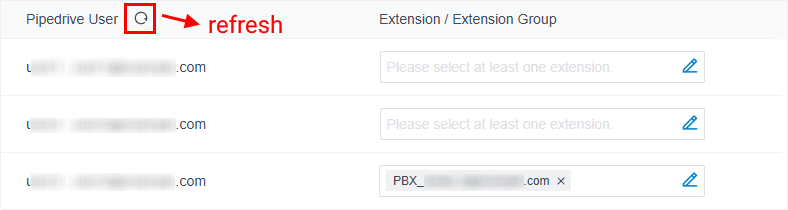
- You will be redirected to the Pipedrive integration settings page.
- Click the refresh icon next to Pipedrive User to retrieve the latest list of users from CRM.
- You can link users to Extensions either automatically or manually:
- a. Automatically - If users share the same email address in both Pipedrive and Cloud PBX.
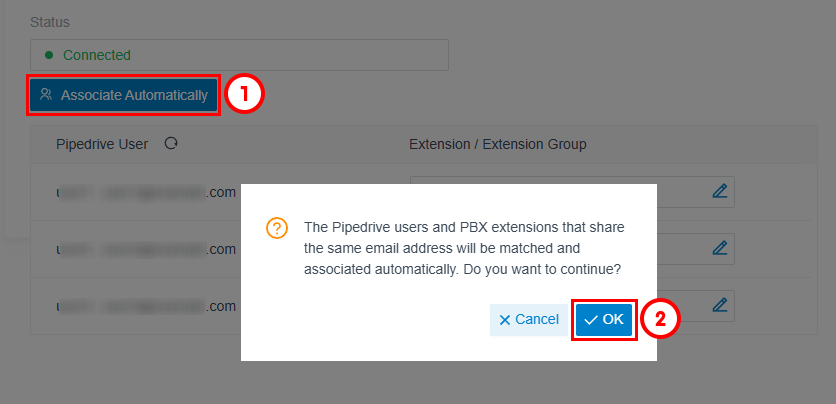
- i. Click "Associate Automatically".
- ii. In the pop-up window, click "OK".
- b. Manually - If users have different email addresses in Pipedrive and PBX Extension, manual linking is required:
- iii. In the Extension dropdown next to the desired Pipedrive user, click the pencil icon.
- iv. In the pop-up window, select the corresponding PBX Extension.
- v. Click “Confirm”.
- Click Save in the bottom of the page to apply the user mappings. Pipedrive users can now place and receive calls using their assigned extensions.
How to Synchronize Contacts with Pipedrive
After integrating with Pipedrive CRM, you can enable one-way contact synchronization to automatically sync Pipedrive contacts with a specific phonebook in Cloud PBX:
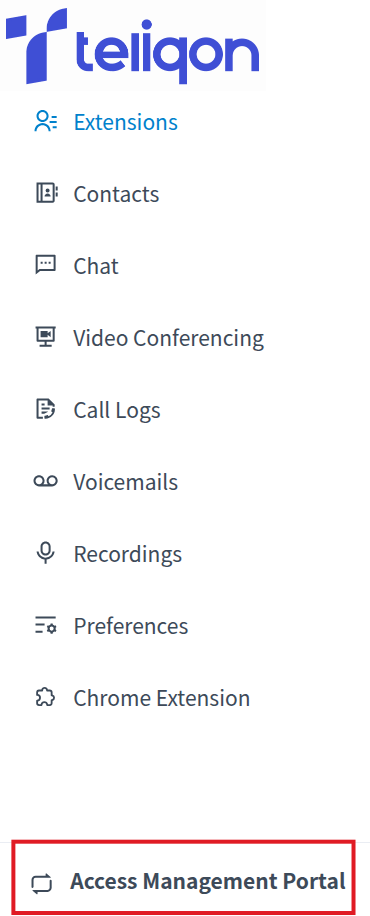
- Log in your Cloud PBX personal account and use the button to open the portal management system:
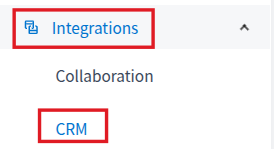
- On the page that opens, select “Integrations” → “CRM” from the menu
- You will be redirected to the Pipedrive integration settings page.
- Enable the Synchronize Contacts Automatically option.
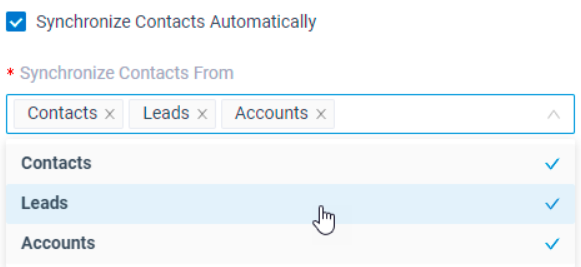
- In the Synchronize Contacts From dropdown menu, select the type(s) of contacts you want to synchronize from Pipedrive CRM:
- In the Synchronize to Phonebook dropdown, choose an existing empty phonebook or create a new one for storing synchronized contacts. (Note: The target phonebook must be completely empty.)

- Configure the Always Query CRM setting. Choose whether contact lookups in the CRM should be performed in real time. Important: Enabling this option increases API usage, so be sure to monitor your API quota accordingly. Real-time lookup is not supported when masked numbers are enabled.

- a. Enabled: PBX will query Pipedrive CRM for contact details in real time during calls (increases API usage).
- b. Disabled: PBX will query Pipedrive only when no matching contact is found in PBX phonebooks.
- Click Save.
Done. Now, when users receive an incoming call from a Pipedrive CRM contact type or make an outgoing call to a contact, PBX will automatically search for contact information and synchronize matching CRM contact information to the corresponding phonebook in Teliqon Cloud PBX.
How to set up automatic Contact creation in Pipedrive
You can configure Cloud PBX to automatically or manually create new contact records in Pipedrive for incoming or outgoing calls to unknown phone numbers.
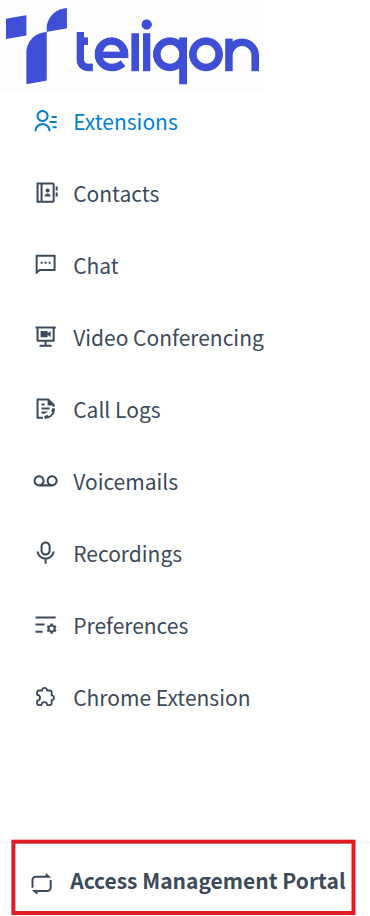
- Log in to the Cloud PBX portal by accessing your personal account and using the button to open the portal management system:
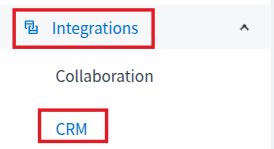
- On the page that opens, select “Integrations” → “CRM” from the menu
- You will be automatically redirected to the Pipedrive integration settings page.
- On the Pipedrive integration page, enable the Create New Contact option.

- In the Create Contact or Lead dropdown list, select whether unknown numbers should be saved as a Contact or a Lead/Deal.
- Select your preferred Create Method:
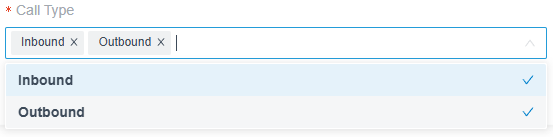
- a. Automatically - Select Automatically, then choose when the record should be created using the Call Type dropdown (Inbound, Outbound, or both).
- b. Manually - Select Manually if you prefer to give users an in-call button to manually create CRM contacts on demand.
- Click Save to apply the changes.
How to set up Call Journal in Pipedrive
To ensure complete call visibility, you can enable automatic call logging to record all call activities in Pipedrive CRM whenever associated users make or receive calls.
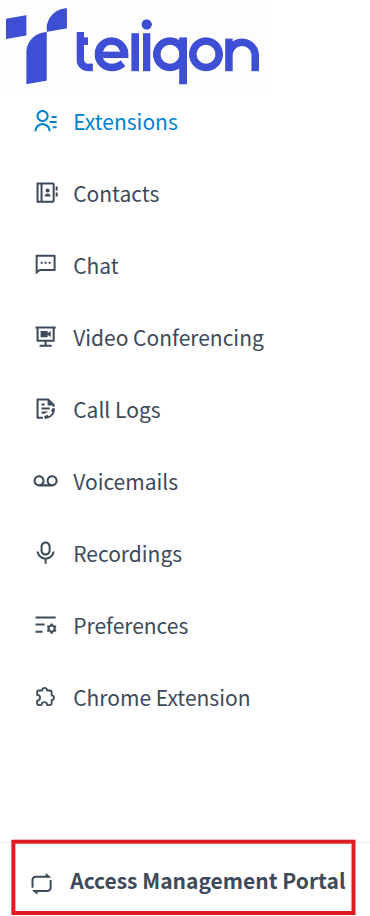
- Log in to the Cloud PBX portal by accessing your personal account and using the button to open the portal management system:
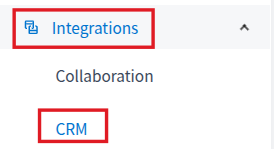
- On the page that opens, select “Integrations” → “CRM” from the menu
- You will be redirected to the already connected Pipedrive integration page. Go to the Call Journal section.
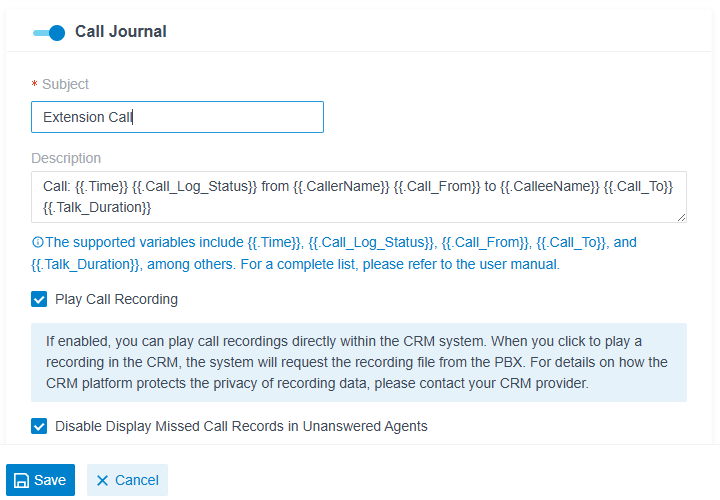
- Customize the Subject and Description template fields for call logs generated in Pipedrive.
- Configure optional logging features according to your preferences:
- a. Play Call Recording: Enables a playable audio link to the call recording inside Pipedrive call activities.
- b. Disable Display Missed Call Records in Unanswered Agents: Ensures missed queue or ring group calls only log under the agent who actually answered, avoiding redundant missed call entries for other agents.
- Click Save to apply all changes.
SugarCRM
How to Integrate SugarCRM
To enable this integration, SugarCRM must be on one of the following plan editions: Enterprise, Unlimited, Developer, or Performance Edition. Additionally, the user who sets up the integration must have Administrator rights in SugarCRM.
Once you have confirmed that these requirements are met, you can proceed with activating and configuring the integration:
Step 1
To set up the SugarCRM integration, you need an integration template - a special XML file containing setup instructions to connect your system with the CRM. Сontact Teliqon Portal technical support to obtain this file before proceeding.
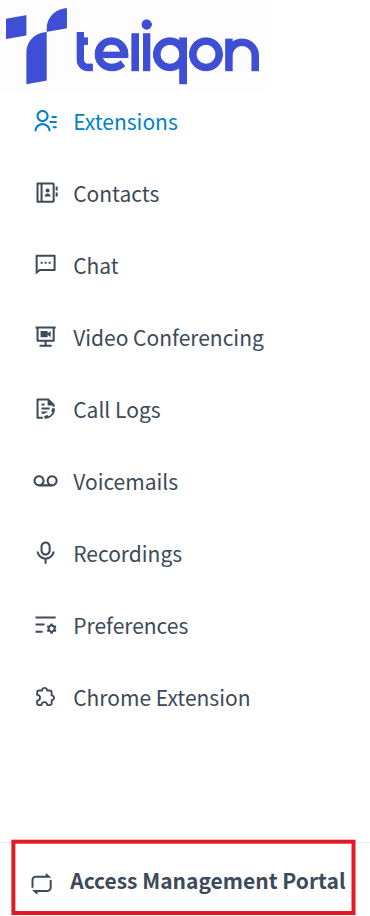
- Log in to the Cloud PBX portal by accessing Teliqon Cloud PBX personal account and using the button to navigate to the portal management system:
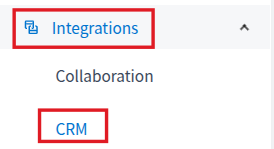
- On the page that opens, select “Integrations” → “CRM” from the menu:
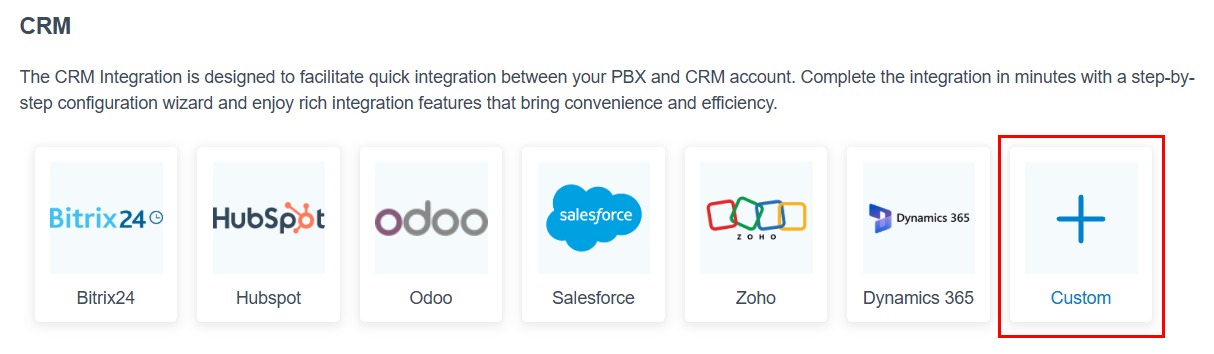
- Click Custom +:
- Then upload the SugarCRM template xml file: click Upload → Browse (select template file), and Save.
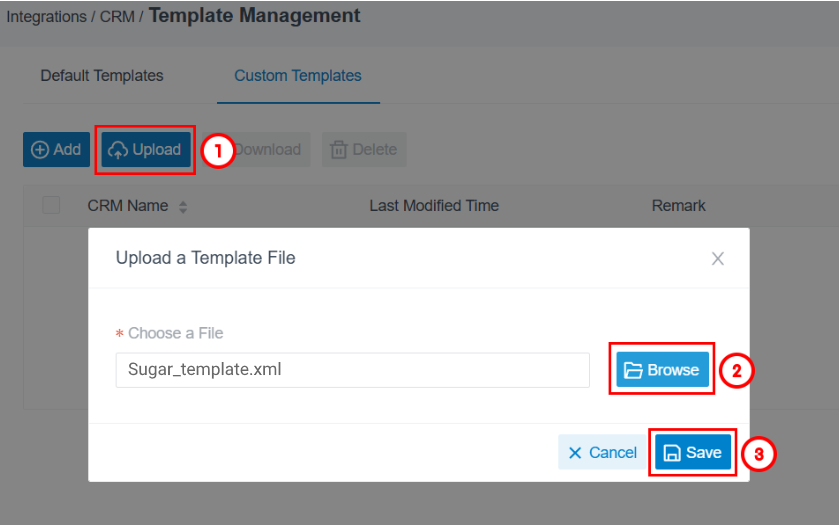
- Once uploaded, the SugarCRM template will be displayed under the Custom Template section:
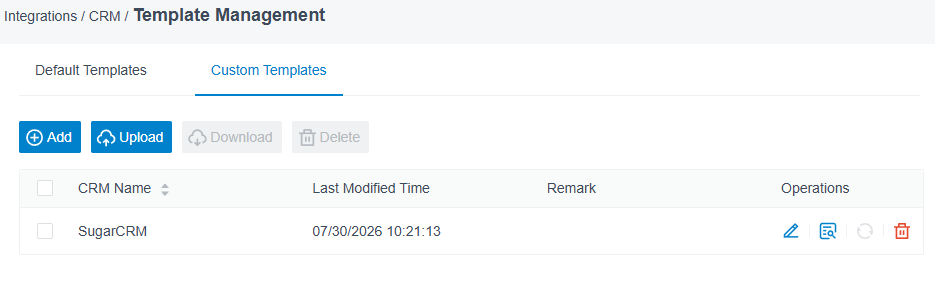
Step 2
Next, you need to create an OAuth application by adding an OAuth Key in your SugarCRM instance to obtain your API authentication credentials:
- Log in to your SugarCRM account as an administrator.
- Click your user icon or open the navigation menu in the top-right corner and go to the Administration panel:
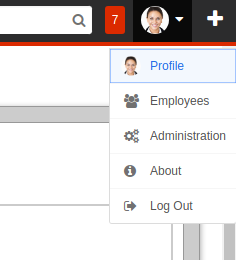
- Scroll down to the System section and click OAuth Keys.
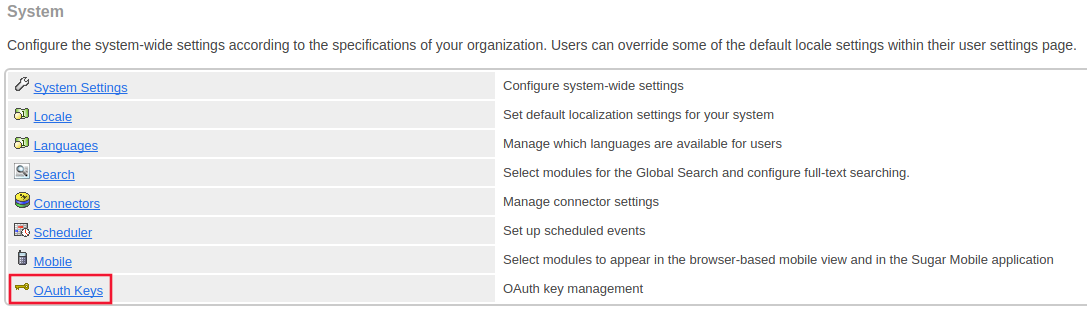
- In the top bar, click the OAuth Keys menu:
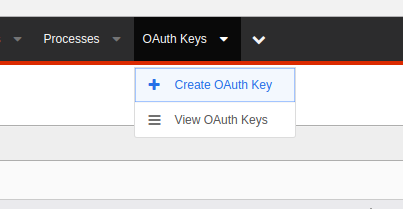
- Select Create OAuth Key.
- Fill in the required fields:
- a. Consumer Key Name: Enter a name that is convenient to remember (e.g., Teliqon PBX).
- b. Consumer Key: Enter or generate a strongly random string.
- c. Consumer Secret: Enter or generate a secret key string.
- d. OAuth Version: Select OAuth 2.0.
- e. Client type: Select Sugar User.
- f. Description: Optional value for your convenience.
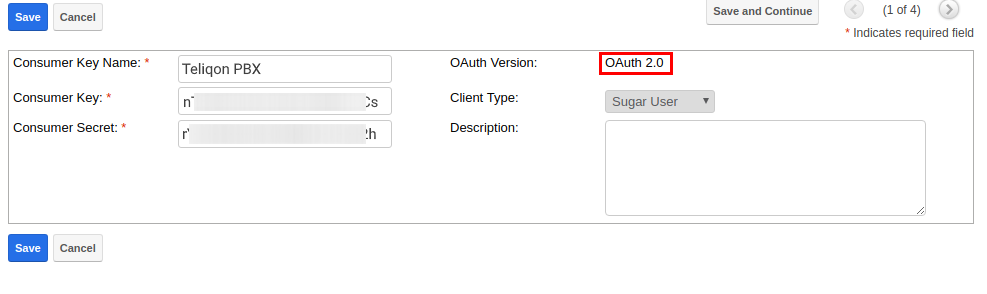
- Click Save.
- Copy your CRM's homepage Base URL from the browser address bar. (Format: [your-subdomain].sugaropencloud.com)
- Copy and securely save your Consumer Key, Consumer Secret, and the Username and Password of the dedicated integration account.
Step 3
Now connect SugarCRM directly to Teliqon Cloud PBX using the credentials obtained in the previous step:
- Navigate to Cloud PBX personal account and use the button to access the portal management system:
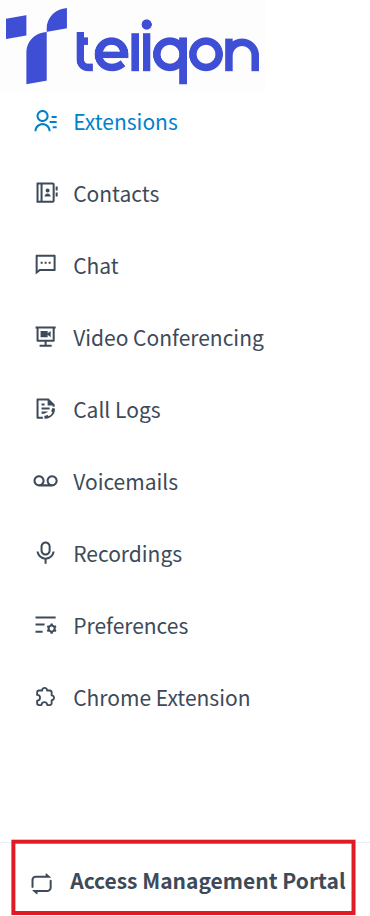
- On the page that opens, select “Integrations” → “CRM” from the menu
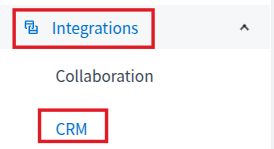
- Select SugarCRM from the list of available integrations.
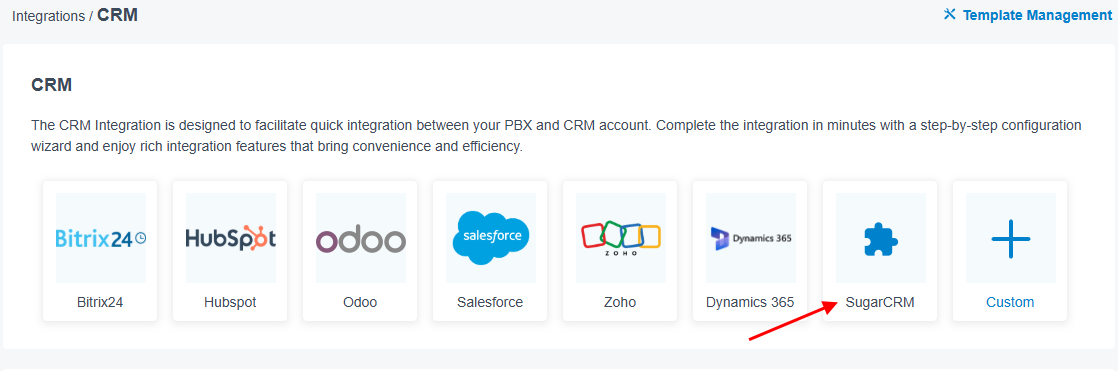
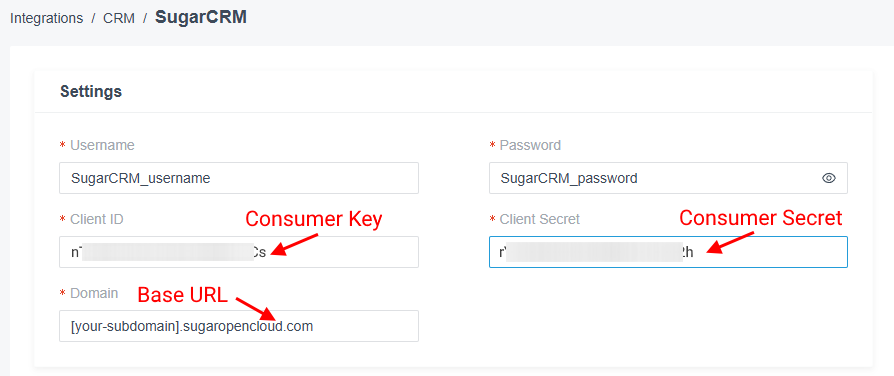
- In the configuration settings, fill in the required fields:
- a. Username: Your username from SugarCRM account.
- b. Password: Your password from SugarCRM account.
- c. Client ID: Your Consumer Key.
- d. Client Secret: Your Consumer Secret.
- e. Domain: Enter your Base URL copied from the browser address bar.
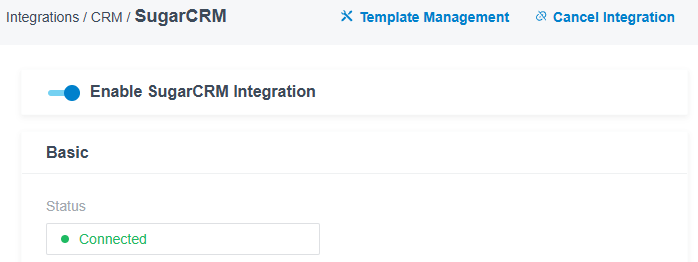
- Click Save. Once authorized, the integration Status field will display Connected:
Step 4
The final step is to associate SugarCRM users with PBX Extensions.
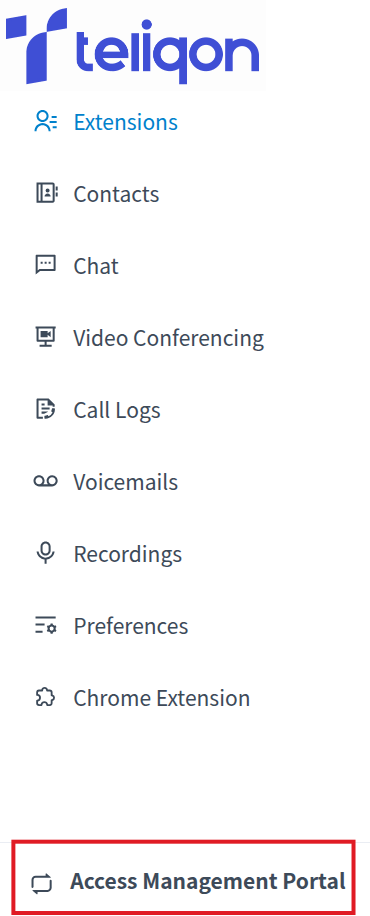
- Access your Cloud PBX personal account and use the button to open the portal management system:
- On the page that opens, select “Integrations” → “CRM” from the menu
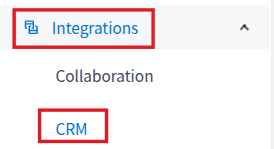
- You will be redirected to the SugarCRM integration settings page.
- Click the refresh icon next to SugarCRM User to retrieve the latest list of users from CRM.
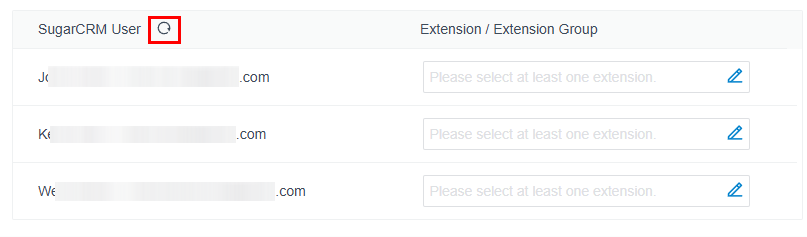
- You can link users to Extensions either automatically or manually:
- a. Automatically - If users share the same email address in both SugarCRM and Cloud PBX.
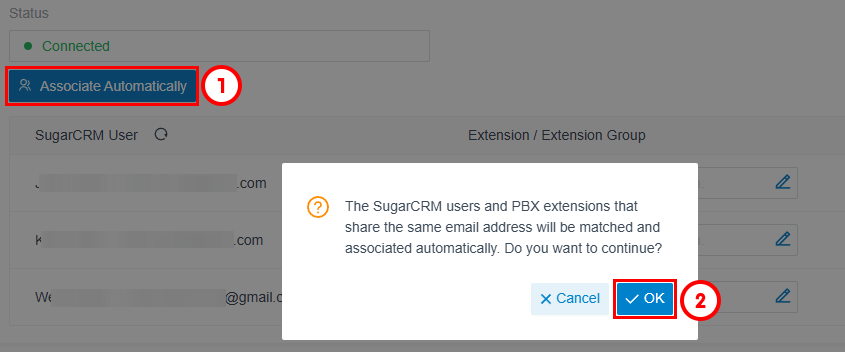
- i. Click "Associate Automatically".
- ii. In the pop-up window, click "OK".
- b. Manually - If users have different email addresses in SugarCRM and PBX Extension, manual linking is required:
- iii. In the Extension dropdown next to the desired SugarCRM user, click the pencil icon.
- iv. In the pop-up window, select the corresponding PBX Extension.
- v. Click “Confirm”.
- Click Save in the bottom of the page to apply the user mappings. SugarCRM users can now place and receive calls using their assigned extensions.
How to Synchronize Contacts with SugarCRM
After integrating with SugarCRM, you can enable one-way contact synchronization to automatically sync SugarCRM contacts with a specific phonebook in Cloud PBX:
- Log in your Cloud PBX personal account and use the button to open the portal management system:
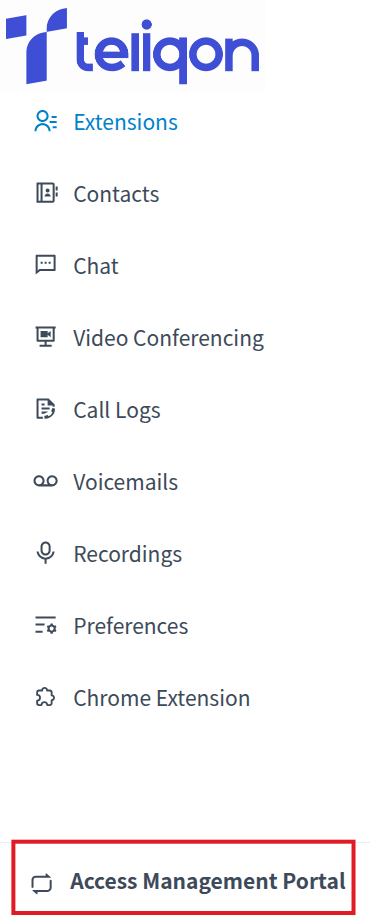
- On the page that opens, select “Integrations” → “CRM” from the menu
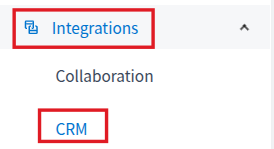
- You will be redirected to the SugarCRM integration settings page.
- Enable the Synchronize Contacts Automatically option.
- In the Synchronize Contacts From dropdown menu, select the type(s) of contacts you want to synchronize from SugarCRM:
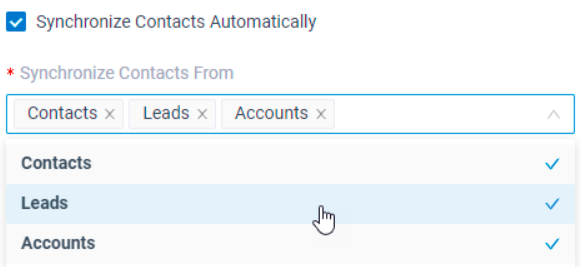
- In the Synchronize to Phonebook dropdown, choose an existing empty phonebook or create a new one for storing synchronized contacts. (Note: The target phonebook must be completely empty.)

- Configure the Always Query CRM setting. Choose whether contact lookups in the CRM should be performed in real time. Important: Enabling this option increases API usage, so be sure to monitor your API quota accordingly. Real-time lookup is not supported when masked numbers are enabled.

- a. Enabled: PBX will query SugarCRM for contact details in real time during calls (increases API usage).
- b. Disabled: PBX will query SugarCRM only when no matching contact is found in PBX phonebooks.
- Click Save.
Done. Now, when users receive an incoming call from a SugarCRM contact type or make an outgoing call to a contact, PBX will automatically search for contact information and synchronize matching CRM contact information to the corresponding phonebook in Teliqon Cloud PBX.
How to set up automatic Contact creation in SugarCRM
You can configure Cloud PBX to automatically or manually create new contact records in SugarCRM for incoming or outgoing calls to unknown phone numbers.
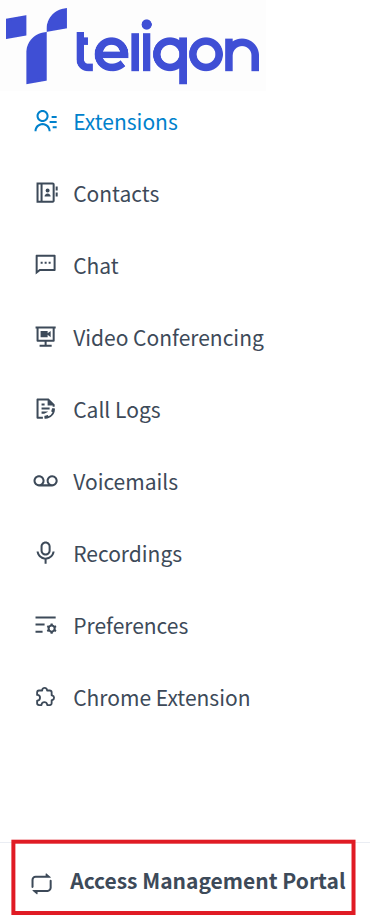
- Log in to the Cloud PBX portal by accessing your personal account and using the button to open the portal management system:
- On the page that opens, select “Integrations” → “CRM” from the menu
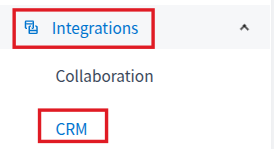
- You will be automatically redirected to the SugarCRM integration settings page.
- On the SugarCRM integration page, enable the Create New Contact option.

- In the Create Contact or Lead dropdown list, select whether unknown numbers should be saved as a Contact or a Lead/Deal.
- Select your preferred Create Method:
- c. Automatically - Select Automatically, then choose when the record should be created using the Call Type dropdown (Inbound, Outbound, or both).
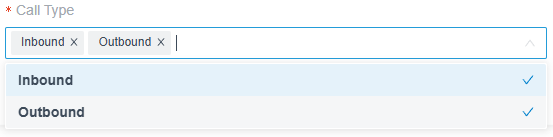
- d. Manually - Select Manually if you prefer to give users an in-call button to manually create CRM contacts on demand.
- Click Save to apply the changes.
How to set up Call Journal in SugarCRM
To ensure complete call visibility, you can enable automatic call logging to record all call activities in SugarCRM whenever associated users make or receive calls.
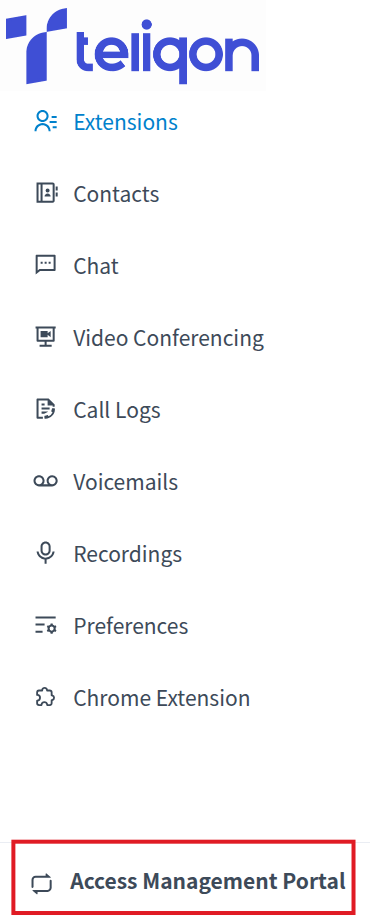
- Log in to the Cloud PBX portal by accessing your personal account and using the button to open the portal management system:
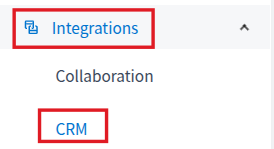
- On the page that opens, select “Integrations” → “CRM” from the menu
- You will be redirected to the already connected SugarCRM integration page. Go to the Call Journal section.
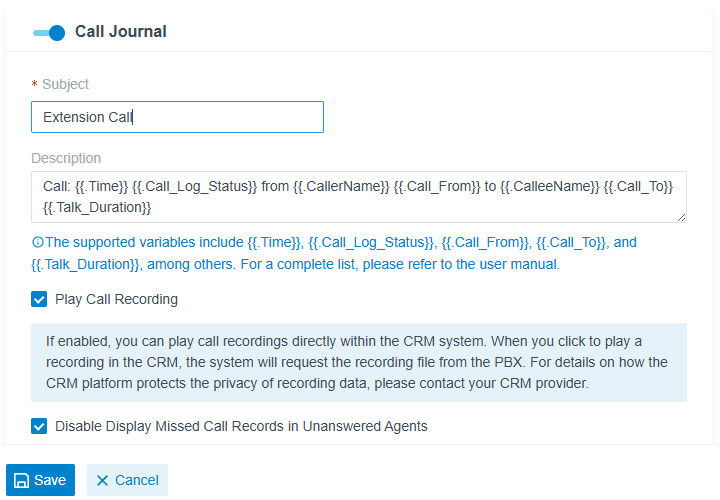
- Customize the Subject and Description template fields for call logs generated in SugarCRM.
- Configure optional logging features according to your preferences:
- c. Play Call Recording: Enables a playable audio link to the call recording inside SugarCRM call activities.
- d. Disable Display Missed Call Records in Unanswered Agents: Ensures missed queue or ring group calls only log under the agent who actually answered, avoiding redundant missed call entries for other agents.
6. Click Save to apply all changes.


